ComplexDataReader
Commercial Component

We assume that you have already learned what is described in:
If you want to find the appropriate Reader for your purpose, see Readers Comparison.
Short Summary
ComplexDataReader reads non-homogeneous data from files.
| Component | Data source | Input ports | Output ports | Each to all outputs | Different to different outputs | Transformation | Transf. req. | Java | CTL |
|---|---|---|---|---|---|---|---|---|---|
| ComplexDataReader | flat file | 1 | 1-n | no | yes | yes | yes | yes | yes |
Abstract
ComplexDataReader reads non-homogeneous data from files containing multiple metadata, using the concept of states and transitions and optional lookahead (selector).
The user-defined states and their transitions impose the order of metadata used for parsing the file - presumably following the file's structure.
The component uses the Data policy attribute as described in Data Policy.
Icon

Ports
| Port type | Number | Required | Description | Metadata |
|---|---|---|---|---|
| Input | 0 | no | For port reading. See Reading from Input Port. | One field (byte,
cbyte, string). |
| Output | 0 | yes | For correct data records | Any (Out0)1) |
| 1-N | no | For correct data records | Any (Out1-OutN) |
Legend:
1): Metadata on output ports can use Autofilling Functions.
ComplexDataReader Attributes
| Attribute | Req | Description | Possible values |
|---|---|---|---|
| Basic | |||
| File URL | yes | The data source(s) which ComplexDataReader should read from. The source can be a flat file, the console, an input port or a dictionary. See Supported File URL Formats for Readers. | |
| Transform | The definition of the state machine that carries out the reading. The settings dialog opens in a separate window that is described in Advanced Description. | ||
| Charset | The encoding of records that are read. | ISO-8859-1 (default) | <any encoding> | |
| Data policy | Determines steps that are done when an error occurs.
See Data Policy for details.
Unlike other Readers, Controlled
Data Policy is not implemented.
Lenient allows you to skip redundant
columns in metadata with a record delimiter (but not
incorrect lines).
| Strict (default) | Lenient | |
| Trim strings | Specifies whether leading and trailing whitespaces should be removed from strings before inserting them to data fields. See Trimming Data. | false (default) | true | |
| Quoted strings | Fields containing a special character (comma, newline, or double
quotes) have to be enclosed in quotes. If true, these special characters inside
the quoted
string are not treated as delimiters and the quotes are removed.
| false (default) | true | |
| Quote character | Specifies which kind of quotes will be permitted in Quoted strings. | both (default) | " | ' | |
| Advanced | |||
| Skip leading blanks | Specifies whether leading whitespace characters (spaces etc.) will be skipped before inserting input strings to data fields. If you leave it default, the value of Trim strings is used. See Trimming Data. | false (default) | true | |
| Skip trailing blanks | Specifies whether trailing whitespace characters (spaces etc.) will be skipped before inserting input strings to data fields. If you leave it default, the value of Trim strings is used. See Trimming Data. | false (default) | true | |
| Max error count | The maximum number of tolerated error records on the input.
The attribute is applicable only if Controlled Data
Policy is being used. | 0 (default) - N | |
| Treat multiple delimiters as one | If a field is delimited by a multiplied delimiter character,
it will be interpreted as a single delimiter if this
attribute is true.
| false (default) | true | |
| Verbose | By default, not so complex error notification is provided
and the performance is fairly high. However, if switched to
true, more detailed information with lower
performance will be provided. | false (default) | true | |
| Selector code | 1) | If you decide to use a selector, here you can write its code in Java. A selector is only an optional feature in the transformation. It supports decision-making when you need to look ahead at the data file. See Advanced Description. | |
| Selector URL | 1) | The name and path to an external file containing a selector code written in Java. To learn more about the Selector, see Advanced Description. | |
| Selector class | 1) | The name of an external class containing the Selector. To learn more about the Selector, see Advanced Description. | |
| Transform URL | The path to an external file which defines state transitions in the state machine. | ||
| Transform class | The name of a Java class that defines state transitions in the state machine. | ||
| Selector properties | Allows you to instantly edit the current Selector in the State transitions window. | ||
| State metadata | Allows you to instantly edit the metadata and states assigned to them in the State transitions window. | ||
Legend:
1): If you do not define any of these three attributes, the
default Selector class
(PrefixInputMetadataSelector) will be used.
Advanced Description
Reading heterogeneous data is generally not an easy task. The data may
mix various data formats, delimiters, fields and record types. On top of that,
records and their semantics can be dependent on eachother. For example,
a record of type address can mean a person's address if
the preceding record is a person, or company's address in the
case where our address follows a company.
MultiLevelReader and ComplexDataReader are very similar components in terms of what they can achieve. In MultiLevelReader you needed to program the whole logic as a Java transform (in the form of AbstractMultiLevelSelector extension) but, in ComplexDataReader even the trickiest data structures can be configured using the powerful GUI. A new concept of states and transitions has been introduced in ComplexDataReader, and the parsing logic is implemented as a simple CTL2 script.
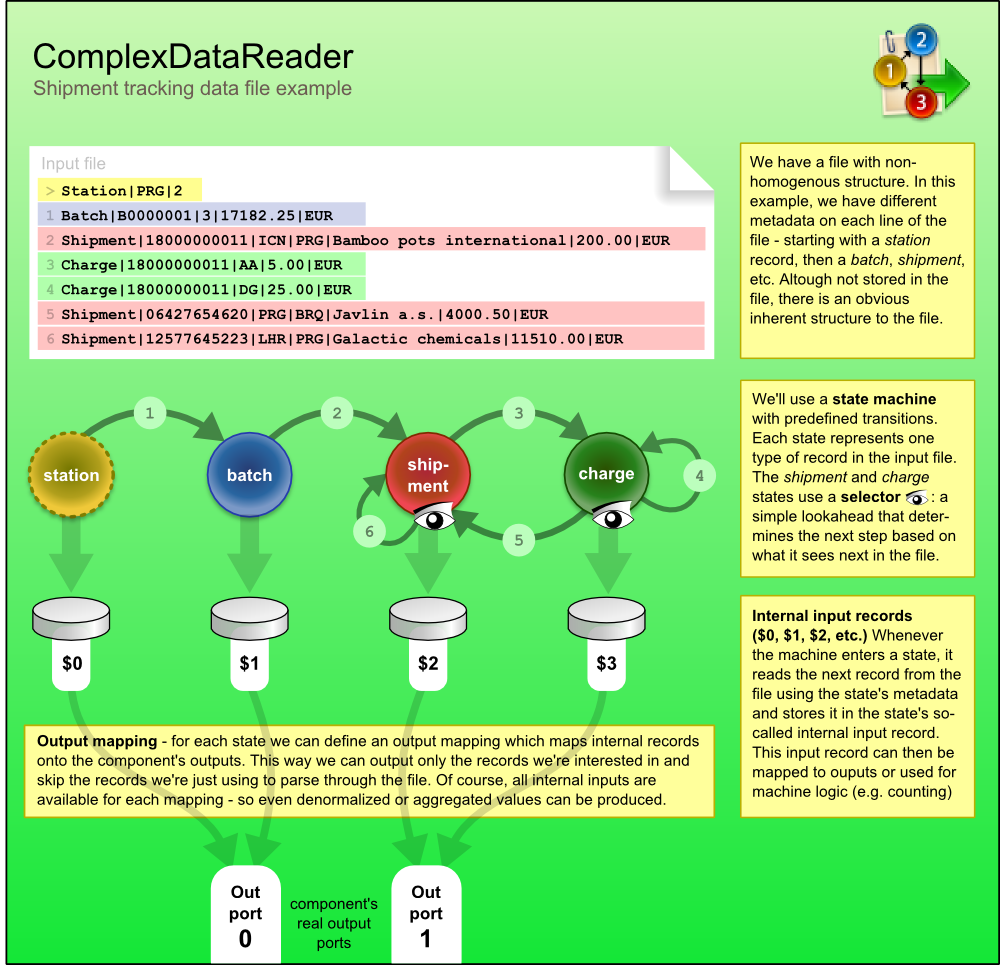
Transitions between states can either be given explicitly - for example, state 3 always follows 2, computed in CTL - for example, by counting the number of entries in a group, or you can "consult" the helping tool to choose the transition. The tool is called Selector and it can be understood as a magnifying glass that looks ahead at the upcoming data without actually parsing it.
You can either custom-implement the selector in Java or just use the default one. The default selector uses a table of prefixes and their corresponding transitions. Once it encounters a particular prefix it evaluates all transitions and returns the first matching target state.
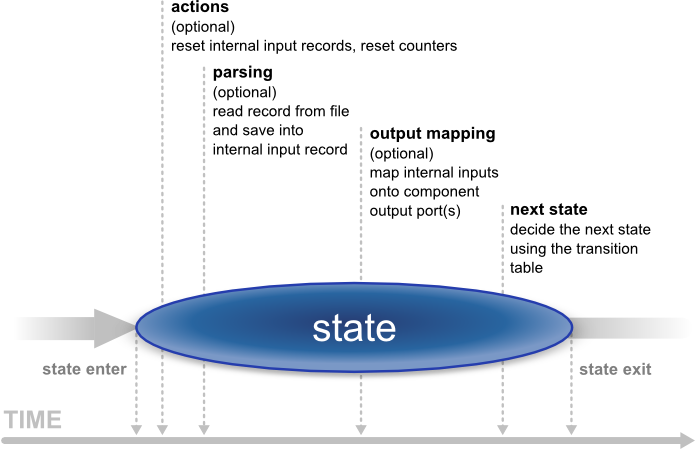
Now let us look a little bit closer on what happens in a state (see picture below). As soon as we enter a state, its Actions are performed. Available actions are:
Reset counter - resets a counter which stores how many times the state has been accessed
Reset record - reset the number of records located in internal storages. Thus, it ensures that various data read do not mix with each other.
Next, Parsing of the input data is done. This reads a record in from the file and stores it in the state's internal input.
After that comes Output, which involves mapping the internal inputs to the component's output ports. This is the only step in which data is sent out of the component.
Finally, there is Transition which defines how the machine changes to the next state.
Last but not least, writing the whole reading logics in CTL is possible as well. See CTL in ComplexDataReader for reference.
Video - How to Work with ComplexDataReader
Instead of reading tons of material, why not take a look at a video walkthrough. After watching it, you should have a clear notion of how to use and configure the ComplexDataReader component.
See ComplexDataReader example video:
http://www.cloudconnect.com/resources/repository/complexdatareader-shipments
Designing State Machine
To start designing the machine, edit the Transform attribute. A new window opens offering these tabs: States, Overview, Selector, Source and other tabs representing states labeled $stateNo stateLabel, e.g. "$0 myFirstState".
On the left hand side of the States tab, you can see a pane with all the Available metadata your graph works with. In this tab, you design new states by dragging metadata to the right hand side's States pane. At the bottom, you can set the Initial state (the first state) and the Final state (the machine switches to it shortly before terminating its execution or if you call Flush and finish). The final state can serve mapping data to the output before the automaton terminates (especially handy for treating the last records of your input). Finally, in the centre there is the Expression editor pane, which supports Ctrl+Space content assist and lets you directly edit the code.
In the Overview tab, the machine is graphically visualised. Here you can Export Image to an external file or Cycle View Modes to see other graphical representations of the same machine. If you click Undock, the whole view will open in a separate window that is regularly refreshed.
In state tabs (e.g. "$0 firstState") you define the outputs in the Output ports pane. What you see in Output field is in fact the (fixed) output metadata. Next, you define Actions and work with the Transition table at the bottom pane in the tab. Inside the table, there are Conditions which are evaluated top-down and Target states assigned to them. These are these values for Target states:
Let selector decide - the selector determines which state to go to next
Flush and finish - this causes a regular ending of the machine's work
Fail - the machine fails and stops its execution. (e.g it comes across an invalid record)
A particular state the machine changes to.
The Selector tab allows you to implement your own selector or supply it in an external file/Java class.
Finally, the Source tab shows the code the machine performs. For more information, see CTL in ComplexDataReader
CTL in ComplexDataReader
The machine can be specified in three ways. First, you can design it as a whole through the GUI. Second, you can create a Java class that describes it. Third, you can write its code in CTL inside the GUI by switching to the Source tab in Transform, where you can see the source code the machine performs.
![[Important]](figures/important.png) | Important |
|---|---|
Please note you do not have to handle the source code at all. The machine can be configured entirely in the other graphical tabs of this window. |
Changes made in Source take effect in remaining tabs if you click Refresh states. If you want to synchronise the source code with states configuration, click Refresh source.
Let us now outline significant elements of the code:
Counters
There are the counterStateNo variables
which store the number of times a state has been accessed.
There is one such variable for each state and their numbering starts with 0. So
e.g. counter2 stores how many times state $2 was accessed. The counter
can be reset in Actions.
Initial State Function
integer initialState() - determines which state
of the automaton is the first one initiated. If you return
ALL, it means Let selector decide,
i.e. it passes the
current state to the selector that determines which state will be next
(if it cannot do that, the machine fails)
Final State Function
integer finalState(integer lastState) - specifies the
last state of the automaton. If you return STOP,
it means the final state is not defined.
Functions In Every State
Each state has two major functions describing it:
nextStatenextOutput
integer nextState_stateNo() returns a number
saying which state follows the current state (stateNo).
If you return ALL, it means Let selector decide.
If you return STOP, it means Flush and finish.
Example 53.1. Example State Function
nextState_0() {
	if(counter0 > 5) {
		return 1;	// if state 0 has been accessed more than five times since
            // the last counter reset, go to state 1
	}
	return 0;  // otherwise stay in state 0
}
nextOutput_stateNo(integer seq) - the main output
function for a particular state (stateNo). It calls
the individual nextOutput_stateNo_seq() service functions according
to the value of seq.
The seq
is a counter which stores how many times
the nextOutput_stateNo function has been called so
far. At last, it calls
nextOutput_stateNo_default(integer seq) which
typically returns STOP meaning everything has been
sent to the output and the automaton can change to the next state.
integer nextOutput_stateNo_seq() - maps
data to output ports. In particular, the function can look like e.g.
integer nextOutput_1_0() meaning it defines mapping for state $1
and seq equal to 0 (i.e. this is the first time
the function has been called).
The function returns a number. The number
says which port has been served by this function.
Global Next State Function
integer nextState(integer state)) -
calls individual nextState() functions according
to the current state
Global Next Output Function
integer nextOutput(integer state, integer seq) - calls
individual nextOutput() functions
according to the current state and the value of seq.