CSV Downloader
CSV Downloader is a component of the data preparation and distribution pipeline (see Data Preparation and Distribution Pipeline). CSV Downloader downloads source files from a remote location and places them to the Big Data Storage (BDS) for ADS Integrator to take over.
CSV Downloader can download the source files in the following formats:
CSV files (uncompressed, GZIPed, or BZIPed)
JSON files (uncompressed or GZIPed)
Excel files
Parquet files (uncompressed or compressed with Snappy)
CSV Downloader can download the source files from the following remote locations:
- S3
- WebDAV
- SFTP
- Google Cloud Storage
- One Drive
For information about how to prepare source files (format, structure) and additional details, see Input Data for CSV Downloader.
Configuration File
Creating and setting up the brick’s configuration file is the third phase of building your data pipeline. For more information, see Phases of Building the Data Pipeline.
For more information about configuring a brick, see Configure a Brick.
Minimum Layout of the Configuration File
The following JSON sample is the minimum layout of the configuration file that CSV Downloader can use. If you are using more bricks, you can reuse some sections of this configuration file for other bricks. For example, the ‘downloaders’ section can list more downloaders, and the ‘integrators’ and ‘ads_storage’ sections can be reused by other downloaders and executors (see Configure a Brick).
This sample describes the following use case:
- One instance of CSV Downloader downloads two CSV files from an S3 location.
- You provide your own manifest files for the downloaded CSV files (see Manifest File).
- CSV Downloader generates a feed file (see Feed File).
Copy the sample and replace the placeholders with your values.
You can later enrich the sample with more parameters depending on your business and technical requirements (see Customize the Configuration File).
{
  "entities": {
    "table_1_name": {
      "global": {
        "custom": {
          "hub": ["column_1_name","column_2_name","column_3_name"]
        }
      }
    },
    "table_2_name": {
      "global": {
        "custom": {
          "hub": ["column_1_name","column_2_name","column_3_name"]
        }
      }
    }
  },
  "downloaders": {
    "csv_downloader_id": {
      "type": "csv",
      "entities": ["table_1_name","table_2_name"]
    }
  },
  "csv": {
    "type": "s3",
    "options": {
      "bucket": "s3_bucket_name",
      "access_key": "s3_access_key",
      "folder": "path/to/manifest/file",
      "region": "s3_bucket_region_code"
    }
  },
  "integrators": {
    "ads_integrator_id": {
      "type": "ads_storage",
      "batches": ["csv_downloader_id"]
    }
  },
  "ads_storage": {
    "instance_id": "data_warehouse_instance_id",
    "username": "dw_email@address.com",
    "options": {}
  }
}
The placeholders to replace with your values:
| Name | Type | Mandatory? | Default | Description |
|---|---|---|---|---|
| entities -> table_x_name | string | yes | n/a | The database tables into which CSV Downloader downloads the data |
| entities -> table_x_name -> global -> custom -> hub | array | yes | n/a | The table columns to generate a primary key |
| downloaders -> csv_downloader_id | string | yes | n/a | The ID of the CSV Downloader instance Example: csv_downloader_1 |
| downloaders -> csv_downloader_id -> entities | array | yes | n/a | The database tables into which CSV Downloader downloads the data Must be the same as the database table names in 'entities -> table_x_name' |
| csv -> options -> bucket | string | yes | n/a | The name of the S3 bucket where the source data is stored |
csv -> options -> access_key | string | yes | n/a | The access key to the S3 bucket where the source data is stored |
csv -> options -> folder | string | yes | n/a | The path to the folder where the manifest files are located Example: |
| csv -> options -> region | string | see 'Description' | n/a | The code of the region of the S3 bucket where the source data is stored This parameter is mandatory for all regions except for US East (N. Virginia) (code: 'us-east-1'). If your region code is 'us-east-1', do not specify it. For the list of regions, see AWS Service Endpoints. |
| integrators -> ads_integrator_id | string | yes | n/a | The ID of the ADS Integrator instance Example: ads_integrator_1 |
| integrators -> ads_integrator_id -> batches | array | yes | n/a | The ID of the CSV Downloader instance Example: csv_downloader_1 |
| ads_storage -> instance_id | string | yes | n/a | The ID of the Agile Data Warehousing Service (ADS) instance into which the data is uploaded |
ads_storage -> username | string | yes | n/a | The access username to the Agile Data Warehousing Service (ADS) instance into which the data is uploaded |
Customize the Configuration File
You can change default values of the parameters and set up additional parameters.
Use uncompressed CSV files as source files
By default, CSV Downloader treats the source files as uncompressed CSV files (the ‘file_format’ parameter is either not explicitly set or set to an empty value as in "file_format": ""). If you have been using a different type of the source files and now want to switch back to using uncompressed CSV files, either delete the ‘file_format’ parameter from ‘csv’ -> ‘options’ -> ‘files_structure’ or set this parameter to an empty value.
"csv": {
  "type": "s3",
  "options": {
    "files_structure": {
      "file_format": ""
    }
  }
}
- You can set the ‘file_format’ parameter at the entity level. To do so, add it to the ‘custom’ section of the entity.
- If your source files are stored in an S3 location, you can switch from using the default COPY FROM LOCAL command to using a faster COPY FROM S3 command. See ‘Use COPY FROM S3 instead of COPY FROM LOCAL’ in ADS Integrator.
Use compressed CSV files as source files
By default, CSV Downloader treats the source files as uncompressed CSV files (the ‘file_format’ parameter is either not explicitly set or set to an empty value as in "file_format": "").
To use compressed (GZIPed or BZIPed) CSV files as source files, set the ‘file_format’ parameter under ‘csv’ -> ‘options’ -> ‘files_structure’ to ‘gzip’.
"csv": {
  "type": "s3",
  "options": {
    "files_structure": {
      "file_format": "gzip"
    }
  }
}
- You can set the ‘file_format’ parameter at the entity level. To do so, add it to the ‘custom’ section of the entity.
- If your source files are stored in an S3 location, you can switch from using the default COPY FROM LOCAL command to using a faster COPY FROM S3 command. See ‘Use COPY FROM S3 instead of COPY FROM LOCAL’ in ADS Integrator.
Use JSON files as source files
By default, CSV Downloader treats the source files as uncompressed CSV files (the file_format parameter is either not explicitly set or set to an empty value as in "file_format": ""). If your source files are JSON files (uncompressed or GZIPed), set CSV Downloader to process JSON files.
For the JSON files to be processed correctly, you must do the following:
Specify the parser that ADS Integrator will use to process the JSON files before it integrates the data from these files into ADS.
Unlike the other types of the source files, ADS Integrator first integrates the JSON source files into flex tables before copying them to the source tables (see “Flex Table” and “Source Table” in ADS Integrator).When being integrated into the flex tables, the JSON files are processed with the Vertica fjsonparser parser with or without flattening the nested data (
flatten_maps=trueorflatten_maps=false). For example, a source JSON file looks like the following:{ "id": 1, "devices": [ "Projector", "Table" ], "date": "2017-05-01", "visits": { "visitors": 40050, "international": false, "company": "Acme" } }If you choose to flatten the data, the nested data is flattened and the data elements are separated with either the default delimiter (
.) or a user-defined delimiter. JSON arrays are converted to arrays of key/value pairs. The processed data will look like the following:{ "date": "2017-05-01", "devices": { "0": "Projector", "1": "Table" }, "id": "1", "visits.company": "Acme", "visits.international": "false", "visits.visitors": "40050", }If you choose to not flatten the data, the nested data is not flattened. This allows ADS Integrator to use brackets (
[ ]) for nested structures and single quotes (' ') for the names of the keys in key/value pairs later in the process when converting the data and loading it to the source tables. JSON arrays are converted to arrays of key/value pairs. The processed data will look like the following:{ "date": "2017-05-01", "devices": { "0": "Projector", "1": "Table" }, "id": "1", "visits": { "company": "Acme", "international": "false", "visitors": "40050" } }
Provide a feed file that contains XPath notations. The XPath notations define the rules for converting the processed data to the format that allows ADS Integrator to load this data from the flex tables to the source tables. For information about the supported XPath notations and examples of the feed file, see Feed File.
The option of generating the feed file automatically is not supported for JSON source files.
Steps:
Because CSV Downloader treats the format of JSON files and CSV files similarly, set the format of the source files to CSV. To do so, choose one of the following options:
Set the
file_formatparameter undercsv->options->files_structureto an empty value (as shown in Use uncompressed CSV files as source files).Set the
file_formatparameter undercsv->options->files_structuretogzip(as shown in Use compressed CSV files as source files).Delete the
file_formatparameter fromcsv->options->files_structure(as shown in Use uncompressed CSV files as source files).You can set or delete thefile_formatparameter at the entity level. To do so, add it to or delete ift from thecustomsection of the entity.
Set the
db_parserparameter undercsv->options->files_structureto eitherfjsonparser(if you want to flatten the nested data; you can also specify it asfjsonparser(flatten_maps=true)) orfjsonparser(flatten_maps=false)(if you do not want to flatten the nested data). For example:"csv": { "type": "s3", "options": { ... "files_structure": { ... "db_parser": "fjsonparser(flatten_maps=false)" } } }Provide the feed file. The feed file must contain the
xpathcolumn with the XPath notations. For information about the supported XPath notations and examples of the feed file, see Feed File.Specify the path to the feed file.
"csv": {
  "type": "s3",
  "options": {
    ...
    "data_structure_info": "path/to/feed/file"
  }
}
(Optional) If your source files are stored in an S3 location, switch from using the default COPY FROM LOCAL command to using a faster COPY FROM S3 command. See “Use COPY FROM S3 instead of COPY FROM LOCAL” in ADS Integrator.
Use Excel files as source files
By default, CSV Downloader treats the source files as uncompressed CSV files (the ‘file_format’ parameter is either not explicitly set or set to an empty value as in "file_format": "").
To use Excel files as source files, set the ‘file_format’ parameter under ‘csv’ -> ‘options’ -> ‘files_structure’ to ‘xlsx’.
"csv": {
  "type": "s3",
  "options": {
    "files_structure": {
      "file_format": "xlsx"
    }
  }
}
- You can set the ‘file_format’ parameter at the entity level. To do so, add it to the ‘custom’ section of the entity.
- If your source files are stored in an S3 location, you can switch from using the default COPY FROM LOCAL command to using a faster COPY FROM S3 command. See ‘Use COPY FROM S3 instead of COPY FROM LOCAL’ in ADS Integrator.
With Excel source files, you cannot use your own manifest files and you must let CSV Downloader generate manifest files for you. To do so, set the ‘generate_manifests’ parameter to ‘true’ (see Generate a manifest file).
Use Parquet files as source files
By default, CSV Downloader treats the source files as uncompressed CSV files (the ‘file_format’ parameter is either not explicitly set or set to an empty value as in "file_format": ""). If your source files are Parquet files (uncompressed or compressed with Snappy; ZIPed Parquet files are not supported), set CSV Downloader to process Parquet files.
- Parquet files can be downloaded only from an S3 location.
- You cannot use link files with Parquet files.
Steps:
Specify the Parquet type for the source files.
If you want to set Parquet for all entities, set the ‘file_format’ parameter under ‘csv’ -> ‘options’ -> ‘files_structure’ to ‘parquet’.
"csv": {
  "type": "s3",
  "options": {
    ...
    "files_structure": {
      ...
      "file_format": "parquet"
    }
  }
}
If you want to set Parquet for a specific entity, add the ‘file_format’ parameter to the ‘custom’ section for the entity and set it to ‘parquet’:
"entities": {
  "table_1_name": {
    "global": {
      "custom": {
        "hub": ["column_1_name","column_2_name","column_3_name"],
        "file_format": "parquet"
      }
    }
  }
}
Provide a feed file (see Feed File) and configure the feed file parameters in the following way:
"csv": { "type": "s3", "options": { ... "data_structure_info": "path/to/feed/file", "ignore_columns_check": true } }- ‘generate_feed_from_path’ is not set.
- ‘data_structure_info’ is set to the path to the feed file.
- ‘ignore_columns_check’ is set to ‘true’.
Provide a manifest file (see Manifest File) and make sure that CSV Downloader does not generate manifest files:
"csv": {
  "type": "s3",
  "options": {
    ...
    "generate_manifests": false
  }
}
Set the ‘db_parser’ parameter under ‘csv’ -> ‘options’ -> ‘files_structure’ to ‘vertica_default’.
"csv": {
  "type": "s3",
  "options": {
    ...
    "files_structure": {
      ...
      "db_parser": "vertica_default"
    }
  }
}
Set the ADS Integrator instance that processes CSV Downloader to use COPY FROM S3. See ‘Use COPY FROM S3 instead of COPY FROM LOCAL’ in ADS Integrator.
Specify whether ADS Integrator should fail if an error occurs and how it should treat rejected records. See ‘Specify how to proceed in case of errors and rejected records’ in ADS Integrator.
Use an S3 location
To use an S3 location, set the ‘type’ parameter to ‘s3’, and specify S3 parameters under ‘csv’ -> ‘options’.
"csv": {
  "type": "s3",
  "options": {
    "bucket": "s3_bucket_name",
    "access_key": "s3_access_key",
    "folder": "path/to/manifest/file",
    "region": "s3_bucket_region_code"
  }
}
| Name | Type | Mandatory? | Default | Description |
|---|---|---|---|---|
| bucket | string | yes | n/a | The name of the S3 bucket where the source data is stored |
access_key | string | yes | n/a | The access key to the S3 bucket where the source data is stored |
folder | string | yes | n/a | The path to the folder where the manifest files are located Example: |
| region | string | see 'Description' | n/a | The code of the region of the S3 bucket where the source data is stored This parameter is mandatory for all regions except for US East (N. Virginia) (code: 'us-east-1'). If your region code is 'us-east-1', do not specify it. For the list of regions, see AWS Service Endpoints. |
By default, the COPY FROM LOCAL command is used for downloading the source files from an S3 location. To make the load process faster, you can use the COPY FROM S3 command instead. See ‘Use COPY FROM S3 instead of COPY FROM LOCAL’ in ADS Integrator.
Use an SFTP location
To use an SFTP location, set the ‘type’ parameter to ‘sftp’, and specify SFTP parameters under ‘csv’ -> ‘options’.
"csv": {
  "type": "sftp",
  "options": {
    "username": "sftp_email@address.com",
    "host": "sftp_hostname",
    "auth_mode": "password|cert",
    "port": sftp_port_number // optional
  }
}
| Name | Type | Mandatory? | Default | Description |
|---|---|---|---|---|
| username | string | yes | n/a | The username to access the SFTP server to download the data from |
| host | string | yes | n/a | The host name of the SFTP server to download the data from Example: ftp.example.com |
| auth_mode | string | yes | n/a | Mode used to authenticate to the SFTP server from where the data will be downloaded Available options:
|
| port | integer | no | 22 | The port on which the SFTP server is running |
Use a WebDAV location
To use a WebDAV location, set the ‘type’ parameter to ‘webdav’, and specify WebDAV parameters under ‘csv’ -> ‘options’.
"csv": {
  "type": "webdav",
  "options": {
    "username": "webdav_email@address.com",
    "host": "webdav_hostname",
    "data_location": "path/to/data" // optional
  }
}
| Name | Type | Mandatory? | Default | Description |
|---|---|---|---|---|
| username | string | yes | n/a | The username to access the WebDAV server to download the data from |
| host | string | yes | n/a | The host name of the WebDAV server to download the data from Example: |
| data_location | string | no | root folder | The path to the data on the WebDAV server |
Use a Google Cloud Storage location
To use a Google Cloud Storage location, set the ‘type’ parameter to ‘google_cloud_storage’, and specify Google Cloud Storage parameters under ‘csv’ -> ‘options’.
"csv": {
  "type": "google_cloud_storage",
  "options": {
    "auth": {
      <content_from_client_secrets.json>
    },
    "bucket": "bucket_name"
  }
}
| Name | Type | Mandatory? | Default | Description |
|---|---|---|---|---|
| auth | JSON | yes | n/a | The content of client_secrets.json Example: |
| bucket | string | yes | n/a | The name of the bucket where the source data is stored |
Use a OneDrive location
To use a OneDrive location, set the ‘type’ parameter to ‘one_drive’, and specify OneDrive parameters under ‘csv’ -> ‘options’.
"csv": {
  "type": "one_drive",
  "options": {
    "client_id": "onedrive_client_id"
  }
}
| Name | Type | Mandatory? | Default | Description |
|---|---|---|---|---|
| client_id | string | yes | n/a | The OneDrive client ID |
Enable processing of PGP-encrypted source files
If your source files in the remote location are encrypted using PGP, enable CSV Downloader to decrypt them before placing them to the BDS.
- You can process PGP-encrypted source files only if they are CSV files. You cannot process PGP-encrypted Excel or Parquet source files.
- The ECDSA and EdDSA digital signature algorithms are not supported.
Steps:
Enable processing of PGP-encrypted files.
To enable processing for all source files, add the ‘encryption’ parameter under ‘csv’ -> ‘options’, and give it a unique name (for example, ‘encryption_1’). For example, this is what it would look like for an S3 location:
"csv": {
  "type": "s3",
  "options": {
    "bucket": "s3_bucket_name",
    "access_key": "access_key",
    "encryption": "encryption_1"
  }
}
For an SFTP location, it would look like the following:
"csv": {
  "type": "sftp",
  "options": {
    "username": "sftp_email@address.com",
    "host": "sftp_hostname",
    "auth_mode": "password|cert",
    "encryption": "encryption_1"
  }
}
To enable processing for a specific entity, add the ‘encryption’ parameter to the ‘custom’ section for the entity and give it a unique name (for example, ‘encryption_1’):
"entities": {
  "table_1_name": {
    "global": {
      "custom": {
        "hub": ["column_1_name","column_2_name","column_3_name"],
        "encryption": "encryption_1"
      }
    }
  }
}
Add a new section to the configuration file and name it with the same unique name that you used for the ‘encryption’ parameter. In this example, it is ‘encryption_1’. This section should contain one parameter, ‘type’, set to ‘pgp’:
"encryption_1": {
  "type": "pgp"
}
When later scheduling this CVS Downloader instance in the Data Integration Console, provide the parameters in the schedule that are related to the decryption of the PGP-encrypted source files (see Encryption-Specific Parameters).
Use link files
By default, CSV Downloader downloads data from a source and saves it to the BDS. If the files to download are big, this process can be time-consuming. In this case, you can create link files on the BDS pointing to the source files instead of downloading the actual data.
You can use the link files only for CSV, GZIPed CSV or BZIPed CSV source files that are located on S3. You cannot use link files for Excel or Parquet files.
When you use link files, you must do the following:
Make sure that the source files remain in their location and will not be deleted or modified as it may result in errors.
Use a feed file and a manifest file. See Feed File and Manifest File.
Set the ADS Integrator instance that processes CSV Downloader to use link files. See ‘Use link files’ in ADS Integrator.
If your source files are PGP-encrypted, enable the ADS Integrator instance that processes CSV Downloader to process encrypted files. See “Enable processing of PGP-encrypted source files when using link files” in ADS Integrator.
While using the link files with PGP-encrypted source files is supported, we do not recommend that you do so. If you have the secret key used for decrypting the files to rotate automatically according to some schedule, the data load from these files will fail once the secret key is rotated. To prevent data load failures, rotating the secret key must be done manually and only after all source files with the old secret key are loaded to ADS.
The ECDSA and EdDSA digital signature algorithms are not supported.
"csv": {
  "type": "s3",
  "options": {
    "bucket": "s3_bucket_name",
    "access_key": "access_key",
    "use_link_file": true|false
  }
}
| Name | Type | Mandatory? | Default | Description |
|---|---|---|---|---|
| use_link_file | Boolean | no | false | Specifies how to handle big source CSV files
|
Add optional parameters to the S3 location
Depending on your business and technical requirements, you can set one or more optional parameters for your S3 location.
"csv": {
  "type": "s3",
  "options": {
    "bucket": "s3_bucket_name",
    "access_key": "access_key",
    "server_side_encryption": true|false // optional
  }
}
| Name | Type | Mandatory? | Default | Description |
|---|---|---|---|---|
| server_side_encryption | Boolean | no | false | Specifies whether CSV Downloader can work with an S3 location where server-side encryption is enabled.
|
Add multiple instances of CSV Downloader
When you use only one instance of CSV Downloader, it reads its remote location parameters from the ‘csv’ section.
If you use multiple instances of CSV Downloader and each instance has a separate location to download data from, add several ‘csv’ sections and give each section a unique name (for example, ‘csv_users’ or ‘csv_sales’).
"csv_users": {
  "type": "s3",
  "options": {
    "bucket": "s3_bucket_name",
    "access_key": "s3_access_key"
  }
},
"csv_sales": {
  "type": "sftp",
  "options": {
    "username": "sftp_email@address.com",
    "host": "sftp_hostname",
    "auth_mode": "password|cert"
  }
}
For each instance of CSV Downloader in the ‘downloaders’ section, add the ‘settings’ parameter and set it to the name of the section that contains settings for this CSV Downloader instance.
"downloaders": {
  "csv_downloader_1_id": {
    "type": "csv",
    "settings": "csv_users",
    "entities": ["table_1_name","table_2_name"]
  },
  "csv_downloader_2_id": {
    "type": "csv",
    "settings": "csv_sales",
    "entities": ["table_1_name","table_2_name"]
  }
}
Describe the structure of the source CSV files
You can set the parameters describing the structure of the source CSV files.
"csv": {
  "type": "s3",
  "options": {
    "files_structure": {
      "skip_rows": number_of_rows, // optional
      "column_separator": "separator_character", // optional
      "record_terminator": "record_termination_character", // optional
      "escape_as": "escape_character", // optional
      "db_parser": "gdc|vertica_default|fcsvparser-traditional|fcsvparser|fjsonparser|fjsonparser(flatten_maps=false)|{no_value}", // optional
      "enclosed_by": "quote_character", // optional
      "null_value": "null_value" // optional
    }
  }
}
You can also set any of these parameters at the entity level. To do so, add it to the custom section of the entity.
| Name | Type | Mandatory? | Default | Description |
|---|---|---|---|---|
| skip_rows | integer | no | 1 | The number of rows from the top of a file that CSV Downloader will skip By default, it is set to 1 and removes the first row (that typically features a header) from a CSV file. If you want to use this parameter but want to preserve the data in the first row, set it to 0. |
| column_separator | character | no | , | A character that is used to separate fields in a CSV file NOTE: It cannot be the same as the character in the |
| record_terminator | character | no | , | A character that is used to separate rows in a CSV file NOTE: It cannot be the same as the character in the |
| enclosed_by | string | no | n/a | The quote character within which to enclose data This allows delimiter characters to be embedded in string values. You can choose any ASCII value in the range |
| escape_as | character | no | n/a | An escape character You can define an escape character using any ASCII value in the range from |
| null_value | string | no | "" (no value, as in: "null_value" : "") | A character that replaces nulls in the data when loading it to the BDS (corresponds to |
| db_parser | string | no | gdc | The database parser used to process the source files
NOTE:
|
Set optional parameters for your manifest file
The optional ‘generate_manifests’ parameter specifies whether to generate a manifest file or to use the manifest file that you provide. By default, the ‘generate_manifests’ parameter is not set and defaults to ‘false’, which means that:
- You have to create and provide your own manifest files (see Manifest File).
- All manifest file properties take on their default values.
- CSV Downloader expects the manifest files to be found in the folder that you specified in the ‘folder’ parameter (see Minimum Layout of the Configuration File).
Depending on your business and technical requirements, you can set one or more optional parameters to customize the default settings for the manifest file.
If you want CSV Downloader to generate the manifest file for you, set the ‘generate_manifests’ parameter to ‘true’ and see Generate a manifest file.
To be notified when CSV Downloader finds no manifest files to process, set up a notification triggered by a custom event (see Create a Notification Rule for a Data Loading Process). Set manifestMissing as the custom event triggering the notification, and use the {$params.downloader_id} variable in the message subject or/and body, which will include the ID of the affected CSV Downloader instance in the notification email.
"csv": {
  "type": "s3",
  "options": {
    "generate_manifests": false,
    "manifest": "manifest_file_name", // optional
    "manifest_process_type": "move|history", // optional
    "number_of_manifest_in_one_run": number_of_manifests, // optional
    "data_location": "path/to/data/files" // optional
  }
}
| Name | Type | Mandatory? | Default | Description |
|---|---|---|---|---|
| generate_manifests | Boolean | no | false | Specifies whether to generate a manifest file or to use the manifest file that you provide
NOTE: If you use Parquet source files, set this parameter to 'false'. If you use Excel source files, set this parameter to 'true'. |
| manifest | string | no | manifest_{time(%s)} | The format of the manifest file name For information about the format, see Manifest File. |
| manifest_process_type | string | no | move | Specifies how to handle the manifest file after it has been processed
|
| number_of_manifest_in_one_run | integer | no | 1 | The maximum number of manifest files to process in one run |
| data_location | string | no | n/a | The path to the data files Example: prod/files/data_source/ |
Generate a manifest file
The optional ‘generate_manifests’ parameter specifies whether to generate a new manifest file or to use the manifest file that you provide. By default, the ‘generate_manifests’ parameter is not set and defaults to ‘false’, which means that you have to create and provide your own manifest files.
Depending on your business and technical requirements, you can decide to make CSV Downloader generate the manifest file for you. For example, you must let CSV Downloader generate the manifest if you use Excel source files (see Use Excel files as source files).
In generated manifest files, load mode for all source data files is set to ‘full’ by default. If data is loaded in incremental mode, the data files are by default moved to the ‘processed’ folder after being processed (the path to the folder can be set by the ‘move_data_after_processing_to_path’ parameter). To prevent the data files from being moved, set the ‘keep_data_after_processing’ parameter to ‘true’.
If you want to provide your own manifest files, set the ‘generate_manifests’ parameter to ‘false’ and see Set optional parameters for your manifest file.
To be notified when CSV Downloader finds no manifest files to process, set up a notification triggered by a custom event (see Create a Notification Rule for a Data Loading Process). Set manifestMissing as the custom event triggering the notification, and use the {$params.downloader_id} variable in the message subject or/and body, which will include the ID of the affected CSV Downloader instance in the notification email.
"csv": {
  "type": "s3",
  "options": {
    "generate_manifests": true,
    "data_location": "path/to/data/files",
    "file_name": "data_file_name", // optional
    "sheet_name": "sheet_file_name", // optional
    "date_from": "YYYYMMDD", // optional
    "date_to": "YYYYMMDD", // optional
    "keep_data_after_processing": false|true, // optional
    "move_data_after_processing_to_path": "path/to/move/data/to" // optional
  }
}
| Name | Type | Mandatory? | Default | Description |
|---|---|---|---|---|
| generate_manifests | Boolean | no | false | Specifies whether to generate a new manifest file or to use the manifest file that you provide
NOTE: If you use Parquet source files, set this parameter to 'false'. If you use Excel source files, set this parameter to 'true'. |
| data_location | string | yes | n/a | The path to the source data files Example: prod/files/data_source/ |
| file_name | string | no | {entity_name}_{version}_{time(%s)} | The format of the source data file name For more information, see file_name. |
| sheet_name | string | no | entities.xlsx | (Only for XLSX source files) The format of the spreadsheet name in a source data file If you want to customize the spreadsheet name format, you can use the keywords 'regex', 'time', or 'target_predicate' the same way they can be used in file_name. For example, you may want to set the name format to NOTE: The names of individual sheets must be the same as the names of your entities (tables to download). For example, if you have entities named 'company' and 'revenue', you are going to name the sheets in the source file 'company' and 'revenue' as well. |
| date_from | string | no | n/a | Use 'date_from' and 'date_to' to specify a time interval, within which the data will be downloaded (>= date_from, <= date_to)). Format: Always use the 'date_from' and 'date_to' parameters together. |
| date_to | string | no | n/a | |
| keep_data_after_processing | Boolean | no | false | (For incremental load mode only) Specifies how to handle the data files after they have been processed
|
| move_data_after_processing_to_path | string | no | n/a | The path where the data files will be moved to after processing if the 'keep_data_after_processing' parameter is not set or set to 'false' Example: |
file_name
The default format of the source file name is the following:
{entity_name}_{version}_{time(%s)}.csv|gz|zip
The entity represents the table to download data from. The {entity_name} section is mandatory, and the rest is optional.
When resolved, the name of a manifest file may look like the following:
entity_1.0_20160905140015.csv
To customize the file name format, you can use the following keywords:
entity_name: The name of the entity (the table to download data from)
version: Use ‘version’ to version your entities. For example, 1.0, 3.23, and so on. If you do not specify ‘version’ in the names of your data files and you create your own feed file, use the value ‘default’ in the ‘version’ column.
Do not specify ‘version’ when you decide to generate the feed file instead of creating it on your own.regex: If a file name has a changing part, use ‘regex’ to be able to process the files. For more information, see https://ruby-doc.org/core-2.1.1/Regexp.html.
time: ‘time’ can be set as timestamp (
{time(%s)}) or any kind of the YYYYMMDD format (for example,{time(%Y-%m-%d-%H-%M-%S)}). For more information about tags, see http://ruby-doc.org/core-2.2.0/Time.html#method-i-strftime.target_predicate: The field name used in partial full load (see Set partial full load mode for the entities).
When building the file name format, use symbols such as underscores to separate individual elements:
{entity_name}_{time(%Y%m%d%H%M%S)}_{version}
Processing file names with no separating symbols between individual elements (for example, {entity_name}{time(%Y%m%d%H%M%S)}{version} ) may cause an error.
Example: To get the following source data file name:
Event_1.0_20160914_R.abc.csv
the file name format may look like the following:
{entity_name}_{version}_{time(%Y%m%d)}_{regex(R\\.abc)}
Notice that the dot in this regexp means a dot as (.), not as “any character”.
Provide a feed file
By default, CSV Downloader does not check the content of downloaded CSV, JSON, or Parquet files. Therefore, you have to provide information about the content structure of the files in a feed file.
If you do not provide the feed file, CSV Downloader generates it. For more information about the feed file, see Feed File.
You must provide the feed file if you use JSON source files or Parquet source files. The option of generating the feed file automatically is not supported for these source files.
"csv": {
  "type": "s3",
  "options": {
    "data_structure_info": "path/to/feed/file", // optional
    "feed_on_bds": false|true, // optional
    "default_string_size": "255", // optional
    "generate_feed_from_path": "path/to/test/feed/file", // optional
    "ignore_columns_check": false|true // optional
  }
}
| Name | Type | Mandatory? | Default | Description |
|---|---|---|---|---|
| data_structure_info | string | no | n/a | The path to the feed file Example: NOTE: If you use JSON source files or Parquet source files, set this parameter to the path to the feed file. |
| feed_on_bds | Boolean | no | false | Specifies whether the feed file is located on the BDS instead of the location set by the 'data_structure_info' parameter.
|
| default_string_size | string | no | 255 | The default size of the VARCHAR data type for the generated feed file |
| generate_feed_from_path | string | no | n/a | The path to generate a test feed file in If this parameter is explicitly set to some path, the feed file is generated but no data is downloaded from the source files. Use this option to test your settings before actually downloading data. NOTE: If you use Parquet source files, do not specify this parameter. |
| ignore_columns_check | Boolean | no | true | Specifies whether to compare column names in the feed file to those in the source files
NOTE: If you use Parquet source files, set this parameter to 'true'. |
Set up runtime parameters
You can set up optional processing parameters that are used at runtime.
"csv": {
  "type": "s3",
  "options": {
    "delete_data_after_processing": true|false, // optional
    "ignore_check_sum": true|false, // optional
    "number_of_threads": number_of_threads // optional
  }
}
| Name | Type | Mandatory? | Default | Description |
|---|---|---|---|---|
| delete_data_after_processing | Boolean | no | false | Specifies whether to delete data from the source after processing
|
| ignore_check_sum | Boolean | no | true | Specifies whether to ignore MD5 checksums when downloading data
|
| number_of_threads | integer | no | 4 (for S3) 1 (for others) | The number of threads that will be used for copying data from the source location to the BDS
|
Specify additional load options for the entities
For each entity, you can set up additional load options.
Setting up an entity option and then removing it does not set back the default value but keeps the last value that had been set. To change the option to its default value, you have to set it explicitly.
"entities": {
  "table_1_name": {
    "global": {
      "custom": {
        "hub": ["column_1_name","column_2_name","column_3_name"],
        "export_type": "full|inc", // optional
        "skip_rows": number_of_rows // optional
      }
    }
  }
}
| Name | Type | Mandatory? | Default | Description |
|---|---|---|---|---|
| export_type | string | no | n/a | Load mode used for loading the entity to the database
|
| skip_rows | integer | no | 1 | The number of rows from the top of a file that CSV Downloader will skip By default, it is set to 1 and removes the first row (that typically features a header) from a CSV file. Set it to zero if you want to use the parameter but want to preserve the data in the first row. |
Set partial full load mode for the entities
You can specify partial full load mode for some or all entities. In partial full load, the rows that should be removed must contain the same value in the specified field as the new data does.
[Example]{.ul}: You have two clients: Client A and Client B. You already have data for those clients in your ADS instance from previous data loads. The data for both Client A and Client B is stored in the same table. The table contains, among others, the ‘id’ and ‘client’ columns. The names of these columns are specified in the ‘hub’ parameter of your configuration file (see Minimum Layout of the Configuration File).
This is how your data currently looks in the table on the ADS instance:
| id | text | client |
|---|---|---|
| 1 | aaabbbb | clientA |
| 1 | ccddd | clientB |
Now, you want to reload data for Client A without affecting Client B’s data in the same table.
This is the new data that you want to load for Client A:
| id | text | client |
|---|---|---|
| 2 | eeeeeff | clientA |
After the data load completes, you want the table with the data to look like the following:
| id | text | client |
|---|---|---|
| 2 | eeeeeff | clientA |
| 1 | ccddd | clientB |
Notice that Client A has a different ID and text, and Client B’s data remains the same.
To achieve this output, use partial full load , and use the ‘client’ field as its differentiator.
After the next data load runs, the table with the data will be updated to look exactly as you want it to.
For comparison, this is what your data would look like if you ran the data load in full load mode:
| id | text | client |
|---|---|---|
| 2 | eeeeeff | clientA |
Notice that the data for Client A is loaded correctly, but the data for Client B is no longer present in the table.
[How to set partial full load mode]{.ul}: Depending on whether the field that you want to use as the partial full load field does or does not exist in your data, choose one of the following scenarios to set partial full load mode.
Scenario 1: The field that you want to be the partial full load field [exists]{.ul} in your data
- In the manifest file (see Manifest File), set up the full load mode for loading the source data. To do so, set the ‘export_type’ field to ‘full’.
- In the configuration file, set up the partial full load field:
If you want to use partial full load for a specific entity, add the ‘partial_full_load_field’ parameter to the ‘custom’ section for the entity and set it to the name of the field that will be used as the partial full load field:
"entities": {
  "table_1_name": {
    "global": {
      "custom": {
        "hub": ["column_1_name","column_2_name","column_3_name"],
        "partial_full_load_field": "your_field_name"
      }
    }
  }
}
If you want to use partial full load for all entities, add the ‘partial_full_load_field’ parameter to the ‘options’ section of the CSV Downloader instance, and set it to the name of the field that will be used as the partial full load field:
"csv": {
  "type": "s3",
  "options": {
    "bucket": "s3_bucket_name",
    "access_key": "s3_access_key",
    "folder": "path/to/manifest/file",
    "partial_full_load_field": "your_field_name"
  }
}
Scenario 2: The field that you want to be the partial full load field [does not exist]{.ul} in your data
- In the manifest file (see Manifest File), set up the full load mode for loading the source data. To do so, set the ‘export_type’ field to ‘full’.
- In the configuration file, set up the field that will be used as the partial full load field. Although you can use any field as the partial full load field, we recommend that you use the ‘target_predicate’ field for that purpose, and this procedure describes the process of setting partial full load mode using the ‘target_predicate’ field. Do one of the following:
- If you provide your own manifest file, propagate the ‘target_predicate’ field from the manifest file (see the ‘target_predicate’ column in Manifest File).
- If CSV Downloader generates a manifest file for you, propagate the ‘target_predicate’ field from the name of the source files (see the ‘target_predicate’ keyword in the ‘file_name’ parameter).
- Depending on whether you want to use partial full load for a specific entity or all entities, do one of the following:
- If you want to use partial full load for a specific entity, configure the ‘custom’ section for the entity.
Add the ‘partial_full_load_field’ parameter, and set it to ‘target_predicate’.
Add the ‘computed_fields’ section so that the ‘target_predicate’ field gets added to your source and stage tables. For more information about the computed fields, see Computed Fields.
"entities": {
  "table_1_name": {
    "global": {
      "custom": {
        "hub": ["column_1_name","column_2_name","column_3_name"],
        "partial_full_load_field": "target_predicate",
        "computed_fields": [
          {
            "name": "target_predicate",
            "type": "string-32",
            "function": "runtime_metadata|target_predicate",
            "table_type": ["src"],
            "key": true,
            "position": "first",
            "encoding": "RLE"
          },
          {
            "name": "target_predicate",
            "type": "string-32",
            "function": "value|target_predicate",
            "table_type": ["stg"],
            "key": true,
            "position": "first",
            "encoding": "RLE"
          }
        ]
      }
    }
  }
}
- If you want to use partial full load for all entities, do the following:
Add the ‘partial_full_load_field’ parameter to the ‘options’ section of the CSV Downloader instance, and set it to ‘target_predicate’:
"csv": {
  "type": "s3",
  "options": {
    "bucket": "s3_bucket_name",
    "access_key": "s3_access_key",
    "folder": "path/to/manifest/file",
    "partial_full_load_field": "target_predicate"
  }
}
Add the ‘computed_fields’ section to the ‘ads_storage’ section so that the ‘target_predicate’ field gets added to your source and stage tables. For more information about the computed fields, see Computed Fields.
"ads_storage": {
  "instance_id": "data_warehouse_instance_id",
  "username": "dw_email@address.com",
  "options": {},
  "computed_fields": [
    {
      "name": "target_predicate",
      "type": "string-32",
      "function": "runtime_metadata|target_predicate",
      "table_type": ["src"],
      "key": true,
      "position": "first",
      "encoding": "RLE"
    },
    {
      "name": "target_predicate",
      "type": "string-32",
      "function": "value|target_predicate",
      "table_type": ["stg"],
      "key": true,
      "position": "first",
      "encoding": "RLE"
    }
  ]
}
- If you want to use partial full load for a specific entity, configure the ‘custom’ section for the entity.
Customize integrators
The ‘integrators’ and ‘ads_storage’ sections define the behavior of integrators.
"integrators": {
  "ads_integrator": {
    "type": "ads_storage",
    "batches": ["csv_downloader_id"]
  }
},
"ads_storage": {
  "instance_id": "data_warehouse_instance_id",
  "username": "dw_email@address.com",
  "options": {}
}
If you want to add more parameters or change the defaults, see ADS Integrator.
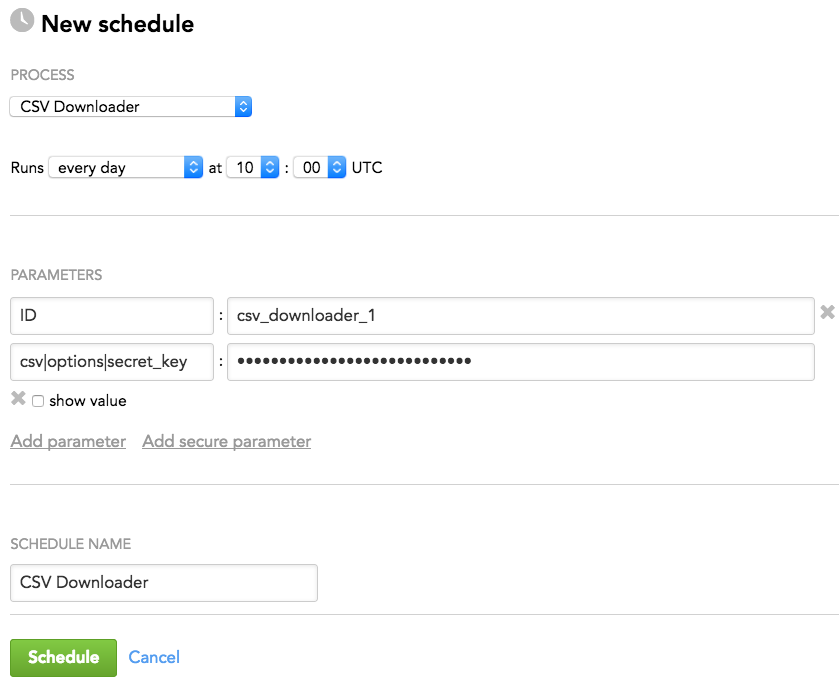
Schedule Parameters
When scheduling CSV Downloader (see Phases of Building the Data Pipeline -> Production Implementation), provide the parameters from this section in the schedule.
General Parameters
Some parameters must be entered as secure parameters (see Configure Schedule Parameters).
Some parameters contain the names of the nesting parameters, which specifies where they belong in the configuration hierarchy. For example, a parameter entered as csv|options|password is resolved as the following:
"csv": {
  "options": {
    "password": ""
  }
}
Enter such parameters as is (see Schedule Example).
| Name | Type | Mandatory? | Secure? | Default | Description |
|---|---|---|---|---|---|
| ID | string | yes | no | n/a | The ID of the CSV Downloader instance being scheduled Must be the same as the 'batches -> csv_downloader_id' parameter and the 'downloaders -> csv_downloader_id' parameter in the configuration file (see Minimum Layout of the Configuration File) Example: csv_downloader_1 |
| server_side_encryption | Boolean | no | no | false | Specifies whether CSV Downloader can work with an S3 location where server-side encryption is enabled.
|
Location-Specific Parameters
Depending on the location where your source data files are stored, provide the corresponding location-specific parameters as secure schedule parameters (see Configure Schedule Parameters).
Some parameters contain the names of the nesting parameters, which specifies where they belong in the configuration hierarchy. For example, a parameter entered as csv|options|password is resolved as the following:
"csv": {
  "options": {
    "password": ""
  }
}
Enter such parameters as is (see Schedule Example).
| Location | Parameter Name | Type | Mandatory? | Secure? | Default | Description |
|---|---|---|---|---|---|---|
| S3 | csv|options|secret_key | string | yes | yes | n/a | The secret key to the S3 bucket where the source data is stored |
| SFTP | csv|options|password | string | see 'Description' | yes | n/a | The password to the SFTP server to download the data from This parameter is mandatory only when 'auth_mode' is set to 'password' (see Use an SFTP location). Otherwise, do not use it. |
| csv|options|cert_key | string | see 'Description' | yes | n/a | The private key used for authentication This parameter is mandatory only when 'auth_mode' is set to 'cert' (see Use an SFTP location). Otherwise, do not use it. The private key must be in the PEM (Privacy Enhanced Mail) format. If the private key is encrypted, also provide the passphrase to decrypt it (see the 'csv|options|cert_passphrase' parameter). NOTE: Although you are entering the private key as a secure parameter, its value will be visible right after you paste it in the parameter value field (the show value check-box is selected) because it is a multi-line string. To hide the value, un-select the show value check-box. When the schedule is saved, the value will not appear in clear-text form in any GUI or log entries. For more information, see Configure Schedule Parameters. | |
csv|options|cert_passphrase | string | see 'Description' | yes | n/a | The passphrase used to decrypt the private key if it is encrypted This parameter is mandatory only when 'auth_mode' is set to 'cert' (see Use an SFTP location) and the private key (see the 'csv|options|cert_key' parameter) is encrypted. Otherwise, do not use it. | |
| WebDAV | csv|options|password | string | yes | yes | n/a | The password to the WebDAV server to download the data from |
| OneDrive | token | string | yes | yes | n/a | The OneDrive refresh token |
Encryption-Specific Parameters
If you enable processing of PGP-encrypted source files, provide the encryption-specific parameters as secure schedule parameters (see Configure Schedule Parameters).
Some parameters contain the names of the nesting parameters, which specifies where they belong in the configuration hierarchy. For example, a parameter entered as csv|options|password is resolved as the following:
"csv": {
  "options": {
    "password": ""
  }
}
Enter such parameters as is (see Schedule Example).
| Parameter Name | Type | Mandatory? | Secure? | Default | Description |
|---|---|---|---|---|---|
| encryption_name|private_key | string | yes | yes | n/a | The private key used for decrypting the PGP-encrypted files If the private key itself is encrypted, also provide the passphrase to decrypt it (see the 'encryption_name|passphrase' parameter). NOTE: Although you are entering the private key as a secure parameter, its value will be visible right after you paste it in the parameter value field (the show value check-box is selected) because it is a multi-line string. To hide the value, un-select the show value check-box. When the schedule is saved, the value will not appear in clear-text form in any GUI or log entries. For more information, see Configure Schedule Parameters. |
encryption_name|passphrase | string | see 'Description' | yes | n/a | The passphrase used to decrypt the private key if it is encrypted This parameter is mandatory only when the private key (see the 'encryption_name|private_key' parameter) is encrypted. Otherwise, do not use it. |
Schedule Example
The following is an example of how you can specify schedule parameters:
Best Practices
For better performance, we recommend that you apply the following best practices when using CSV Downloader:
Source Files
Format
- Use GZIPed CSV files.
- If you have multiple source files, compress each file separately (GZIPed CSV files, not tar.gz).
CSV File Structure
- Use the UTF-8 encoding without the byte order mark (BOM).
- Use a comma delimiter (
,). - End lines with
\nor\r\n. - Quote strings that contain commas, newlines, or other special characters with a double quote character (
"). - Escape quotes in strings with a backslash character (
\). Duplicated double quotes are accepted, but are slower to process. - Make the first line of each file a header.
- Keep all dates and datetimes in the same format.
Example:
ID,Name,City,Note,timeCreated,dateOpened,dateClosed
1,Texas Account,"Dallas, TX","Width has to be 5\" at least",2017-11-12 23:08:22.000,2017-11-12,2018-01-11
2,NYC Account,"New York City, NY","",2017-10-28 11:18:12.352,2017-11-12,
3,Prague,Prague,"Width has to be 5\" at least",2017-10-15 13:02:22.193,2017-11-12,
Size
- Keep the size of each CSV file below 100 MB. Split bigger (up to 1 GB) files into smaller files.
- Keep the size of each XLSX sheet below 10 MB.
- The maximum file size that CSV Downloader can process is 2 GB. This limit is applied only if the ‘number_of_threads’ parameter is set to 1 (see Set up runtime parameters). With a higher number of threads, the maximum file size is considerably smaller. Break large data files (greater than 1 GB) into smaller files, and configure CSV Downloader to process multiple files in one run.
Location
- Store the source files on S3 (see S3 Bucket).
- On S3, place the source files into the following path:
{SOURCE_ROOT}/data/{YYYY}/{MM}/{DD}/ - Keep the source files in the S3 bucket for a while after CSV Downloader downloaded them. When the data integration process stabilizes over a number of successful executions, you can set up a retention period.
Load
- Use link files (see Use link files).
- If you need to do both daily loads and historical loads to the same table, use multiple instances of CSV Downloader (see Add multiple instances of CSV Downloader). If you use multiple instances of CSV Downloaders for one ADS Integrator instance, make sure that each instance of CSV Downloader has a unique ID.
- For each entity, prepare at least one source file.
- If you are using the computed fields for setting partial full load mode, use the ‘position’ and ‘encoding’ parameters (see Computed Fields) for better performance. Set the ‘position’ parameter to ‘first’, and set the ‘encoding’ parameter to ‘RLE’.
Additional Files
- Provide your own manifest file (the ‘generate_manifests’ parameter is set to ‘false’). See Manifest File.
- Provide a feed file. See Feed File.
S3 Bucket
Set up the structure of the S3 bucket as follows:
| Folder | Purpose | Note |
|---|---|---|
| The root folder/bucket | |
| The location of a feed file (feed.txt) | See Feed File. |
| The location of data source files | Keep the number of data source files in one folder below 500. If needed, distribute source data files among subfolders by year/month/date. |
| The location of unprocessed manifest files | Make sure that CSV Downloader has write access to this folder so that it can move the manifest files after they have been processed. |
| The location where processed manifests are moved to | CSV Downloader creates the 'processed' folder with subfolders by year/month/date to limit the number of files in a folder. |