Provisioning Brick
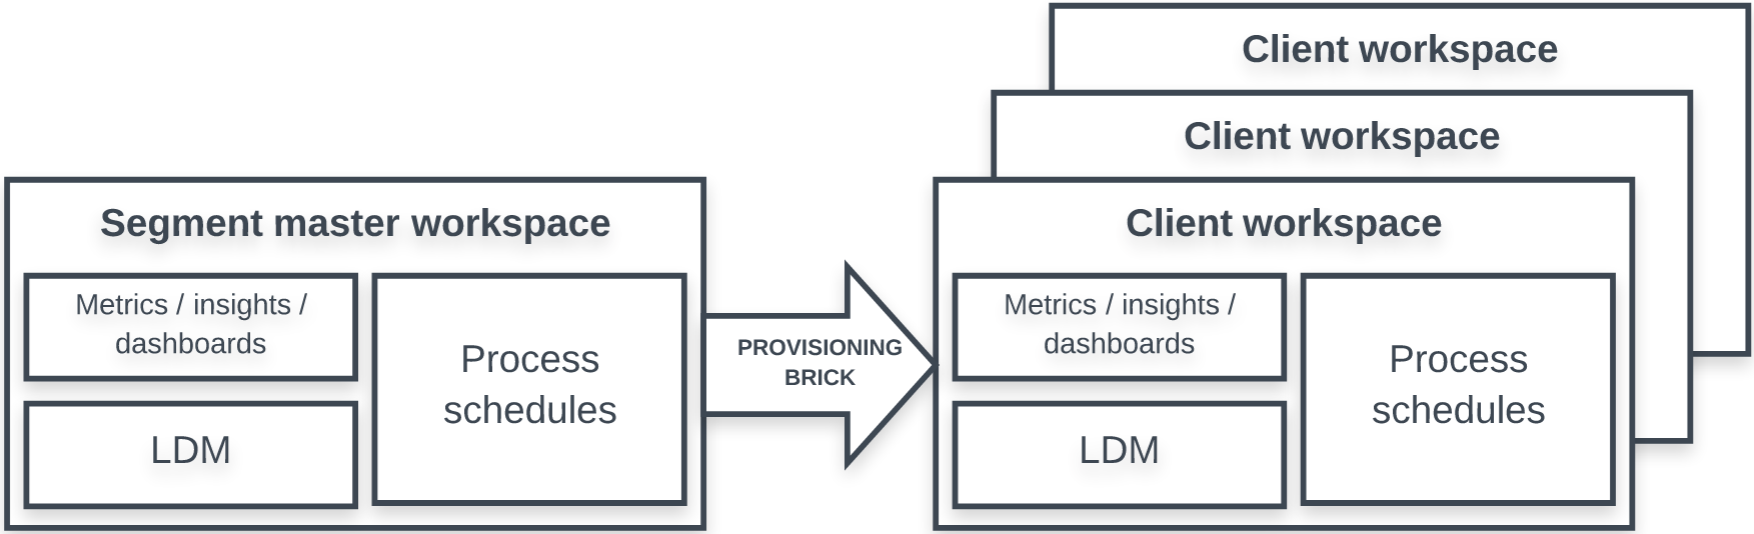
The provisioning brick creates clients' workspaces under the appropriate segments, and deploys the reports, dashboards, filters, logical data model (LDM), data loading processes, and metadata from the master workspace to the clients' workspaces within a segment. Optionally, the provisioning brick deletes obsolete clients and their workspaces.
For information about how to use the brick, see How to Use a Brick.
Prerequisites
Before using the provisioning brick, make sure that the following is true:
- The release brick (see Release Brick) has been executed.
- You have an input source with a list of the client workspaces to be provisioned. The preferred source is GoodData Data Warehouse (ADS) or one of the supported cloud data warehouses/object storage services (see Types of Input Data Sources).
How the Brick Works
The provisioning brick creates the new workspaces specified in the input source and associates them with the appropriate segment.
Depending on how the delete_mode parameter is set, the brick may also delete the existing client workspaces that are no longer in the input source. If the titles of some workspaces have changed in the input source, the brick renames these workspaces.
Other than deleting and renaming, the brick does not touch the existing workspaces.
Provisioning Brick and Custom Fields in the LDM
If you have custom fields set up in the LDM, consider the following:
- If you use Object Renaming Utility to set up custom fields in the LDM of a segment’s master workspace (see Object Renaming Utility), you may need to run Object Renaming Utility after the provisioning brick to make sure that newly created client workspaces have the custom fields properly set.
- If you have custom fields in the LDMs of the client workspaces and you have created new client workspaces, run Custom Field Creator after the provisioning brick to make sure that the custom fields are added to those newly created workspaces. For more information, see Add Custom Fields to the LDMs in Client Workspaces within the Same Segment.
Input
The provisioning brick expects to receive the data about which client should be provisioned under which segment.
In GoodData, terms workspace and project denote the same entity. For example, project ID is exactly the same as workspace ID. See Find the Workspace ID.
The input data format is the following:
| segment_id | client_id | project_title | project_token |
|---|---|---|---|
| basic_segment | client_1 | workspace_one | vertica_token |
| premium_segment | client_2 | workspace_two |
Values in the “segment_id” and “client_id” columns must match the following regex:
[a-zA-Z0-9_\-]+If you store “client_id” values in a database, store them with theVARCHARdata type.If the “project_title” column is missing from the input data, the workspace name is populated from the data in the “client_id” column.
If the “project_token” column is missing from the input data or is empty, the PostgreSQL authorization token of the master workspace (see the
tokensparameter in Release Brick) is used for provisioning client workspaces. If you have a Vertica authorization token, you can provision client workspaces on Vertica. To do so, specify your Vertica token in the “project_token” column for those workspaces.
In addition, you have to add the parameters when scheduling the brick process.
Parameters
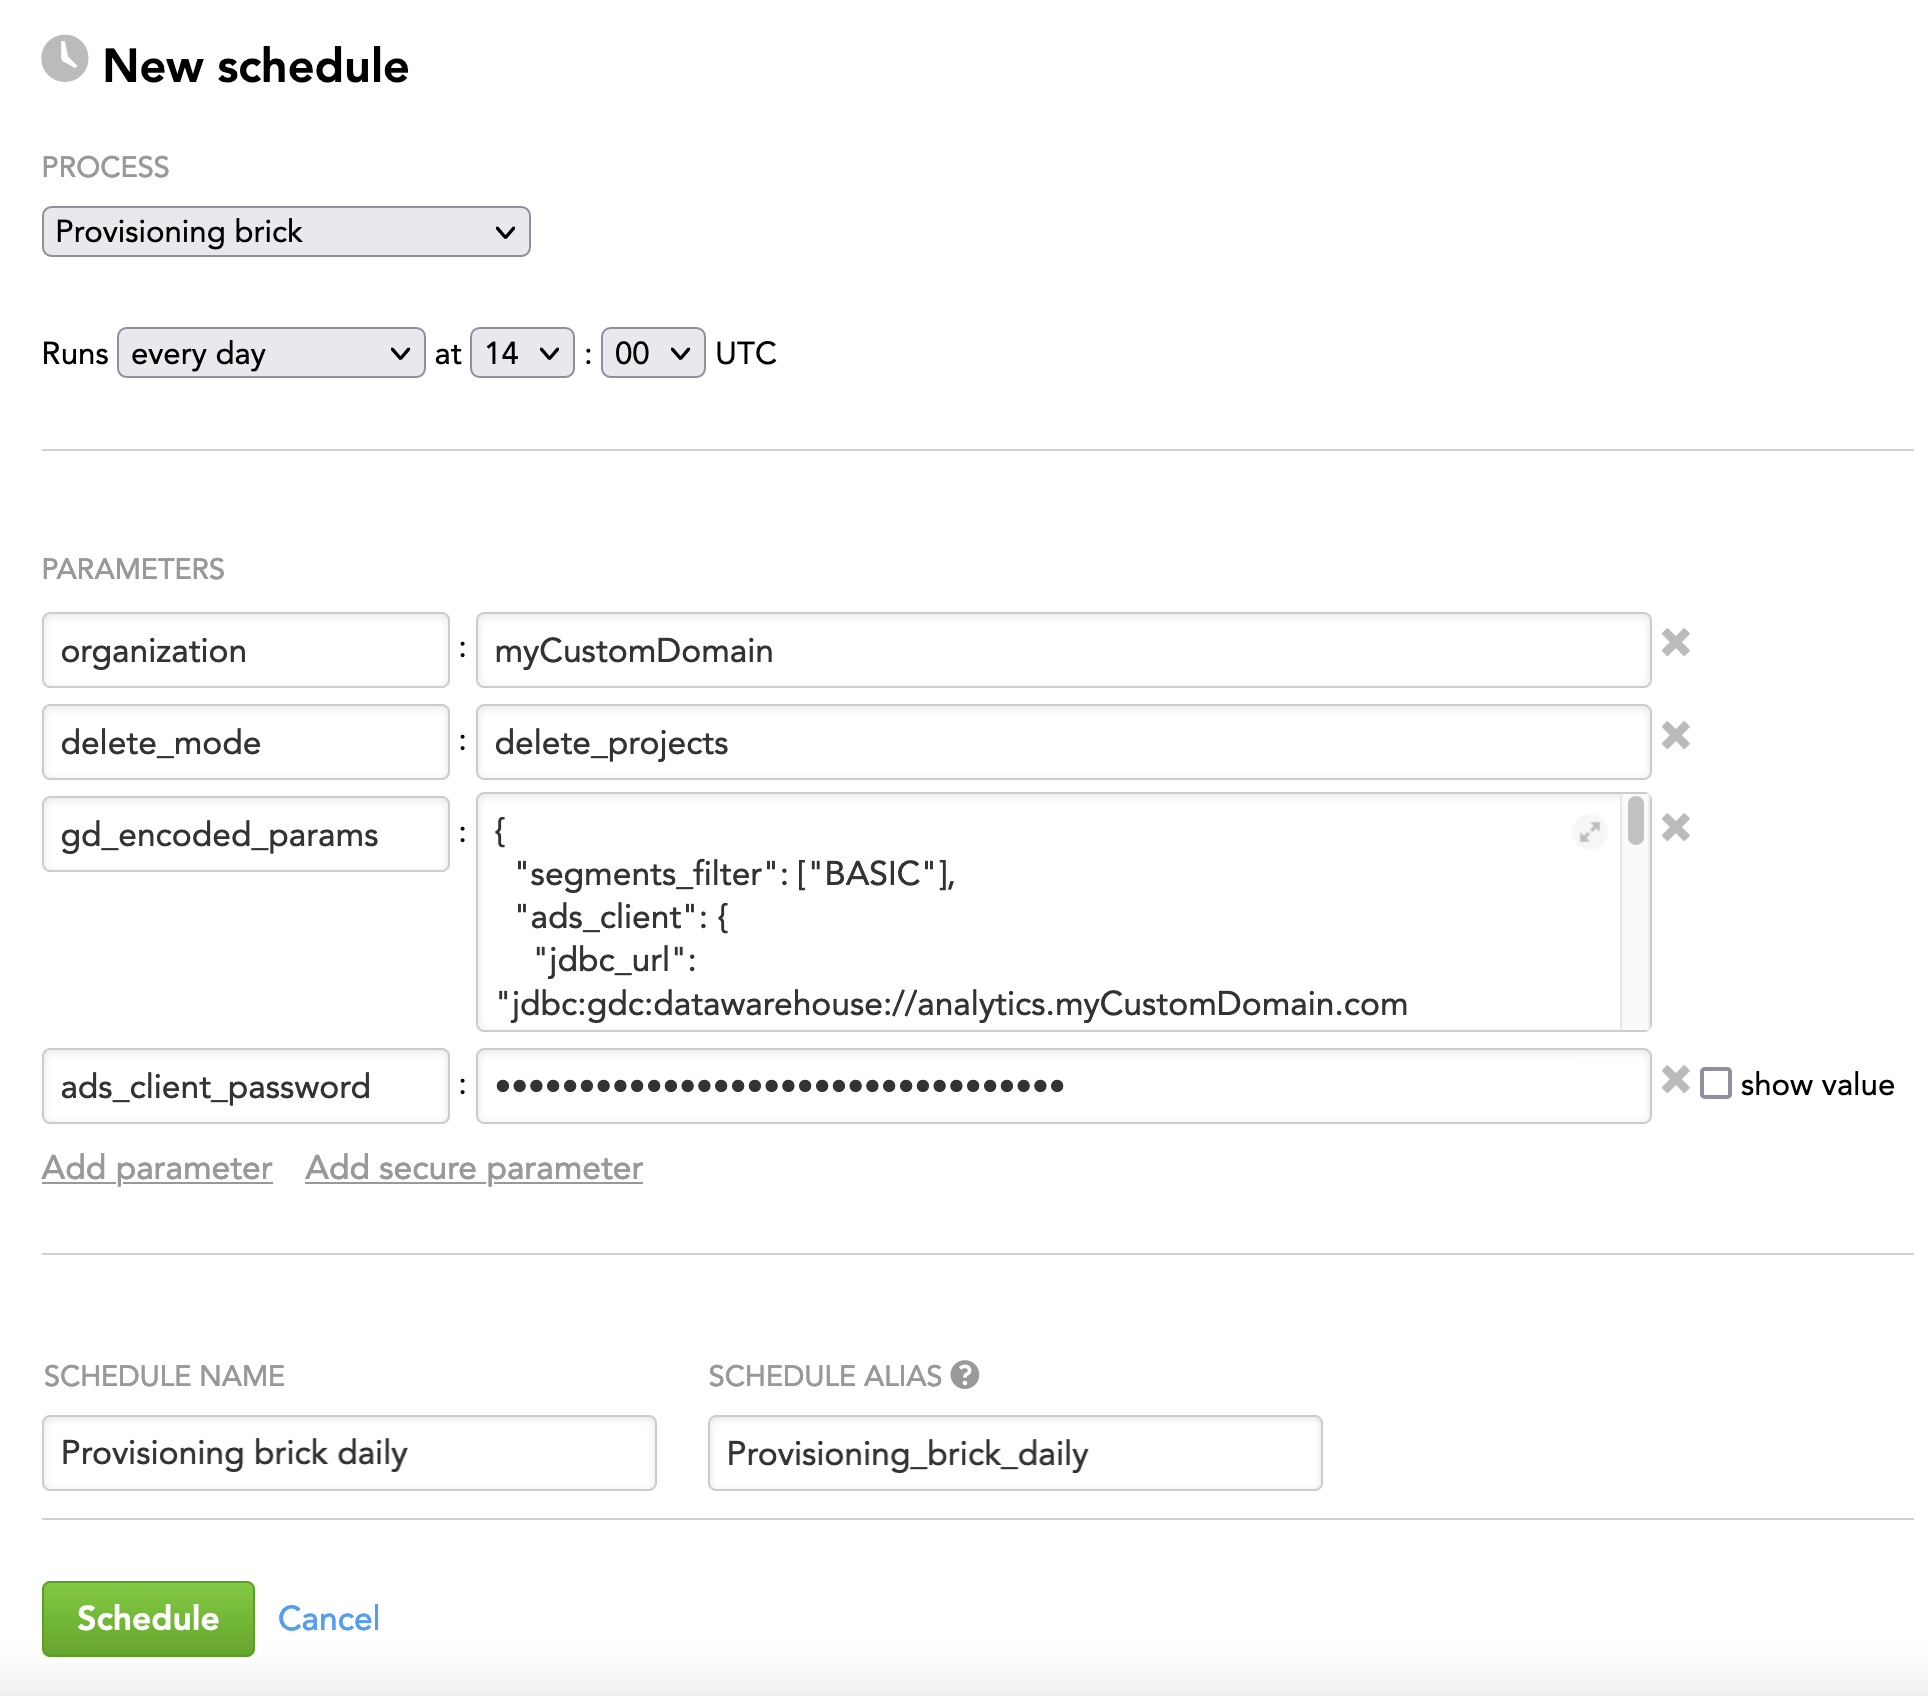
When scheduling the deployed brick (see How to Use a Brick and Schedule a Data Load), add parameters to the schedule.
| Name | Type | Mandatory? | Default | Description |
|---|---|---|---|---|
| organization | string | yes | n/a | The name of the domain where the brick is executed |
| segments_filter | array | yes | n/a | The segments that you want to provision You must encode this parameter using the Example: |
| input_source | JSON | yes | n/a | The input data that identifies the client workspaces and the location of that input data You must encode this parameter using the The preferred source is ADS or one of the supported cloud data warehouses/object storage services. For more information about setting up the input source on an ADS instance as well as the other types of the input sources, see Types of Input Data Sources. Example: |
| data_product | string | no | default | The data product that contains the segments that you want to provision |
| delete_mode | string | no | none | Defines how the brick should process the clients and their workspaces when detecting that one or more clients existing in the segment are not present in the input source. Possible values:
|
| disable_kd_dashboard_permission | Boolean | no | false | Shared dashboard permissions for user groups are enabled by default. Even when the parameter is not explicitly specified in the syntax, it is assumed. Set to true to disable synchronizing user group permissions for shared dashboards. For more information, see LCM and Shared Dashboards. |
| technical_users | array | no | n/a | The users that are going to be added as admins to each client workspace The user logins are case-sensitive and must be written in lowercase. You must encode this parameter using the Example: |
LCM and Shared Dashboards
In a segment’s master workspace, dashboards can be private or shared with all or some users/user groups.
The sharing permissions are propagated from the master workspace to the client workspaces in the following way:
- Dashboards set as private in the master workspace remain private in the client workspaces.
- Dashboards shared with all users in the master workspace become dashboards shared with all users in the client workspaces.
- Dashboards shared with some users/user groups in the master workspace become dashboards shared with some user groups in the client workspaces.
Only user group permissions on the master workspace are preserved during rollout. Because the permission sharing a dashboard in the master workspace with some users is not preserved during rollout, we recommend that the master workspace contain only the dashboards that can be safely shared with all users in the client workspaces. If access is given to a user directly on the client workspace, the LCM will not remove that permission.
In some cases, you might want to keep private dashboards in the master workspace knowing that they will remain private in the client workspaces (for example, if they are used only as target dashboards in drilling).
In addition to the sharing permissions, the dashboards can be configured:
- To allow only administrators to update the dashboards (that is, editors cannot update such dashboards)
- To be displayed to users when they drill to these dashboards from facts, metrics, and attributes, even if the dashboards are not explicitly shared with those users
These settings are propagated to the client workspaces exactly as they are set in the master workspace. For more information about these settings, see Share Dashboards.
Example - Brick Configuration
The following is an example of configuring the brick parameters in the JSON format:
{
"organization": "myCustomDomain",
"delete_mode": "delete_projects",
"gd_encoded_params": {
"segments_filter": ["BASIC"],
"ads_client": {
  "jdbc_url": "jdbc:gdc:datawarehouse://mycompany.com/gdc/datawarehouse/instances/kluuu4h3sogai9x2ztn4wc0g8lta7sn8",
  "username": "john.doe@gooddata.com",
  "password": "${ads_client_password}"
},
"input_source": {
  "type": "ads",
  "query": "SELECT DISTINCT client_id, segment_id, project_title FROM lcm_workspace;"
},
"technical_users": ["dev_admin@myCustomDomain.com", "admin@myCustomDomain.com"]
},
"ads_client_password": "enter_as_a_secure_parameter"
}
Troubleshooting
Provisioning brick fails
The provisioning brick fails with the following error message:
Master release not found. You must call client synchronization to create a master release before provisioning new projects.
Why has this happened?
When executing, the provisioning brick relies on the platform metadata objects that the rollout brick generates (see “Rollout and Provisioning Metadata” in Rollout Brick). These objects are automatically cleaned up three years after the rollout process was last executed.
How can you fix this?
- Synchronize the client workspaces to create the platform metadata objects that the provisioning brick uses. To do so, either run the rollout brick or use the synchronization API.
- Run the provisioning brick again.
Advanced Settings
This section describes advanced settings of the provisioning brick.
Change these settings only if you are confident in executing the task or have no other options. Adjusting the advanced options in a wrong way may generate unexpected side effects.
Proceed with caution.
| Name | Type | Mandatory? | Default | Description |
|---|---|---|---|---|
| dynamic_params | JSON | no | n/a | See dynamic_params. |
| metric_format | JSON | no | n/a | See metric_format. |
| include_deprecated | Boolean | no | false | Specifies how to handle deprecated objects in the logical data model (LDM) while one is being generated in a client's workspace based on the LDM of the master workspace
|
| skip_actions | array | no | n/a | The actions or steps that you want the brick to skip while executing (for example, deleting clients or collecting dynamically changing parameters) The specified actions and steps will be excluded from the processing and will not be performed. NOTE: Using this parameter in a wrong way may generate unexpected side effects. If you want to use it, contact the GoodData specialist who was involved in implementing LCM at your site. |
| abort_on_error | Boolean | no | true | Specifies whether the
The brick results in one of the following:
|
dynamic_params
The dynamic_params parameter lets you add client-specific, dynamically changing parameters to all or some schedules in all or some client workspaces. If the parameters pass sensitive data (for example, passwords), you can send them in encrypted form and add them as secure parameters (see Configure Schedule Parameters).
The dynamic_params parameter should be used sparsely and in very specific use cases (see the examples further in this section). The most use cases are automatically covered by Life Cycle Management (LCM; see Managing Workspaces via Life Cycle Management). Specifically, the CLIENT_ID parameter is automatically propagated to schedules.
An example of the special use case when you may want to use the dynamic_params parameter is when you use CloudConnect for managing data load processes (see Loading Data Using CloudConnect), and each client receives data from a different source. In this case, you need to propagate data source credentials to the schedules in the appropriate client’s workspaces (for example, if Client A’s workspaces are populated with data from Google Analytics, the schedules in those workspaces should get the Google Analytics credentials). Any sensitive data (such as passwords, secret keys, client secrets, and so on) must be encrypted first so that it does not appear in clear-text form in the input source of the brick (see input_source in Parameters).
Example 1: No parameters encrypted You want to add the MODE parameter with the value set to specific_mode to the schedules named “main.rb” for the client with the client ID client_A.
Steps:
Make sure that your input data (see
input_sourcein Parameters) returns correct information when queried for the client ID, schedule name, parameter name, and parameter value. That is, the input data must contain the following:client_id schedule_title param_name param_value client_A main.rb MODE specific_mode client_idis the client ID of the client.schedule_titleis the name of the schedules where you want to add the parameter.param_nameis the name of the parameter that you want to add.param_valueis the value of the specified parameter.
Create the JSON structure for the
dynamic_paramsparameter, and add it to the brick schedule. Because it is a complex parameter, include it in yourgd_encoded_paramsparameter (see Example - Brick Configuration)."gd_encoded_params": { ... "dynamic_params": { "input_source": { "type": "ads", "query": "SELECT p.client_id, 'main.rb' AS schedule_title, 'MODE' AS param_name, p.param_value FROM lcm_dynamic_params p;" } } }
Example 2: Some parameters encrypted You want to add the following parameters to the schedules named “provisioning” for the client with the client ID client_B:
- The
loginparameter with the value set toadmin@myCustomDomain.com(as a regular parameter) - The
passwordparameter with the value set tomy_password(as a secure parameter)
The value of the password parameter should not appear in clear-text form in the input source of the brick (see input_source in Parameters) and therefore must first be encrypted. When the password parameter is passed to the client’s schedules, its value will be decrypted, and the parameter will be added as secure and with its original value.
Steps:
Encrypt the value of the
passwordparameter (which ismy_password). To encrypt the parameter, use the OpenSSLenccommand (see https://wiki.openssl.org/index.php/Enc) or any compatible encryption tool that you trust. Use a cipher algorithm with the key size of 256 bits or higher (for example, AES-256-CBC). When encrypting, use the encryption passwordmy_secret_encryption_password. The resulting encrypted value iswCmxeJhyzdM4O9S9+LPJ6w==.Make sure that your input data (see
input_sourcein Parameters) returns correct information when queried for the client ID, schedule name, parameter name, parameter value, and the indicator whether the specified parameter should be added to the schedules as a regular or a secure parameter. That is, the input data must contain the following:client_id schedule_title param_name param_secure param_value client_B provisioning login FALSE admin@myCustomDomain.com client_B provisioning password TRUE wCmxeJhyzdM4O9S9+LPJ6w== client_idis the client ID of the client.schedule_titleis the name of the schedules where you want to add the parameter.param_nameis the name of the parameter that you want to add.param_secureis a Boolean flag that specifies whether the parameter should be added to the schedules as a secure parameter (see Configure Schedule Parameters).param_secureis optional. If it is not found in the input data or does not contain any value, it defaults toFALSE(the parameter is added as a regular, not secure parameter). Note the following:- The
loginparameter does not pass sensitive data and therefore can be added as a regular, not secure parameter. That is why itsparam_secureis set toFALSE. If you leaveparam_secureempty, it will default toFALSEand also result in adding theloginparameter as a regular parameter. - The
passwordparameter passes sensitive data and must be added as a secure parameter. That is why itsparam_secureis set toTRUE.
- The
param_valueis the value of the specified parameter. Note that the value of thepasswordparameter is encrypted (see Step 1 of this procedure).
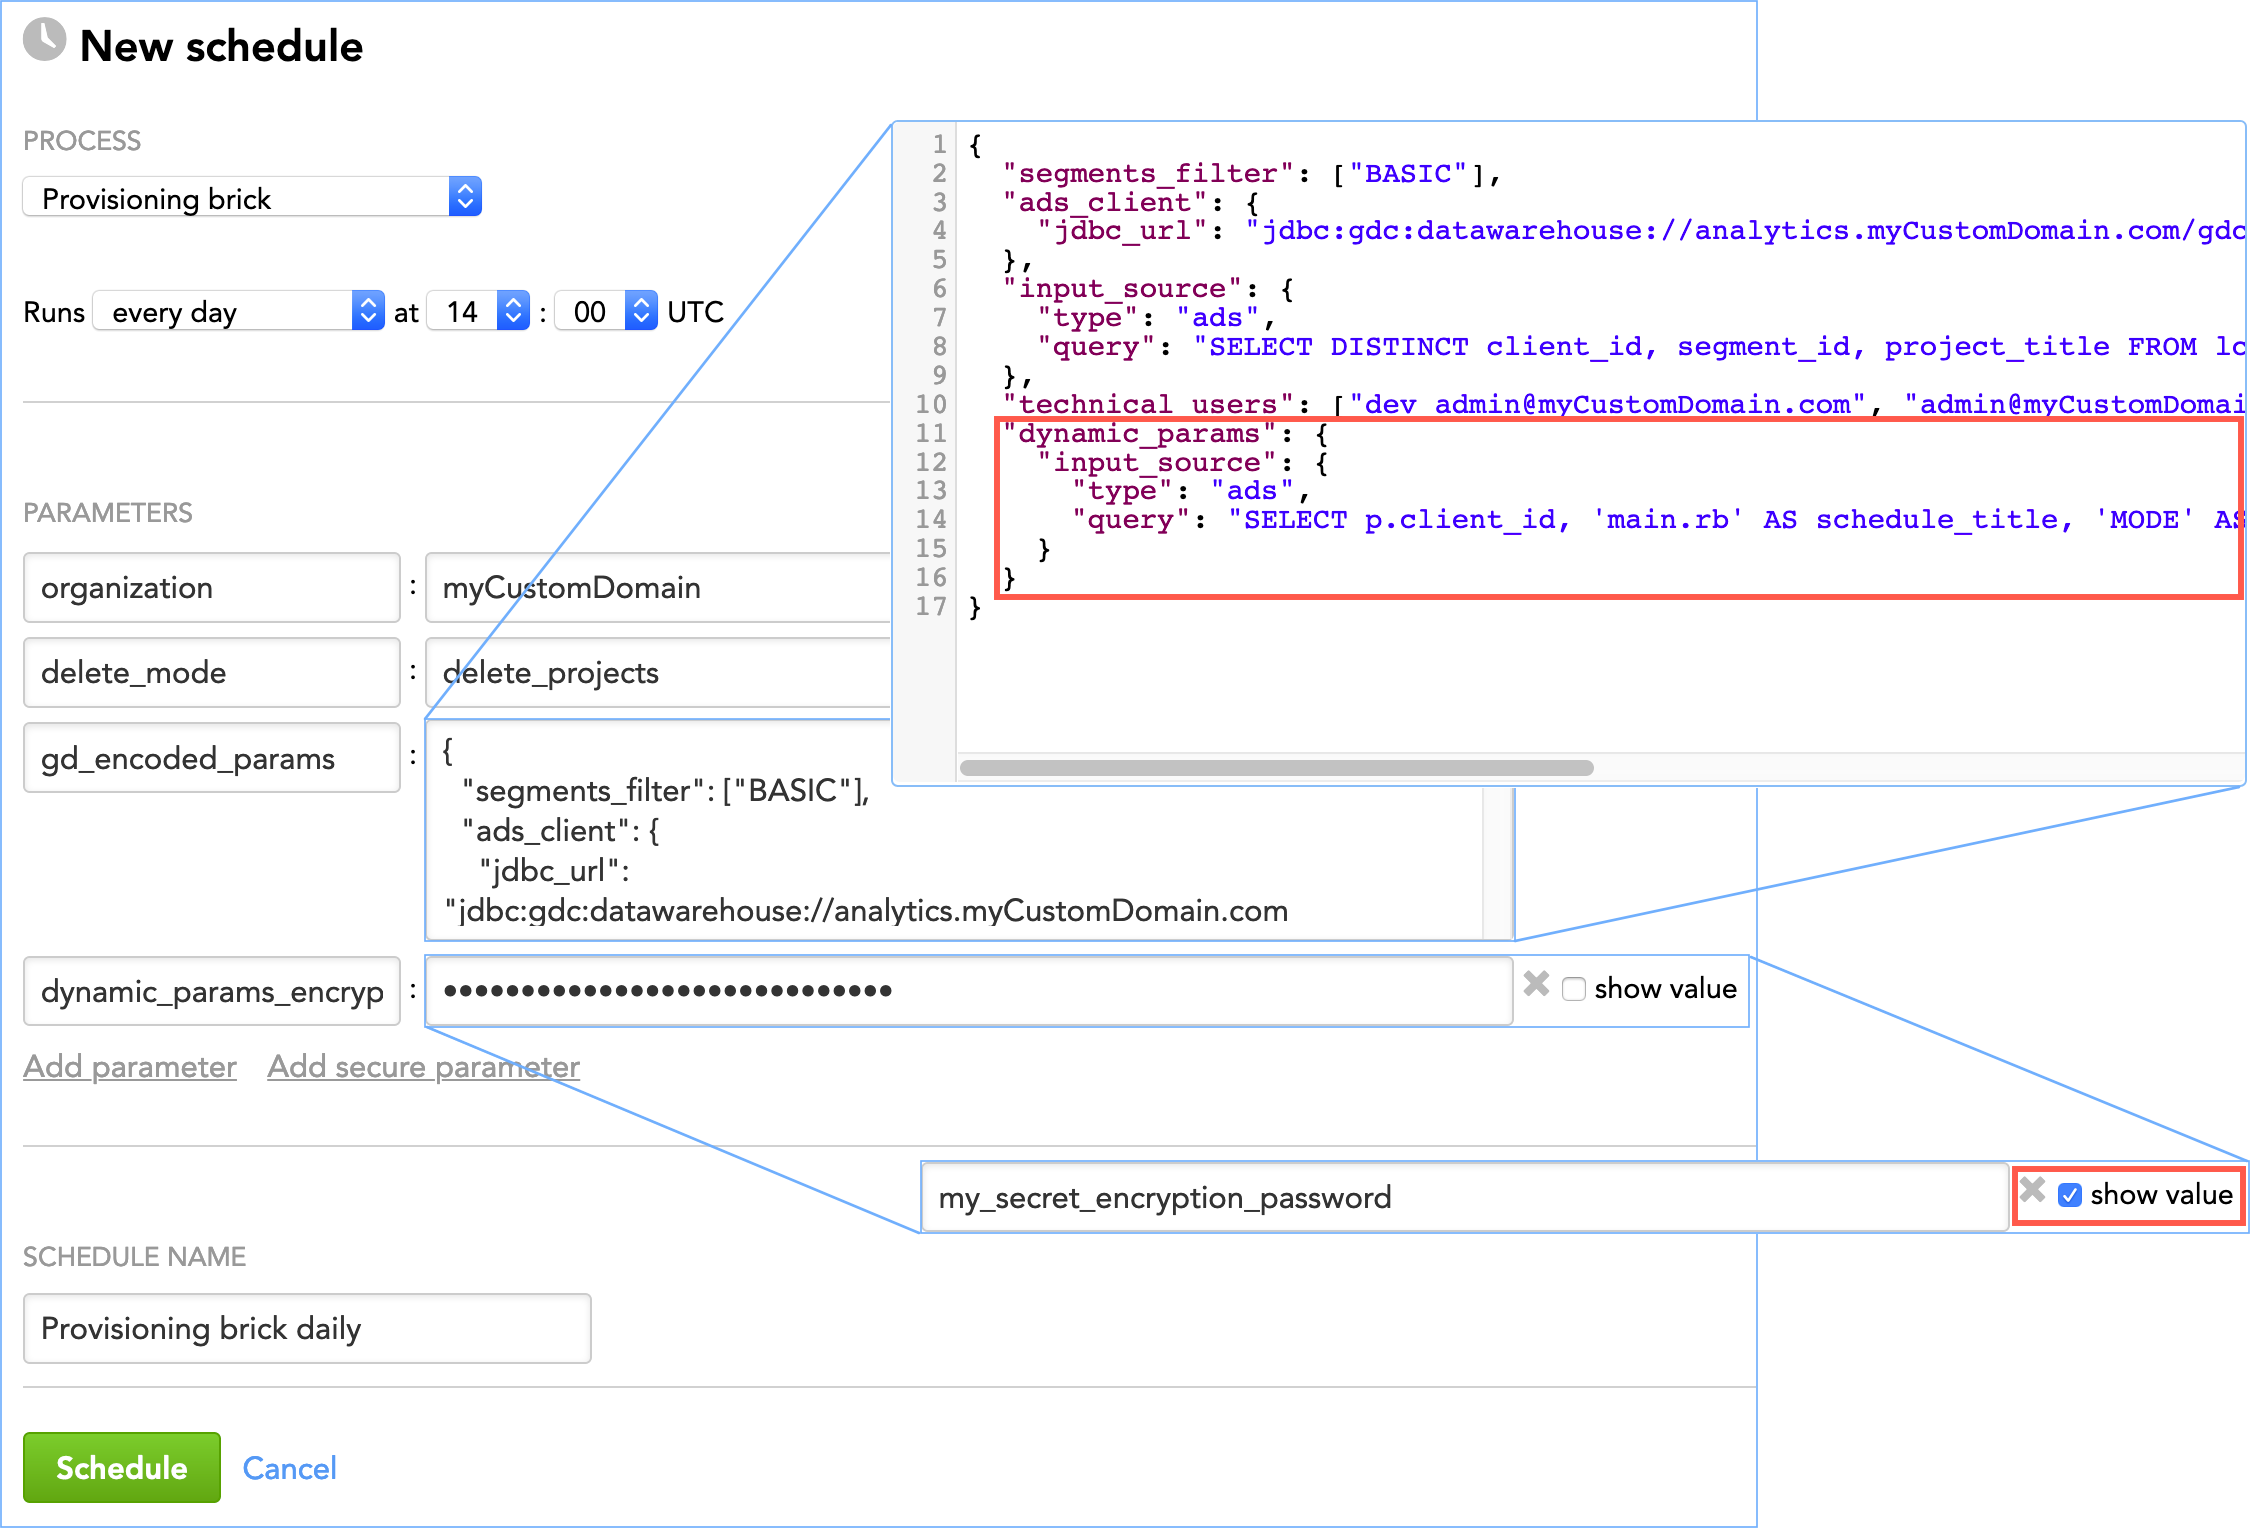
Create the
dynamic_paramparameter, and add it to the brick schedule. Because it is a complex parameter, include it in yourgd_encoded_paramsparameter (see Example - Brick Configuration)."gd_encoded_params": { ... "dynamic_params": { "input_source": { "type": "ads", "query": "SELECT p.client_id, p.schedule_title, p.param_name, p.param_secure, p.param_value FROM lcm_dynamic_params p;" } } }Add the
dynamic_params_encryption_keyparameter to the brick schedule as a secure parameter and set it tomy_secret_encryption_password(this is the value of the encryption password that you used to encrypt the password; see Step 1 of this procedure). Thedynamic_params_encryption_keyparameter will be used to decrypt the encrypted value of thepasswordparameter when it is passed to the client’s schedules. That is, thepasswordparameter will be added to the client’s schedules with the value ofmy_passwordand notwCmxeJhyzdM4O9S9+LPJ6w==.If you do not add thedynamic_params_encryption_keyparameter to the brick schedule, thepasswordparameter will still be added to the specified client’s schedules as a secure parameter but its value will not be decrypted and will be added to the schedules in its encrypted format (which iswCmxeJhyzdM4O9S9+LPJ6w==). A corresponding warning message will be recorded in the execution logs (see Review a Log of Data Load Execution).
Additional options of dynamic_params
To add dynamic parameters to all schedules for “client_A”, do not explicitly specify
schedule_titlein the query:"gd_encoded_params": { "dynamic_params": { "input_source": { "type": "ads", "query": "SELECT 'client_A' AS client_id, schedule_title, 'MODE' AS param_name, 'specific mode' AS param_value" } } }To add dynamic parameters to the schedules named “main.rb” in all clients, do not explicitly specify
client_idin the query:"gd_encoded_params": { "dynamic_params": { "input_source": { "type": "ads", "query": "SELECT client_id, 'main.rb' AS schedule_title, 'MODE' AS param_name, 'specific mode' AS param_value" } } }
metric_format
The metric_format parameter lets you specify a custom number format for metrics in each client workspace. For example, you can set up different currency codes for client workspaces with data from different countries (USD for the clients operating in the USA, EUR for the clients operating in Germany, and so on).
For more information about the number formatting, see Formatting Numbers in Insights.
A custom format is applied to the metrics in a specific client workspace based on tags that you add to the metrics in advance. The custom format is applied everywhere where a number format is used in the GoodData Portal (see GoodData Portal). The custom format does not rewrite the format that is defined for a metric in a specific report/insight (for more information about setting a number format in a report/insight, see Formatting Table Values Using the Configuration Pane and Format Numbers).
You can also use the metric_format parameter in Rollout Brick.
Steps:
Add tags to the metrics that you want to apply a custom format to (see Add a Tag to a Metric). For example, you can use
format_#to tag metrics using the COUNT function,format_$to tag currency metrics,format_%to tag metrics with percentages.Create a table that maps the tags to number formats and the client IDs of the client workspaces where the number formats should be applied. Name the table columns
tag,format, andclient_id, respectively.tag format client_id format_# [>=1000000000]#,,,.0 B;
[>=1000000]#,,.0 M;
[>=1000]#,.0 K;
[>=0]#,##0;
[<0]-#,##0
client_id_best_foods format_% #,##0% client_id_zen_table format_% #,#0% client_id_best_foods The table can have more columns. Those extra columns will be ignored at processing.Save the table in the location where your input data is stored (see
input_sourcein Parameters):- If you use a data warehouse (for example, ADS, Snowflake or Redshift), save the table as a database table named
metric_formats. - If you use a file storage (for example, S3, Azure Blob Storage or a web location), save the table as a CSV file named
metric_formats.csv.
- If you use a data warehouse (for example, ADS, Snowflake or Redshift), save the table as a database table named
Create the JSON structure for the
metric_formatparameter, and add it as a parameter under theinput_sourceparameter (see Parameters). Themetric_formatparameter must contain a query for themetric_formatsdatabase table in the data warehouse or point to themetric_formats.csvfile in the file storage.The
metric_formatstable is located in a data warehouse. For example, in ADS:"input_source": { "type": "ads", "query": "SELECT DISTINCT client_id, segment_id, project_title FROM lcm_workspace;", "metric_format": { "query": "SELECT client_id, tag, format FROM metric_formats;" } }Or, in Redshift:
"input_source": {
  "type": "redshift",
  "query": "SELECT client_id, segment_id, project_title FROM lcm_workspace;",
  "metric_format": {
    "query": "SELECT client_id, tag, format FROM metric_formats;"
  }
}
The
metric_formats.csvfile is located in a file storage.
metric_format parameter must point to the metric_formats.csv file in the file storage. The name of this parameter must be the same as the name of the parameter that points to the file with the source data. For example, it is file for an S3 bucket and url for a web location (see Types of Input Data Sources). For example, in an S3 bucket:
``` text
"input_source": {
"type": "s3",
"file": "/data/upload/users.csv",
"metric_format": {
"file": "/data/upload/metric_formats.csv"
}
}
```
Or, in a web location:
``` text
"input_source": {
"type": "web",
"url": "https://files.acme.com/data/upload/users.csv",
"metric_format": {
"url": "https://files.acme.com/data/upload/metric_formats.csv"
}
}
```