Data Permissions
This article explains how to create and apply a data permission.
A data permission is a data access control that you apply to one or more users. The data permission is defined within a workspace and is based on the value of an attribute. When an attribute value is used as a data permission, the data returned in any query apply only to the querying user. For example, you can configure data permissions to filter data by user identifier, job title, or region.
A data permission can be applied to one or more users in the workspace to control the data that is visible to them.
Data permissions were formerly called Mandatory User Filters (MUF).
How Data Permissions Work
Imagine that your company has multiple departments: Engineering, Accounting, HR, Legal, Product Management, and more.
You want to create a report and you also want to define a filter for specific users: each user of the report should see only the data that pertains to their specific department, as the other data in the report does not apply to them and may, in fact, be sensitive.
The data permission should filter the report by a specific attribute element (attribute value).
Attribute = Department
Attribute element = Human Resources
You can define a data permissions filter based on attribute elements (attribute values) only. You cannot filter the contents of the report by a metric value.
Data Permissions and the Logical Data Model
At the technical level, a data permission is a hidden parameter/value pair that is passed to the database with every query initiated from the GoodData Portal to filter the returned data. This parameter value is retrieved for the user initiating the query from a designated attribute in the logical data model and is silently appended to each query that is submitted for the user.
For example, you want to filter an entire workspace by the region of the country. If you designate the Region attribute as your data permission, then all queries are filtered by the value of the attribute for the current user.
Data permissions function like a selected value or a wildcard in a dashboard filter, except for the following differences:
- The data permissions are hidden from the user.
- The user cannot modify the data permissions.
- The data permissions are applied to the entire workspace for the user, and the user is unaware of any data that does not pass the filter.
Data permissions are applied at the highest table of a logical data model. For example, if you want to filter the data model by an attribute named Client Name, you need to create a data permission for each instance of this attribute. If the dataset includes two companies, Business A and Business B, then each company requires its own attribute value.
To support use of data permissions, you must add an attribute for each data permission to each dataset in your logical data model where you want to filter the data based on the attribute’s values. For each dataset, add the attribute to the highest point in the hierarchy where you want to apply filtering. For example, imagine that your hierarchy looks like the following:
Accounts -> Opportunity -> Opportunity Line Item
By adding the attribute to Accounts, you are enabling data filtration by user for the Accounts dataset only. If you want to filter data in the Opportunity and Opportunity Line Item datasets, you must add the attribute to them, too.
Data Permissions and Datasets
When you define a data permission for one attribute in a dataset, it impacts the available values in the other attributes of the dataset only if a report where those values are used also contains a metric.
Imagine that your dataset looks like the following:
| Company | City | State | Amount | Quantity |
|---|---|---|---|---|
| Trike | Portland | Oregon | 50 | 35 |
| JJ Dean, Inc. | Portland | Maine | 100 | 20 |
| U. Gene, Inc. | Eugene | Oregon | 90 | 40 |
| Sactown Example, Inc. | Sacramento | California | 110 | 45 |
You create a data permission for some user that looks like the following:
State = "Oregon"
Because the attribute applies across all attributes in the dataset, the values for the City attribute are limited to Portland and Eugene only, and the user will be able to see the data related only to the Oregon state:
| Company | City | State | Amount | Quantity |
|---|---|---|---|---|
| Trike | Portland | Oregon | 50 | 35 |
| U. Gene, Inc. | Eugene | Oregon | 90 | 40 |
The drop-down would not contain the Sacramento value, because it is not part of the Oregon set of values and therefore is not part of the hierarchy of city and state information for the state of Oregon. Note that there is another row with an instance of Portland in the data. However, because this instance is associated with the state of Maine, that row of data is filtered out of the results.
Data permissions impact the available values in the other attributes of the dataset only if a report where those values are used also contains a metric. If a user views or creates a report that simply lists all the city names and no metrics is present, the user will be able to see the values of all the other cities in the report (including those outside Oregon).
This propagation simplifies the development and maintenance of data permissions. Instead of creating multiple filter expressions to manage this hierarchy, you create only one expression.
By default, data permissions propagate only to the connection point of the specified dataset and other datasets linked to it.
You can enable the propagation of the data permissions inside the specified dataset (to all its attributes, not only the connection point) via the gray pages:
In GoodData, terms workspace and project denote the same entity. For example, project ID is exactly the same as workspace ID. See Find the Workspace ID.
https://secure.gooddata.com/gdc/md/{workspace_id}/service/datasetMufs
Propagation of date permissions to the attributes inside the linked datasets is not available.
Use Data Permissions
To use data permissions, follow these steps:
Assign the data permission to one or multiple users.
After you have created and assigned the data permissions to the current set of users in the workspace, you may want to apply the data permissions to new users that you invite to the workspace. For more information about this use case, see Inviting Users with Pre-Applied Data Permissions.(Optional) Detach data permissions from a user.
Create an Expression Statement for a Data Permission
To create an expression statement for the data permission, use the identifiers of the attributes and the attribute values. For information about how to acquire the identifiers of the attributes and the attribute values, see Determine the Attribute Value ID.
The expression statement can be up to 100,000 characters long.
The general format is the following:
[attribute_uri] OPERATOR [attribute_value_uri]
You can use the following operators in the expression:
=<>INNOT INAND
[attribute_uri] = [attribute_value_uri]

[attribute_uri] <> [attribute_value_uri]

[attribute_uri] IN ( [attribute_value_1_uri], [attribute_value_2_uri], ... )

[attribute_uri] NOT IN ( [attribute_value_1_uri], [attribute_value_2_uri], ... )

[attribute_1_uri] = [attribute_1_value_uri] AND [attribute_2_uri] = [attribute_2_value_uri]
( [attribute_1_uri] = [attribute_1_value_uri] ) AND ( [attribute_2_uri] = [attribute_2_value_uri] )
The OR operator is not allowed.
Example: In the following example, the left-hand side of the expression returns the current value of the attribute, which is compared to a specified value of the attribute in the right-hand side (for example, Region=West).
[/gdc/md/{workspace_id}/obj/{attribute_id}]=[/gdc/md/{workspace_id}/obj/{attribute_id}/elements?id={attribute_value_id}]
With actual data, the expression statement may look like the following:
[/gdc/md/e863ii0azrnng2zt4fuu81ifgqtyeoj21/obj/34567]=[/gdc/md/e863ii0azrnng2zt4fuu81ifgqtyeoj21/obj/34567/elements?id=7654321]
Create a Data Permission Object
To create data permission objects in a workspace, you must be an administrator of that workspace.
This procedure assumes that you access your workspaces at https://secure.gooddata.com/.
If you are a white-labeled customer, replace secure.gooddata.com with your white-labeled domain in the procedure steps.
Steps:
Use the API for creating data permissions to create the data permission object:
API resource:
https://secure.gooddata.com/gdc/md/{workspace_id}/objMethod:
POSTRequest body:
{
  "userFilter": {
    "content": {
      "expression": "{data_permission_expression_statement}"
    },
    "meta": {
      "category": "userFilter",
      "title": "{data_permission_name}"
    }
  }
}
The API returns an HTTP status code of 200 and the URI of the newly created data permission object:
https://secure.gooddata.com/gdc/md/{workspace_id}/obj/{data_permission_id}Use the API to verify that the data permission object has been created:
API resource:
https://secure.gooddata.com/gdc/md/{workspace_id}/obj/{data_permission_id}Method:
GET
The API returns the data permission JSON structure.
Assign the Data Permission to One or Multiple Users
You can assign the same data permission to multiple users.
You can specify multiple data permissions for one user. Data permissions are applied using the AND operator if multiple data permission objects are assigned.
This procedure assumes that you access your workspaces at https://secure.gooddata.com/.
If you are a white-labeled customer, replace secure.gooddata.com with your white-labeled domain in the procedure steps.
Steps:
In GoodData, terms workspace and project denote the same entity. For example, project ID is exactly the same as workspace ID. See Find the Workspace ID.
Use the API for listing users in the workspace to acquire the IDs of the users whom you want to assign the data permission to:
API resource:
https://secure.gooddata.com/gdc/projects/{workspace_id}/usersMethod:
GET
The API returns the list of workspace users, from which you can choose those you want to assign the data permission to.
Use the API for assigning data permissions to a user to assign the data permission that you have created to the user.
When assigning data permissions to a user, specify all data permissions for that user. The data permissions that you are submitting in the request overwrite all the data permissions currently assigned to the user, if any. You cannot add another data permission to the currently assigned data permissions or update a subset of the user’s data permissions. For this reason, it may be useful to maintain an external record of the data permissions for each user. To review a user’s data permissions, use the API for listing data permissions for a user.API resource:
https://secure.gooddata.com/gdc/md/{workspace_id}/userfiltersMethod:
POSTRequest body:
{
  "userFilters": {
    "items": [
      {
        "user": "/gdc/account/profile/{profile_id}",
        "userFilters": [
          "/gdc/md/{workspace_id}/obj/{data_permission_id}"
        ]
      }
    ]
  }
}
The API returns an HTTP status code of 200 and the status information.
{
  "userFiltersUpdateResult": {
    "failed": [],
    "successful": [
      "/gdc/account/profile/{profile_id}"
    ]
  }
}
The filter has been applied to the user. Any report that is passed back to the user should have this filter applied to it.
Repeat Step 2 for all the users whom you want to assign the data permission to.
Dissociate Data Permissions from a User
When you dissociate data permissions from a user, the data permissions are detached from the user but remain in the system as objects.
This procedure assumes that you access your workspaces at https://secure.gooddata.com/.
If you are a white-labeled customer, replace secure.gooddata.com with your white-labeled domain in the procedure steps.
Steps:
Use the API for listing users in the workspace to acquire the IDs of the users whom you want to dissociate data permission from:
API resource:
https://secure.gooddata.com/gdc/projects/{workspace_id}/usersMethod:
GET
The API returns the list of workspace users, from which you can choose those you want to dissociate data permission from.
Use the API for assigning data permissions to a user to dissociate data permission from the user.
API resource:
https://secure.gooddata.com/gdc/md/{workspace_id}/userfiltersMethod:
POSTRequest body: Leave the
userFiltersparameter empty.{ "userFilters": { "items": [ { "user": "/gdc/account/profile/{profile_id}", "userFilters": [] } ] } }
The API returns an HTTP status code of 200 and the status information.
{
  "userFiltersUpdateResult": {
    "failed": [],
    "successful": [
      "/gdc/account/profile/{profile_id}"
    ]
  }
}
All the data permissions got dissociated from the user. The user has no data permissions assigned.
Using the Gray Pages for Managing a User’s Data Permissions
Instead of using the API, you can use the gray pages for assigning data permissions to the user and dissociating the data permissions from the user:
https://secure.gooddata.com/gdc/md/{workspace_id}/userfilters
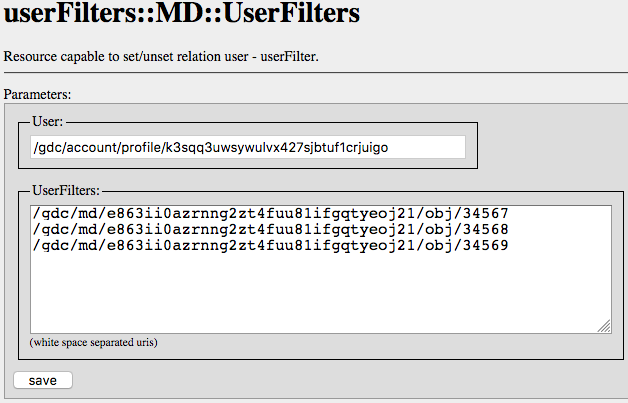
- When assigning data permissions to a user, specify all data permissions for that user. The data permissions that you are submitting in the request overwrite all the data permissions currently assigned to the user, if any. You cannot add another data permission to the currently assigned data permissions or update a subset of the user’s data permissions. For this reason, it may be useful to maintain an external record of the data permissions for each user. To review a user’s data permissions, use the API for listing data permissions for a user.
- To dissociate all data permissions from a user, leave the UserFilters field empty, and submit a request.