Create a Data Source
A Data Source is an entity that holds the properties (location and access credentials) of the source of your data.
- If you integrate data from data warehouses, a Data Source stores the properties of a data warehouse and the prefix for the Output Stage if the Output Stage is used.
- If you integrate data from object storage services, a Data Source stores the properties of an object storage service.
For more information, see Direct Data Distribution from Data Warehouses and Object Storage Services.
Data Sources exist in the context of a domain. You do not have to have access to any workspace to be able to view the Data Sources that exist in your domain.
You can also create Data Sources via the API.
Create a Data Source for an Azure Blob Storage Account
Steps:
On the top navigation bar, select Data. The LDM Modeler opens.
Click Sources.
Click the Azure Blob Storage icon, or click Add data in the left pane and select Azure Blob Storage. The connection parameter screen appears.
Enter the name of the Data Source. The alias will be automatically generated from the name. You can update it, if needed.
The alias is a reference to the Data Source, unique within the domain. The alias is used when exporting and importing the data pipeline (see Export and Import the Data Pipeline).Enter the connection string and the path to the source data. For more information, see GoodData-Azure Blob Storage Integration Details.
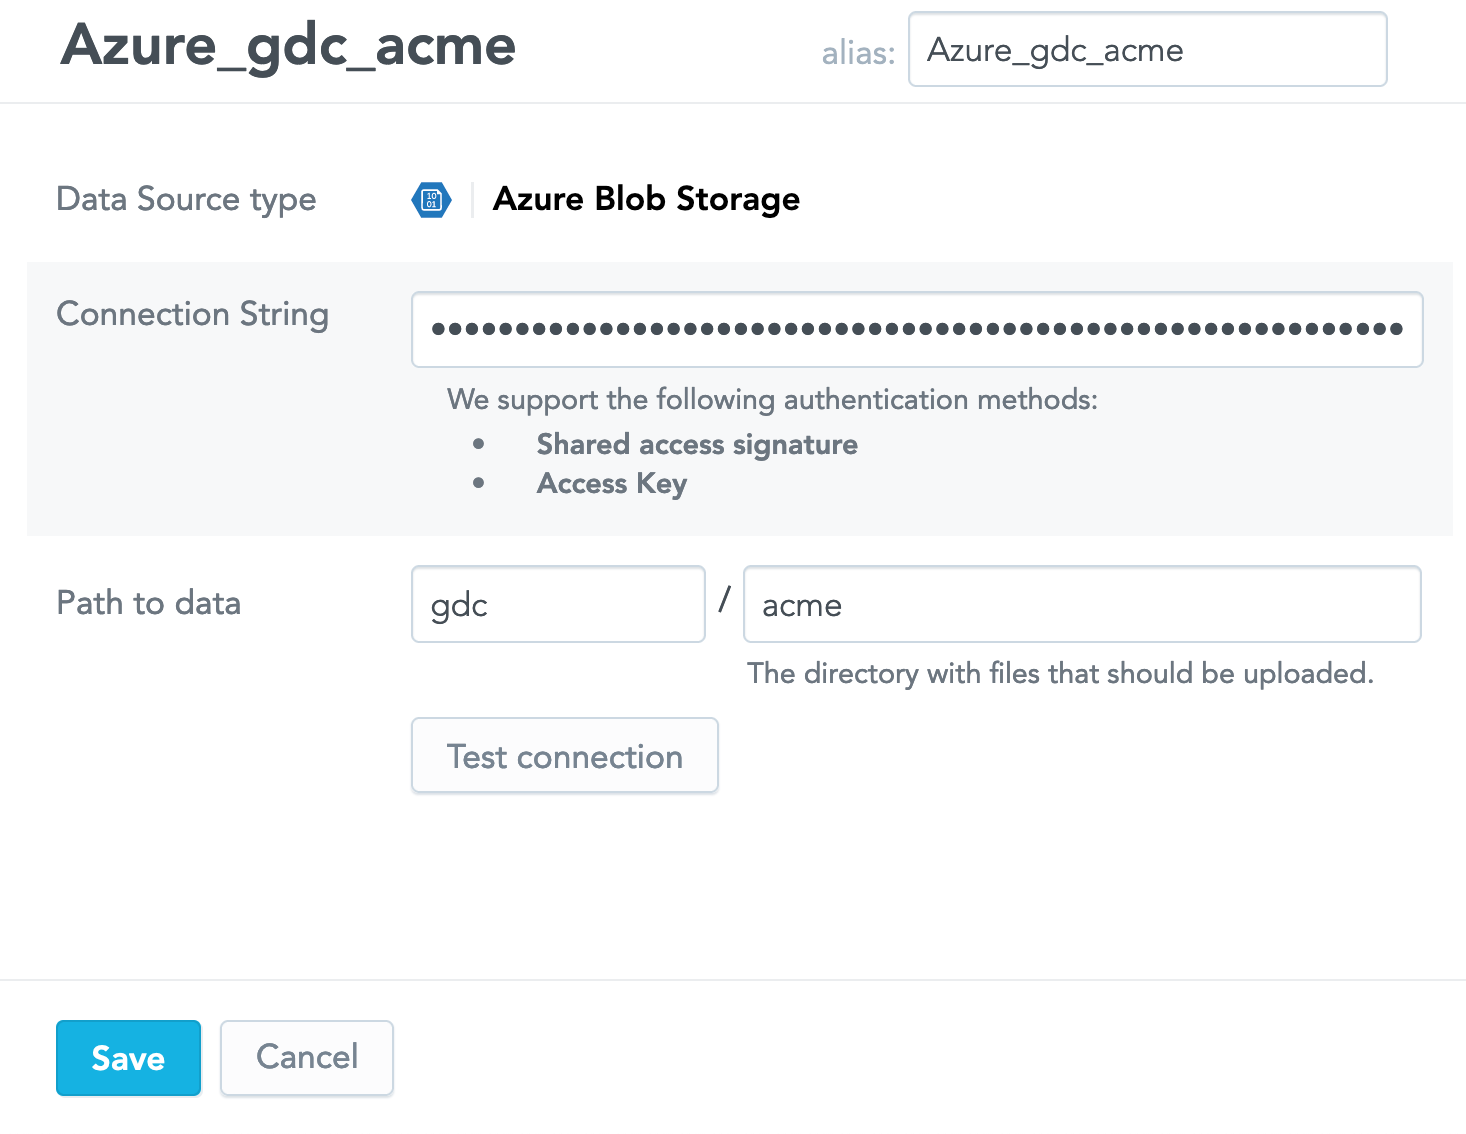
Click Test connection. If the connection succeeds, the confirmation message appears.
Click Save. The Data Source is created. The screen with the connection details opens.
Create a Data Source for an Azure SQL Database
Steps:
On the top navigation bar, select Data. The LDM Modeler opens.
Click Sources.
Click the Azure SQL icon, or click Add data in the left pane and select Azure SQL. The connection parameter screen appears.
Enter the name of the Data Source. The alias will be automatically generated from the name. You can update it, if needed.
The alias is a reference to the Data Source, unique within the domain. The alias is used when exporting and importing the data pipeline (see Export and Import the Data Pipeline).Enter the details of your connection to the Azure SQL Database. For more information, see GoodData-Azure SQL Database Integration Details.
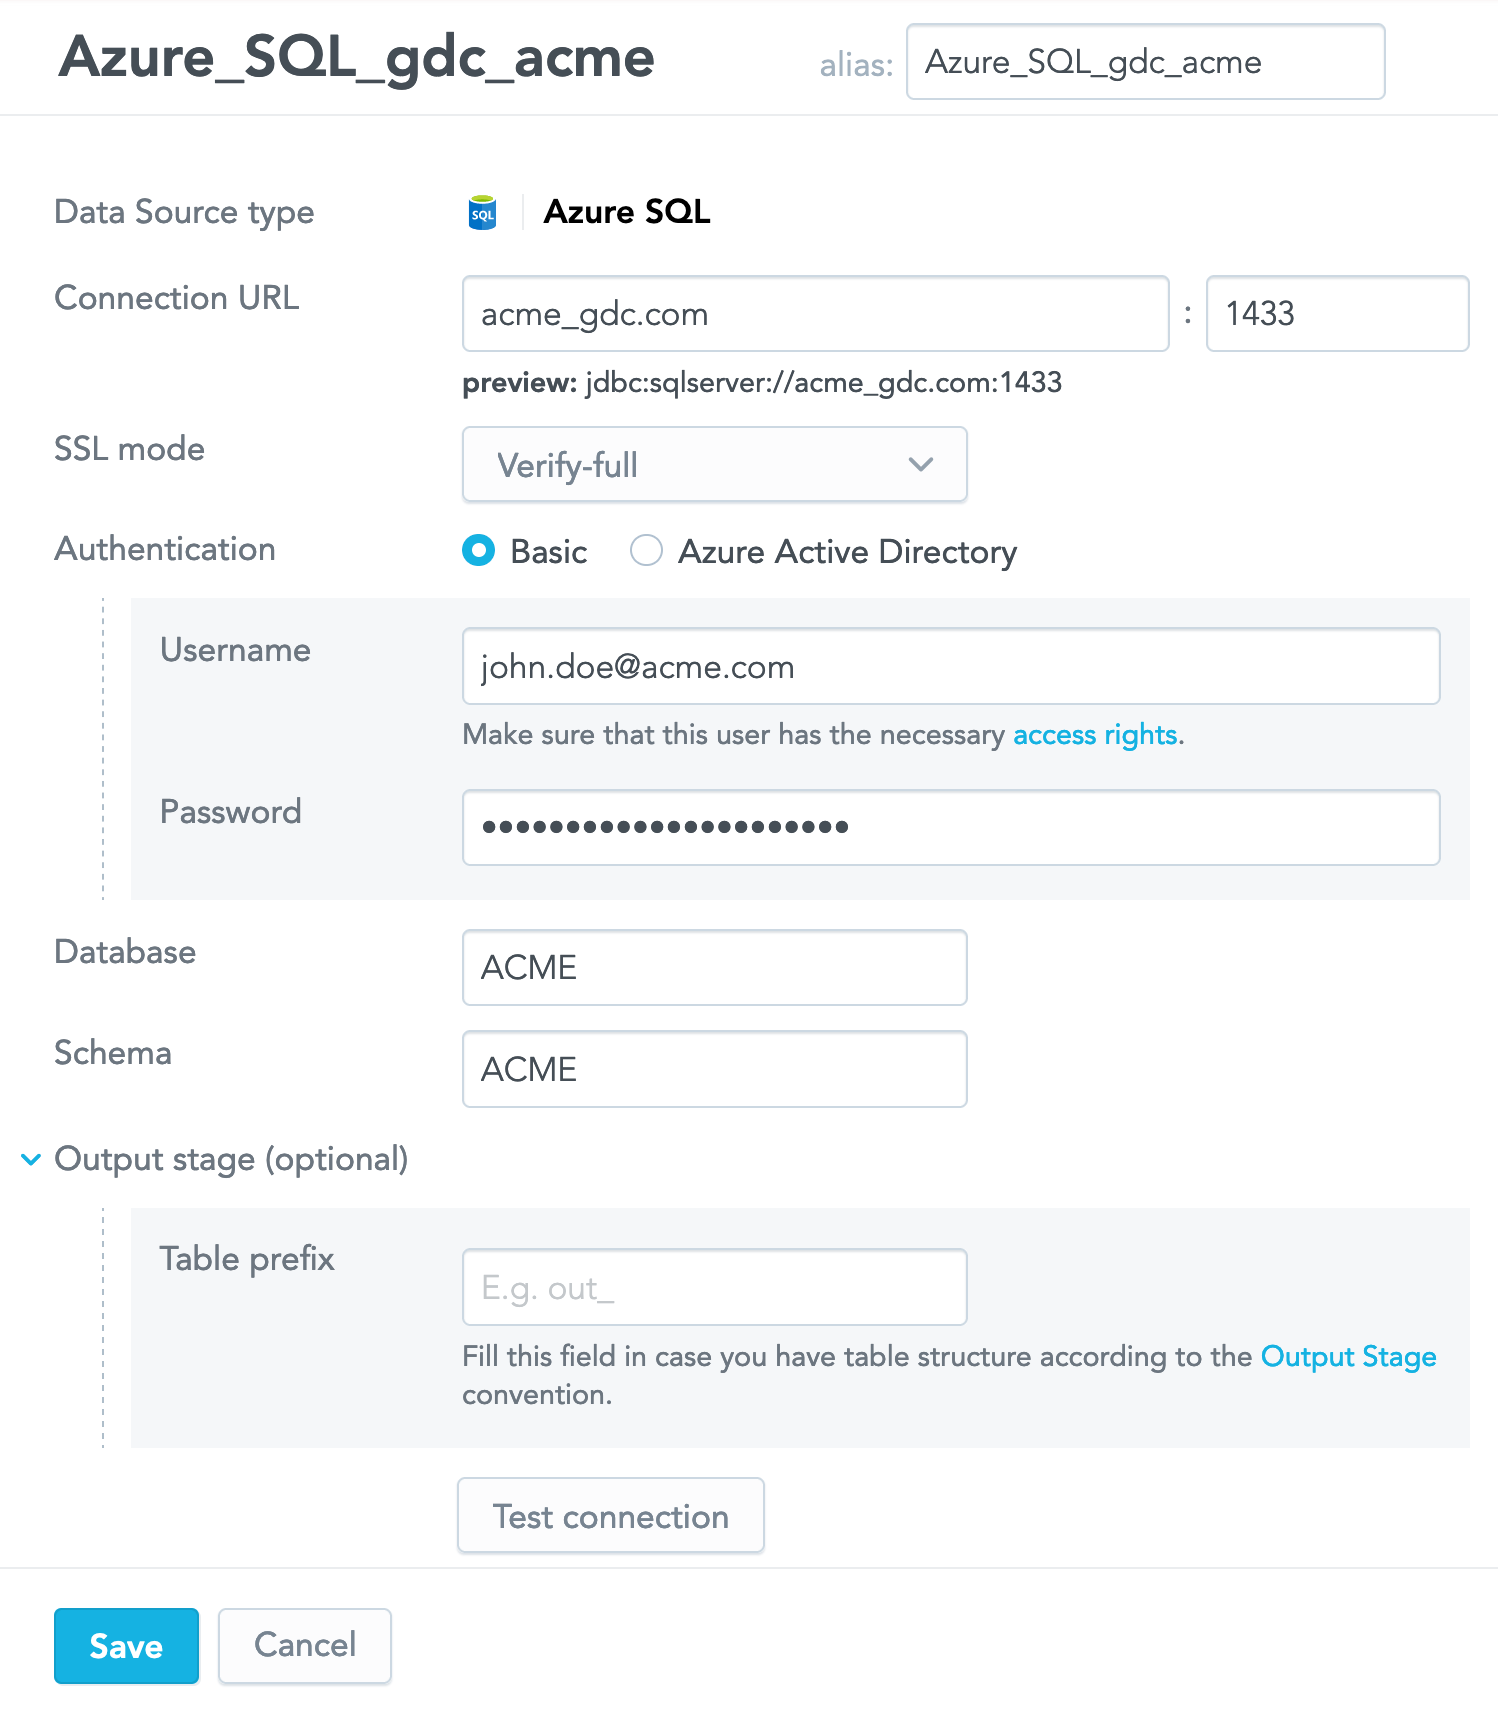
(Optional) If you plan to use the Output Stage (see Direct Data Distribution from Data Warehouses and Object Storage Services), enter the prefix that will be used for the Output Stage tables and views.
Click Test connection. If the connection succeeds, the confirmation message appears.
Click Save. The Data Source is created. The screen with the connection details opens.
Create a Data Source for an Azure Synapse Analytics Service
Steps:
On the top navigation bar, select Data. The LDM Modeler opens.
Click Sources.
Click the Synapse SQL icon, or click Add data in the left pane and select Synapse SQL. The connection parameter screen appears.
Enter the name of the Data Source. The alias will be automatically generated from the name. You can update it, if needed.
The alias is a reference to the Data Source, unique within the domain. The alias is used when exporting and importing the data pipeline (see Export and Import the Data Pipeline).Enter the details of your connection to the Azure Synapse Analytics service. For more information, see GoodData-Azure Synapse Analytics Integration Details.
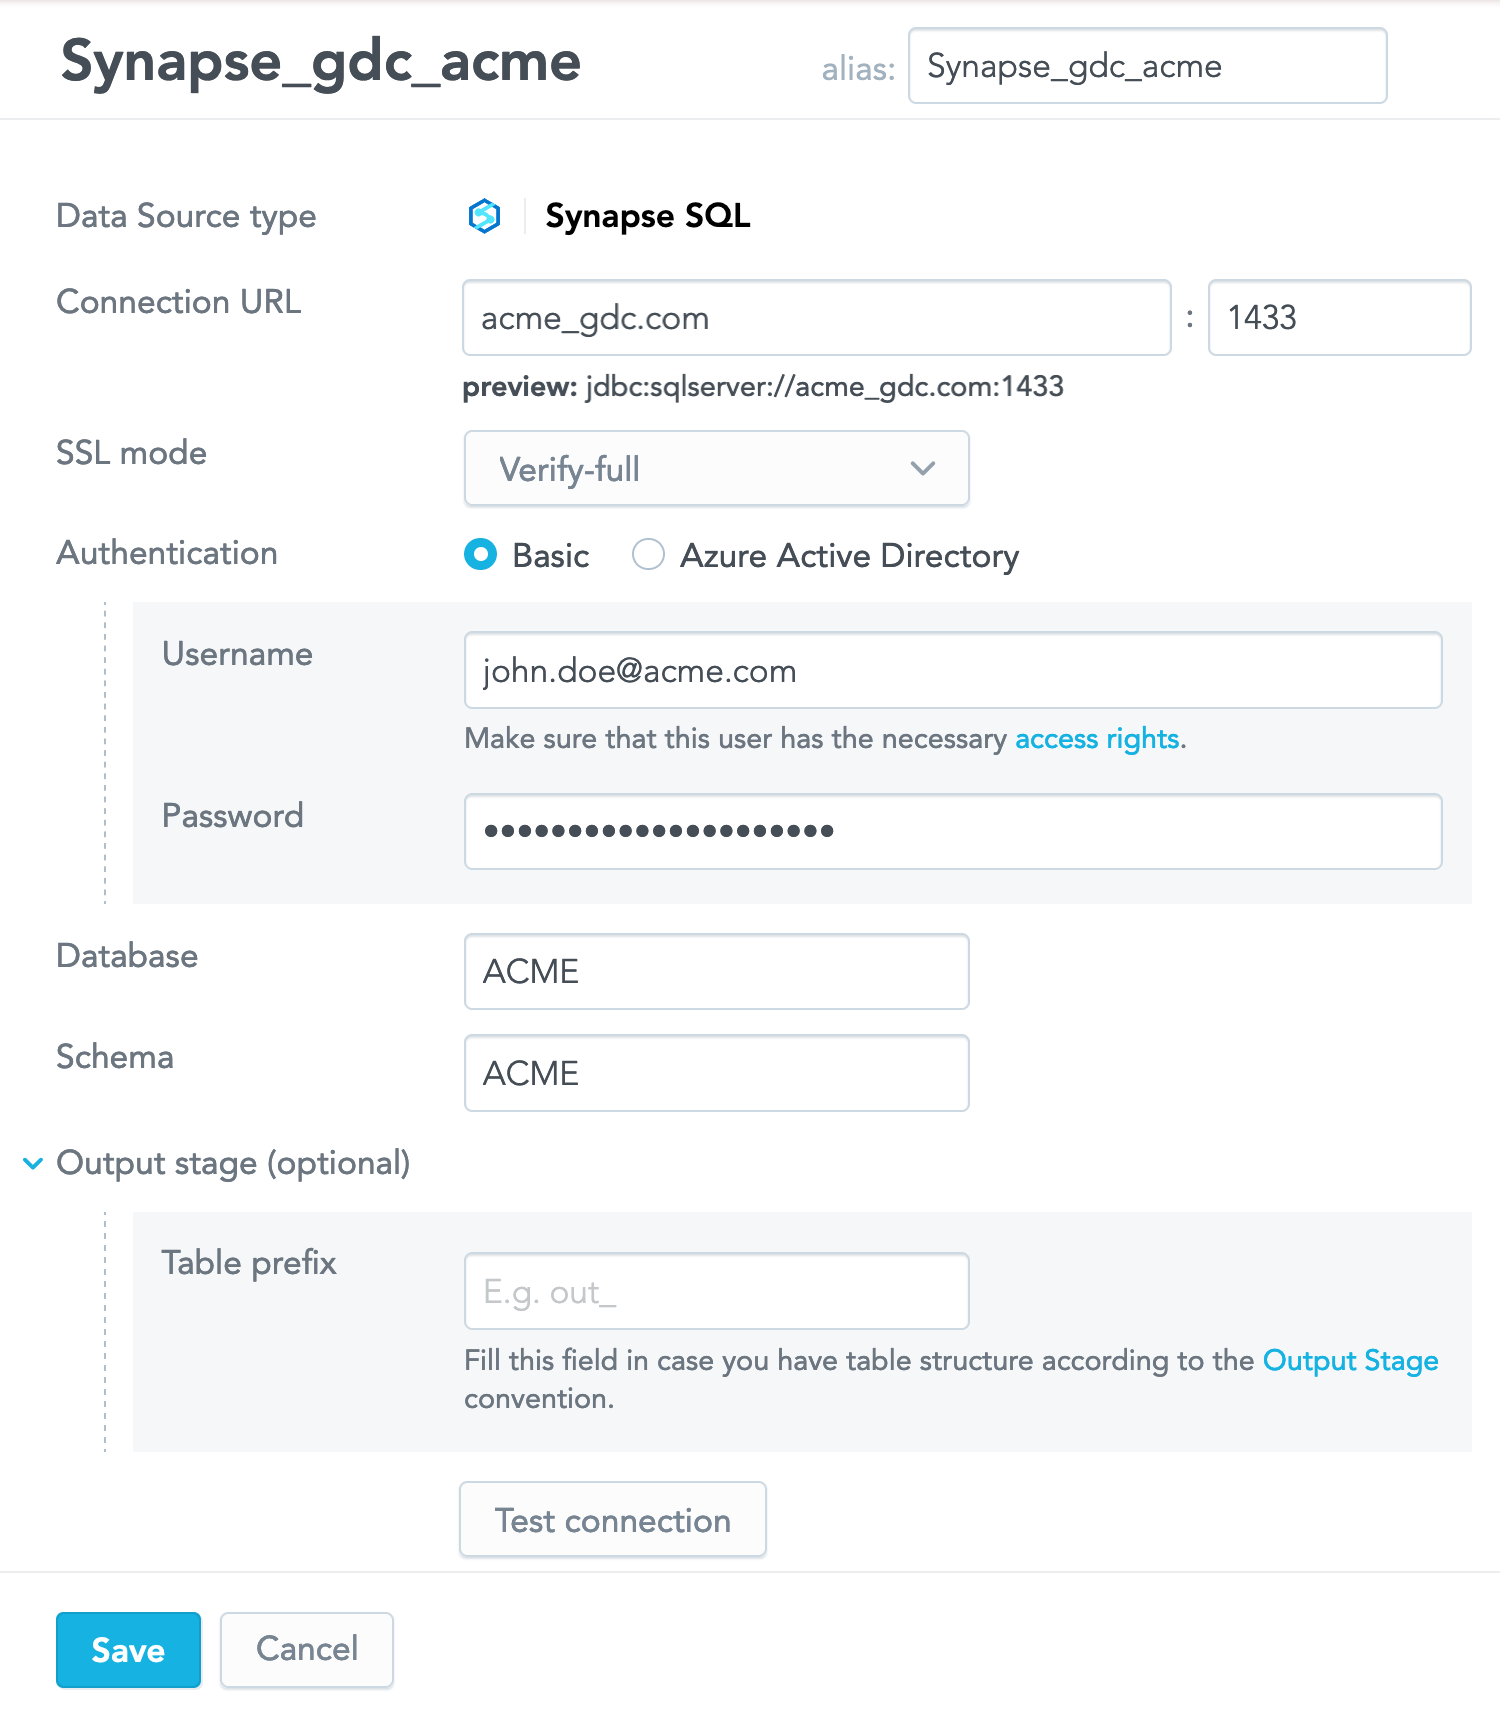
(Optional) If you plan to use the Output Stage (see Direct Data Distribution from Data Warehouses and Object Storage Services), enter the prefix that will be used for the Output Stage tables and views.
Click Test connection. If the connection succeeds, the confirmation message appears.
Click Save. The Data Source is created. The screen with the connection details opens.
Create a Data Source for a BigQuery Project
When creating a Data Source for a BigQuery project, you have the following options:
- Upload the service account key file.
- Fill in all the connection details manually.
For more information, see GoodData-BigQuery Integration Details.
Steps:
On the top navigation bar, select Data. The LDM Modeler opens.
Click Sources.
Click the BigQuery icon, or click Add data in the left pane and select Google BigQuery. You are prompted to provide a service account key file.
Do one of the following:
- If you have a service account key, click Browse and navigate to the file and upload it.
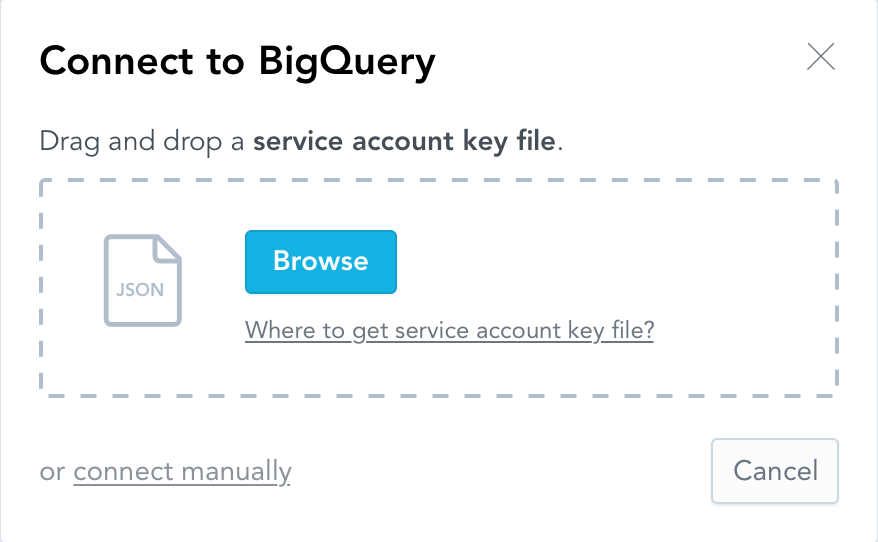
- If you want to enter the details manually, click connect manually and enter the details of your connection to the BigQuery project.
- If you have a service account key, click Browse and navigate to the file and upload it.
Enter the name of the Data Source. The alias will be automatically generated from the name. You can update it, if needed.
The alias is a reference to the Data Source, unique within the domain. The alias is used when exporting and importing the data pipeline (see Export and Import the Data Pipeline).
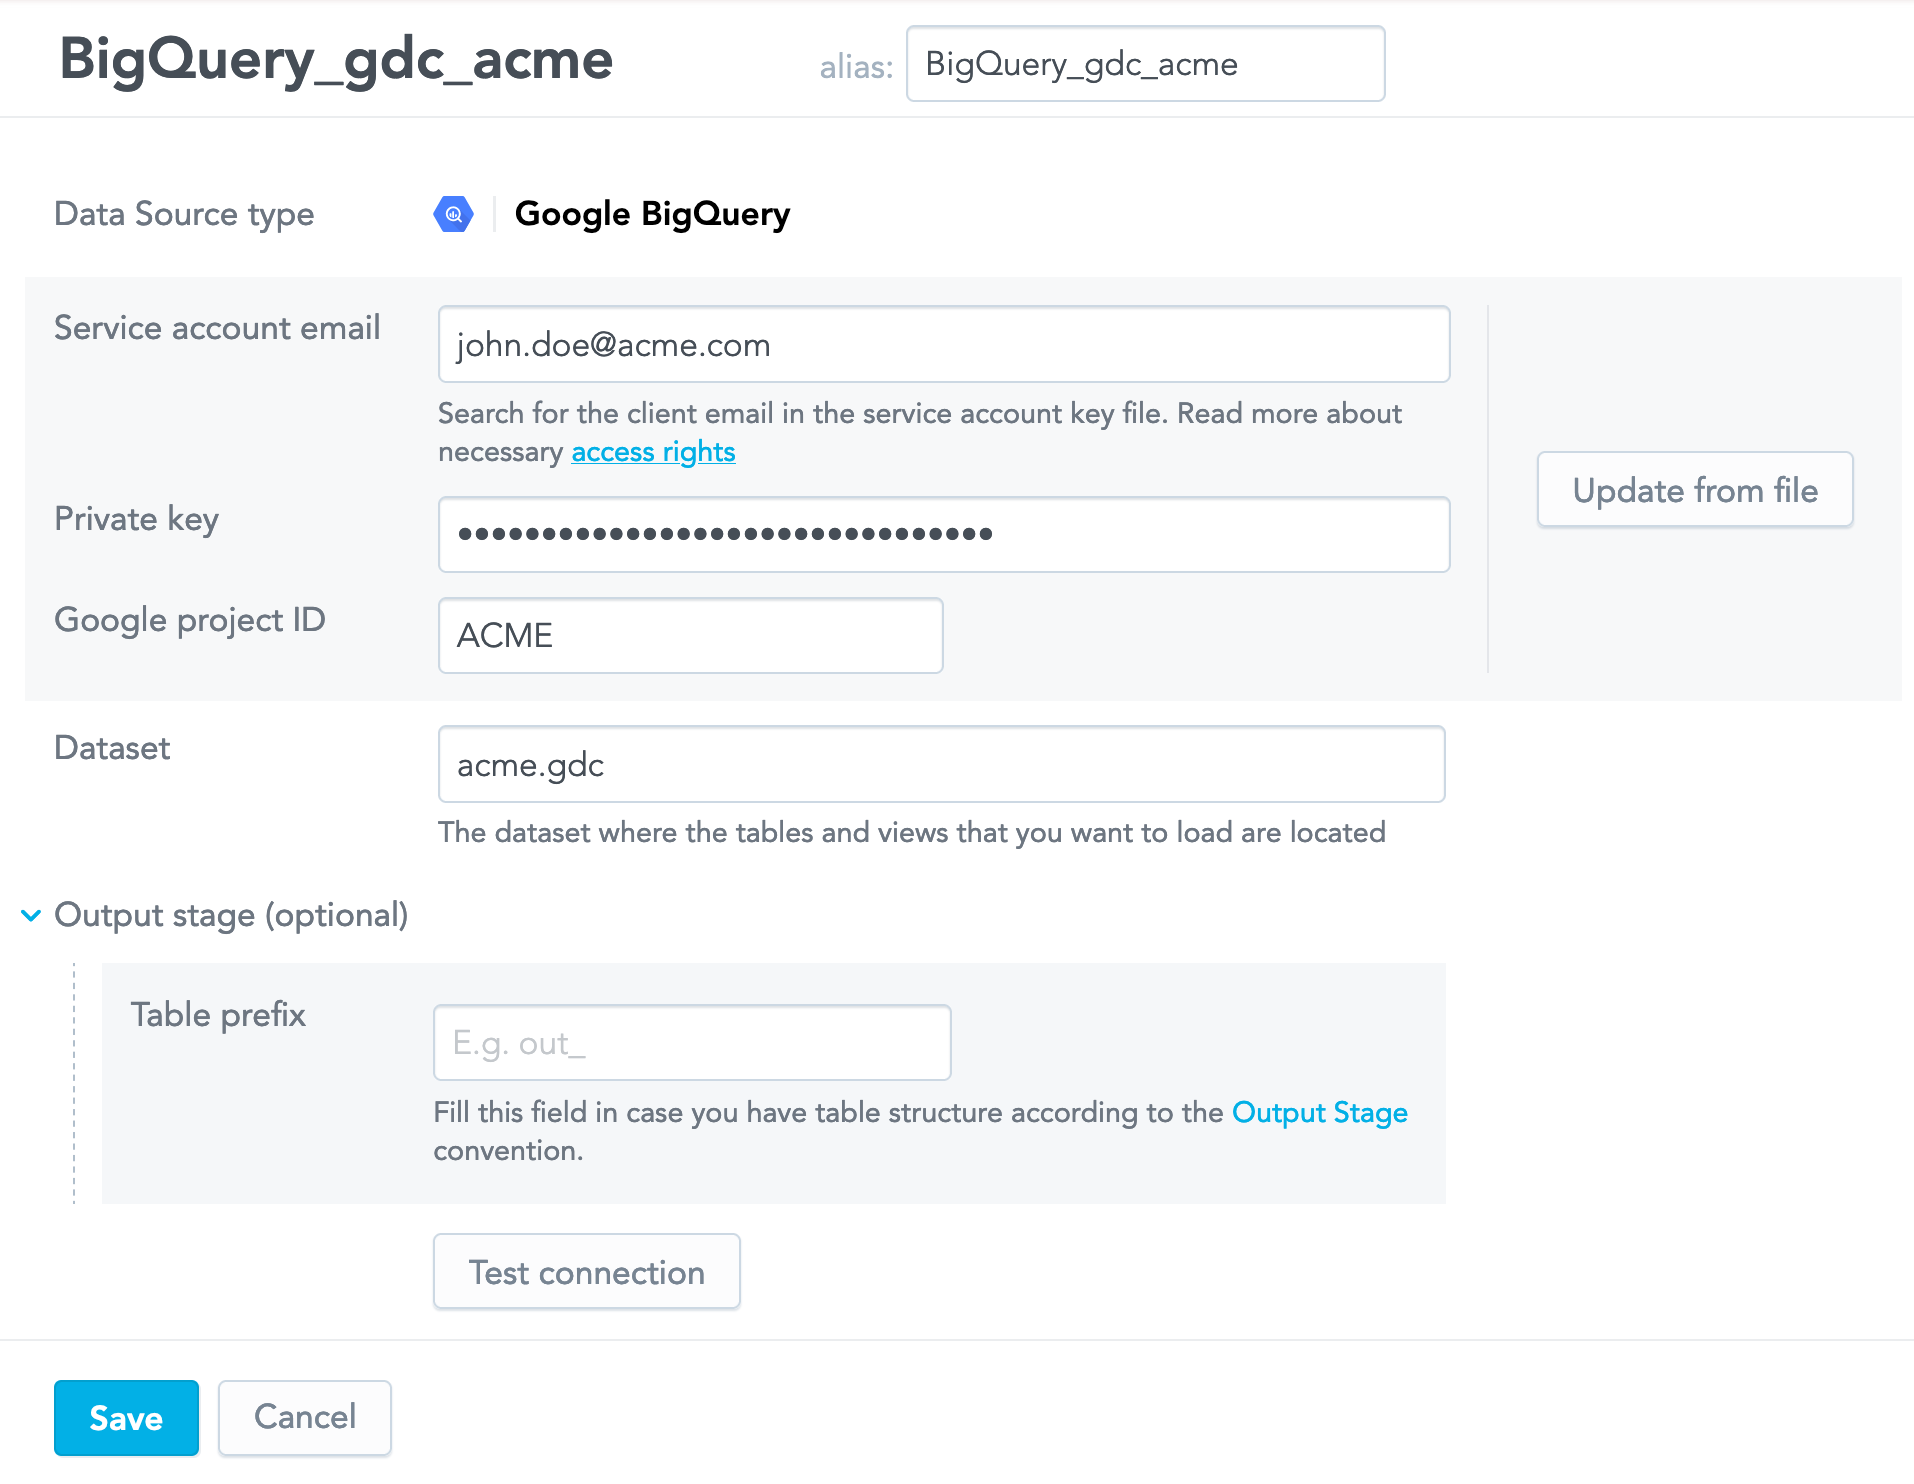
(Optional) If you plan to use the Output Stage (see Direct Data Distribution from Data Warehouses and Object Storage Services), enter the prefix that will be used for the Output Stage tables and views.
Click Test connection. If the connection succeeds, the confirmation message appears.
Click Save. The Data Source is created. The screen with the connection details opens.
Create a Data Source for a Microsoft SQL Server
Steps:
On the top navigation bar, select Data. The LDM Modeler opens.
Click Sources.
Click the Microsoft SQL Server icon, or click Add data in the left pane and select Microsoft SQL Server. The connection parameter screen appears.
Enter the name of the Data Source. The alias will be automatically generated from the name. You can update it, if needed.
The alias is a reference to the Data Source, unique within the domain. The alias is used when exporting and importing the data pipeline (see Export and Import the Data Pipeline).Enter the details of your connection to the Microsoft SQL Server. For more information, see GoodData-Microsoft SQL Server Integration Details.
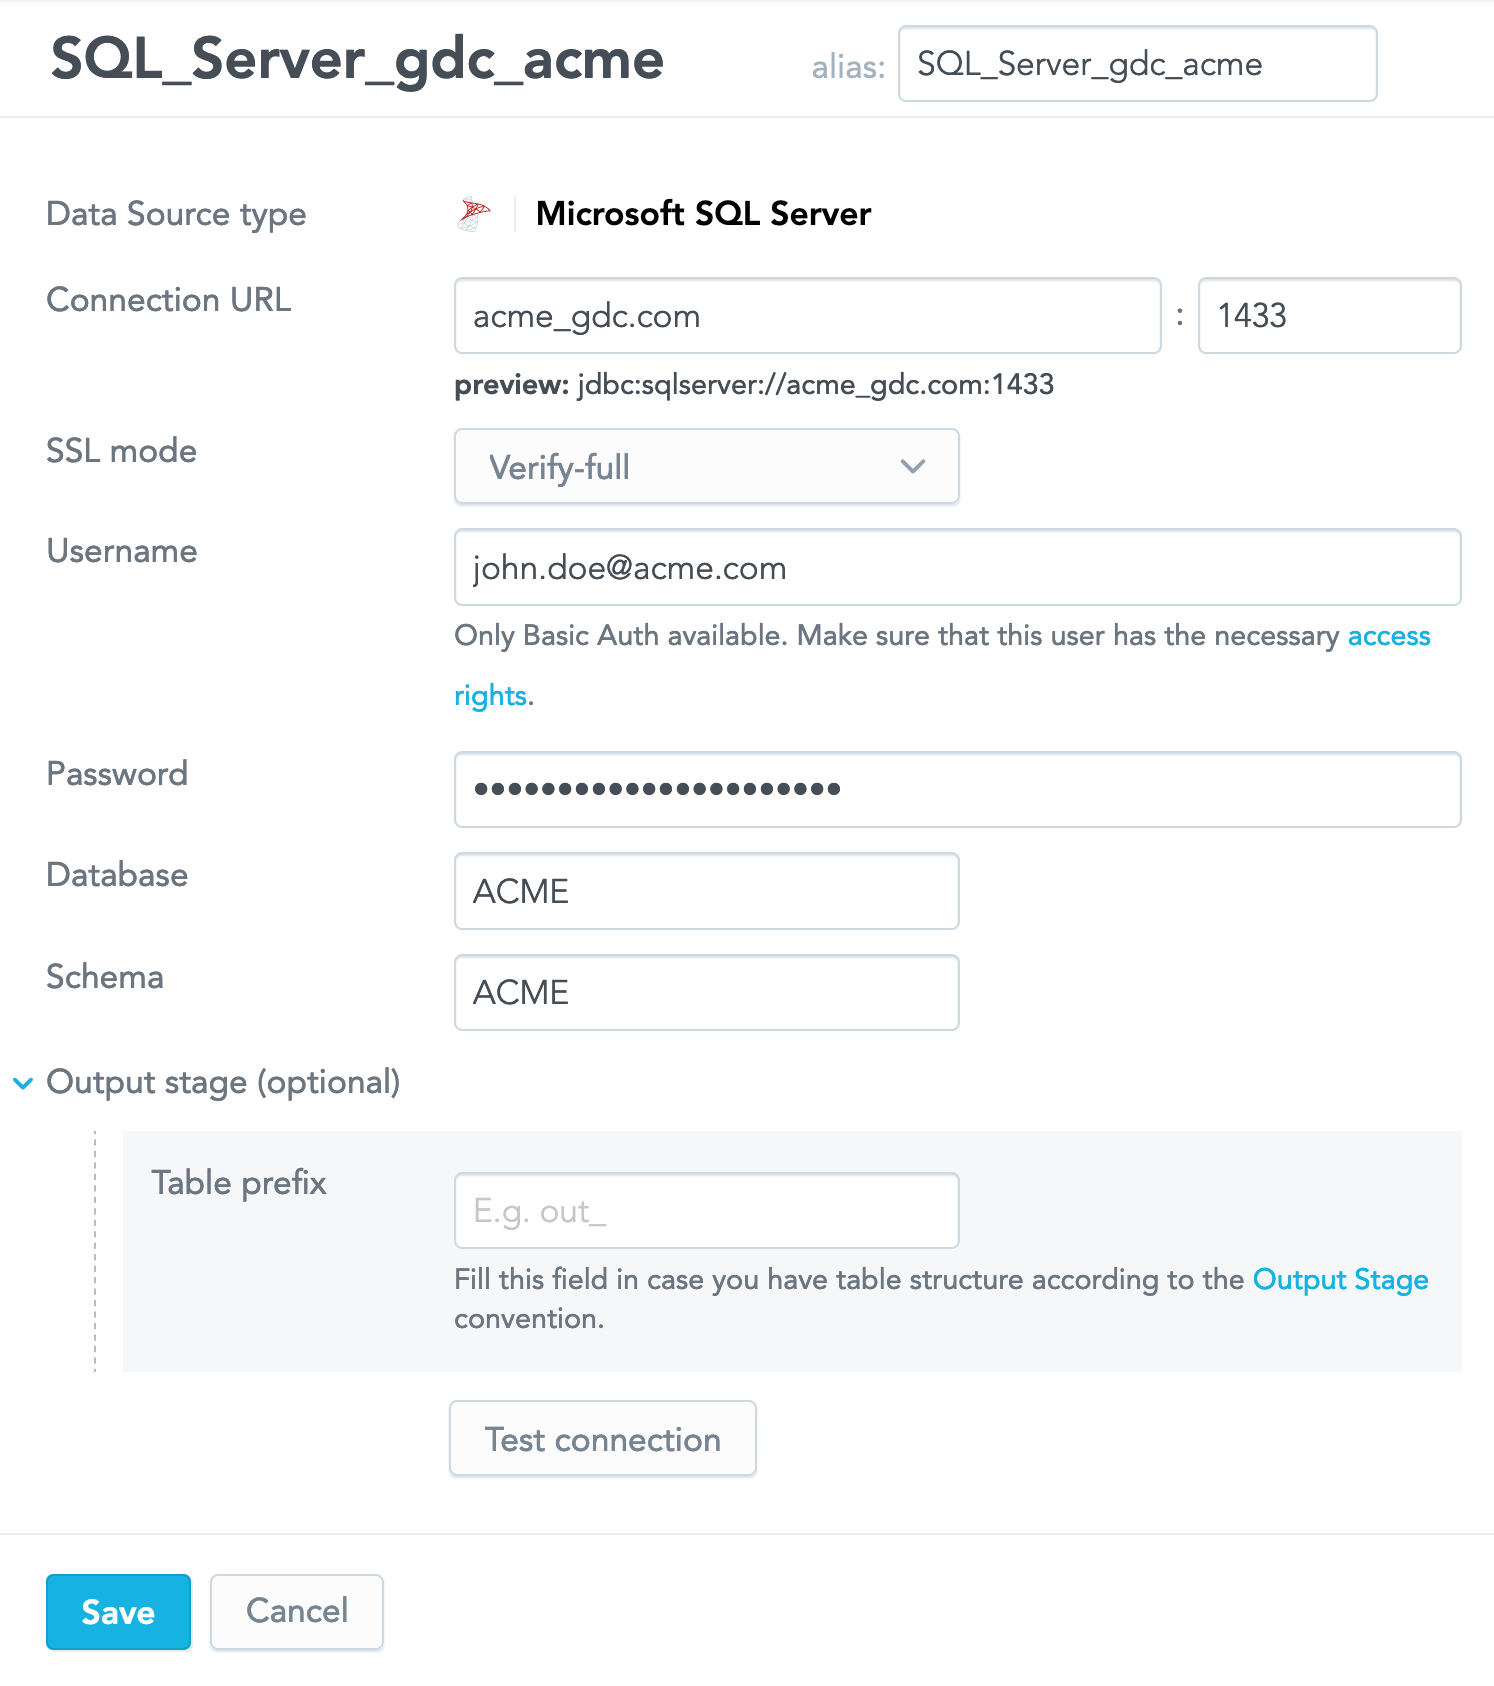
(Optional) If you plan to use the Output Stage (see Direct Data Distribution from Data Warehouses and Object Storage Services), enter the prefix that will be used for the Output Stage tables and views.
Click Test connection. If the connection succeeds, the confirmation message appears.
Click Save. The Data Source is created. The screen with the connection details opens.
Create a Data Source for the MongoDB Connector for BI
Steps:
On the top navigation bar, select Data. The LDM Modeler opens.
Click Sources.
Click the MongoDB icon, or click Add data in the left pane and select MongoDB. The connection parameter screen appears.
Enter the name of the Data Source. The alias will be automatically generated from the name. You can update it, if needed.
The alias is a reference to the Data Source, unique within the domain. The alias is used when exporting and importing the data pipeline (see Export and Import the Data Pipeline).Enter the details of your connection to the MySQL database. For more information, see GoodData-MongoDB BI Connector Integration Details.
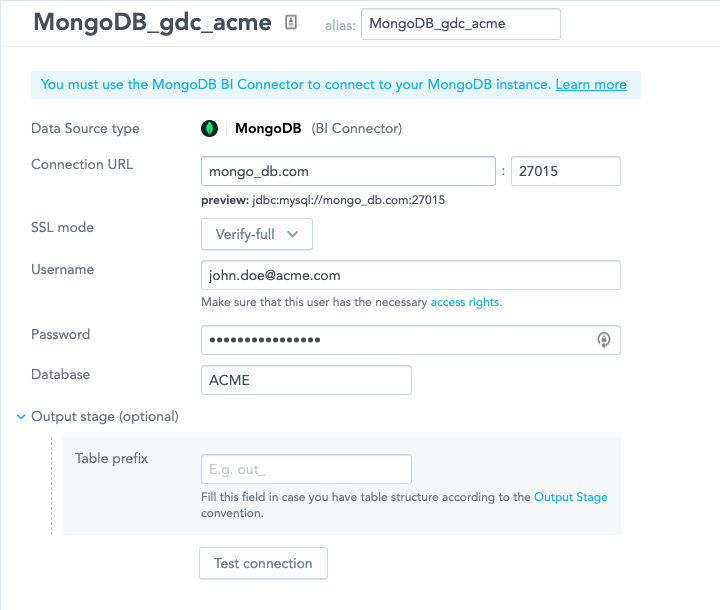
(Optional) If you plan to use the Output Stage (see Direct Data Distribution from Data Warehouses and Object Storage Services), enter the prefix that will be used for the Output Stage tables and views.
Click Test connection. If the connection succeeds, the confirmation message appears.
Click Save. The Data Source is created. The screen with the connection details opens.
Create a Data Source for a MySQL Database
Steps:
On the top navigation bar, select Data. The LDM Modeler opens.
Click Sources.
Click the MySQL icon, or click Add data in the left pane and select MySQL. The connection parameter screen appears.
Enter the name of the Data Source. The alias will be automatically generated from the name. You can update it, if needed.
The alias is a reference to the Data Source, unique within the domain. The alias is used when exporting and importing the data pipeline (see Export and Import the Data Pipeline).Enter the details of your connection to the MySQL database. For more information, see GoodData-MySQL Integration Details.
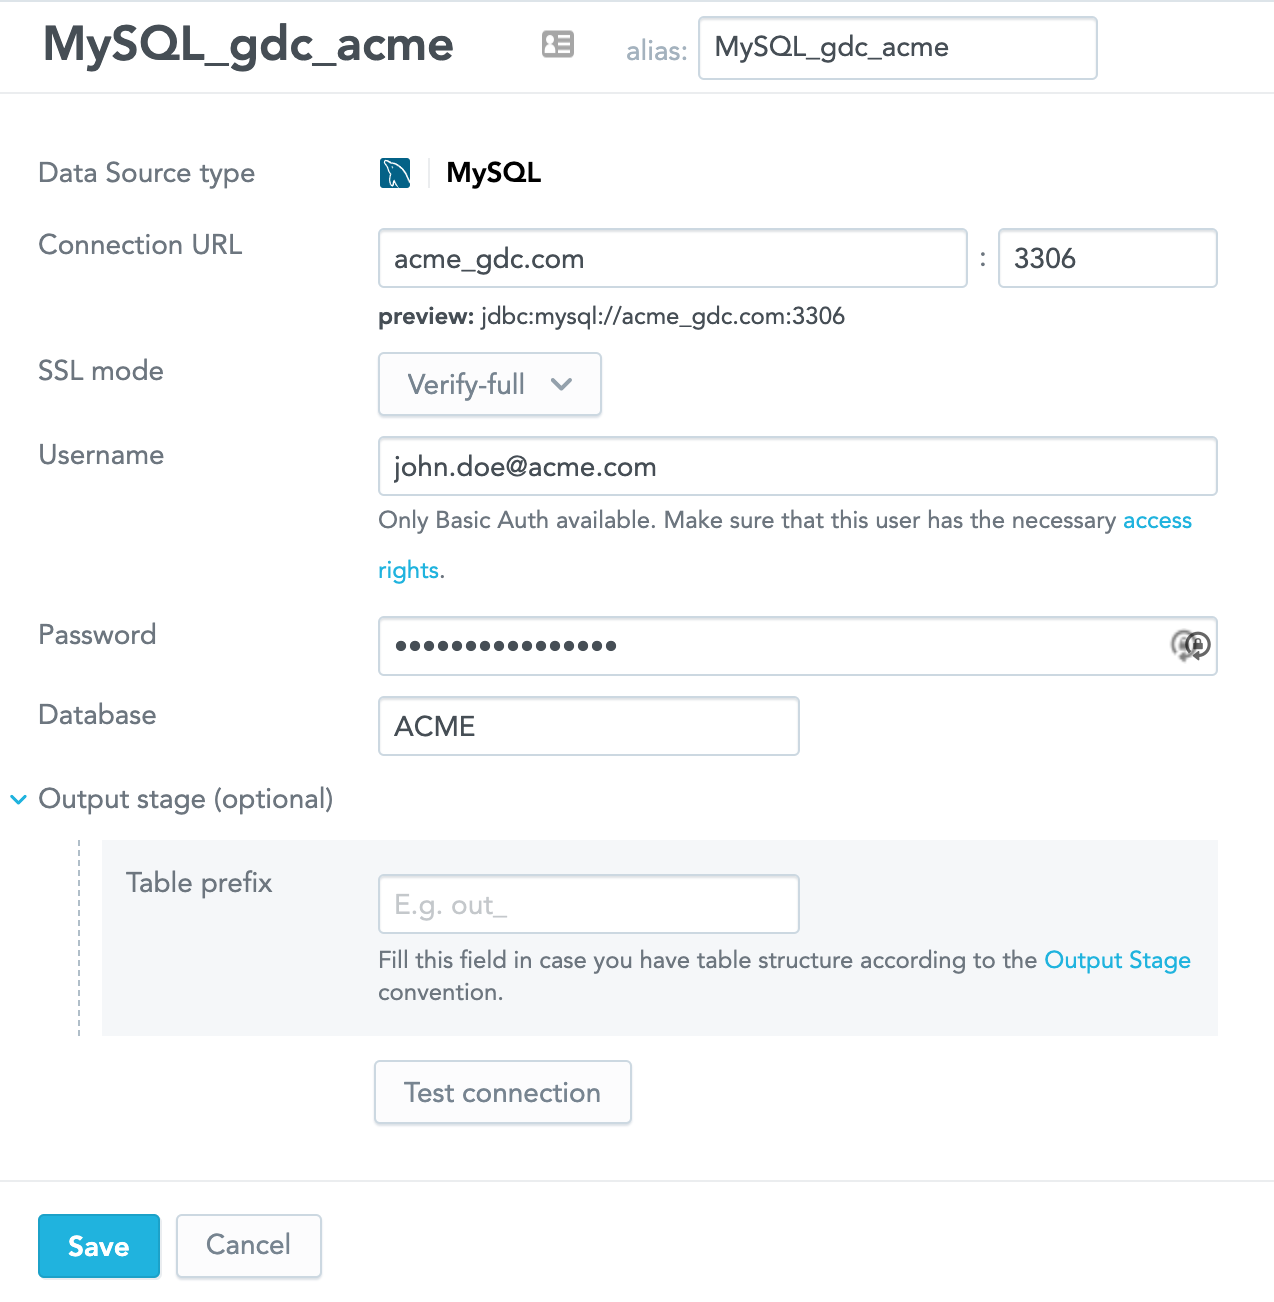
(Optional) If you plan to use the Output Stage (see Direct Data Distribution from Data Warehouses and Object Storage Services), enter the prefix that will be used for the Output Stage tables and views.
Click Test connection. If the connection succeeds, the confirmation message appears.
Click Save. The Data Source is created. The screen with the connection details opens.
Create a Data Source for a PostgreSQL Database
Steps:
On the top navigation bar, select Data. The LDM Modeler opens.
Click Sources.
Click the PostgreSQL icon, or click Add data in the left pane and select PostgreSQL. The connection parameter screen appears.
Enter the name of the Data Source. The alias will be automatically generated from the name. You can update it, if needed.
The alias is a reference to the Data Source, unique within the domain. The alias is used when exporting and importing the data pipeline (see Export and Import the Data Pipeline).Enter the details of your connection to the PostgreSQL database. For more information, see GoodData-PostgreSQL Integration Details.
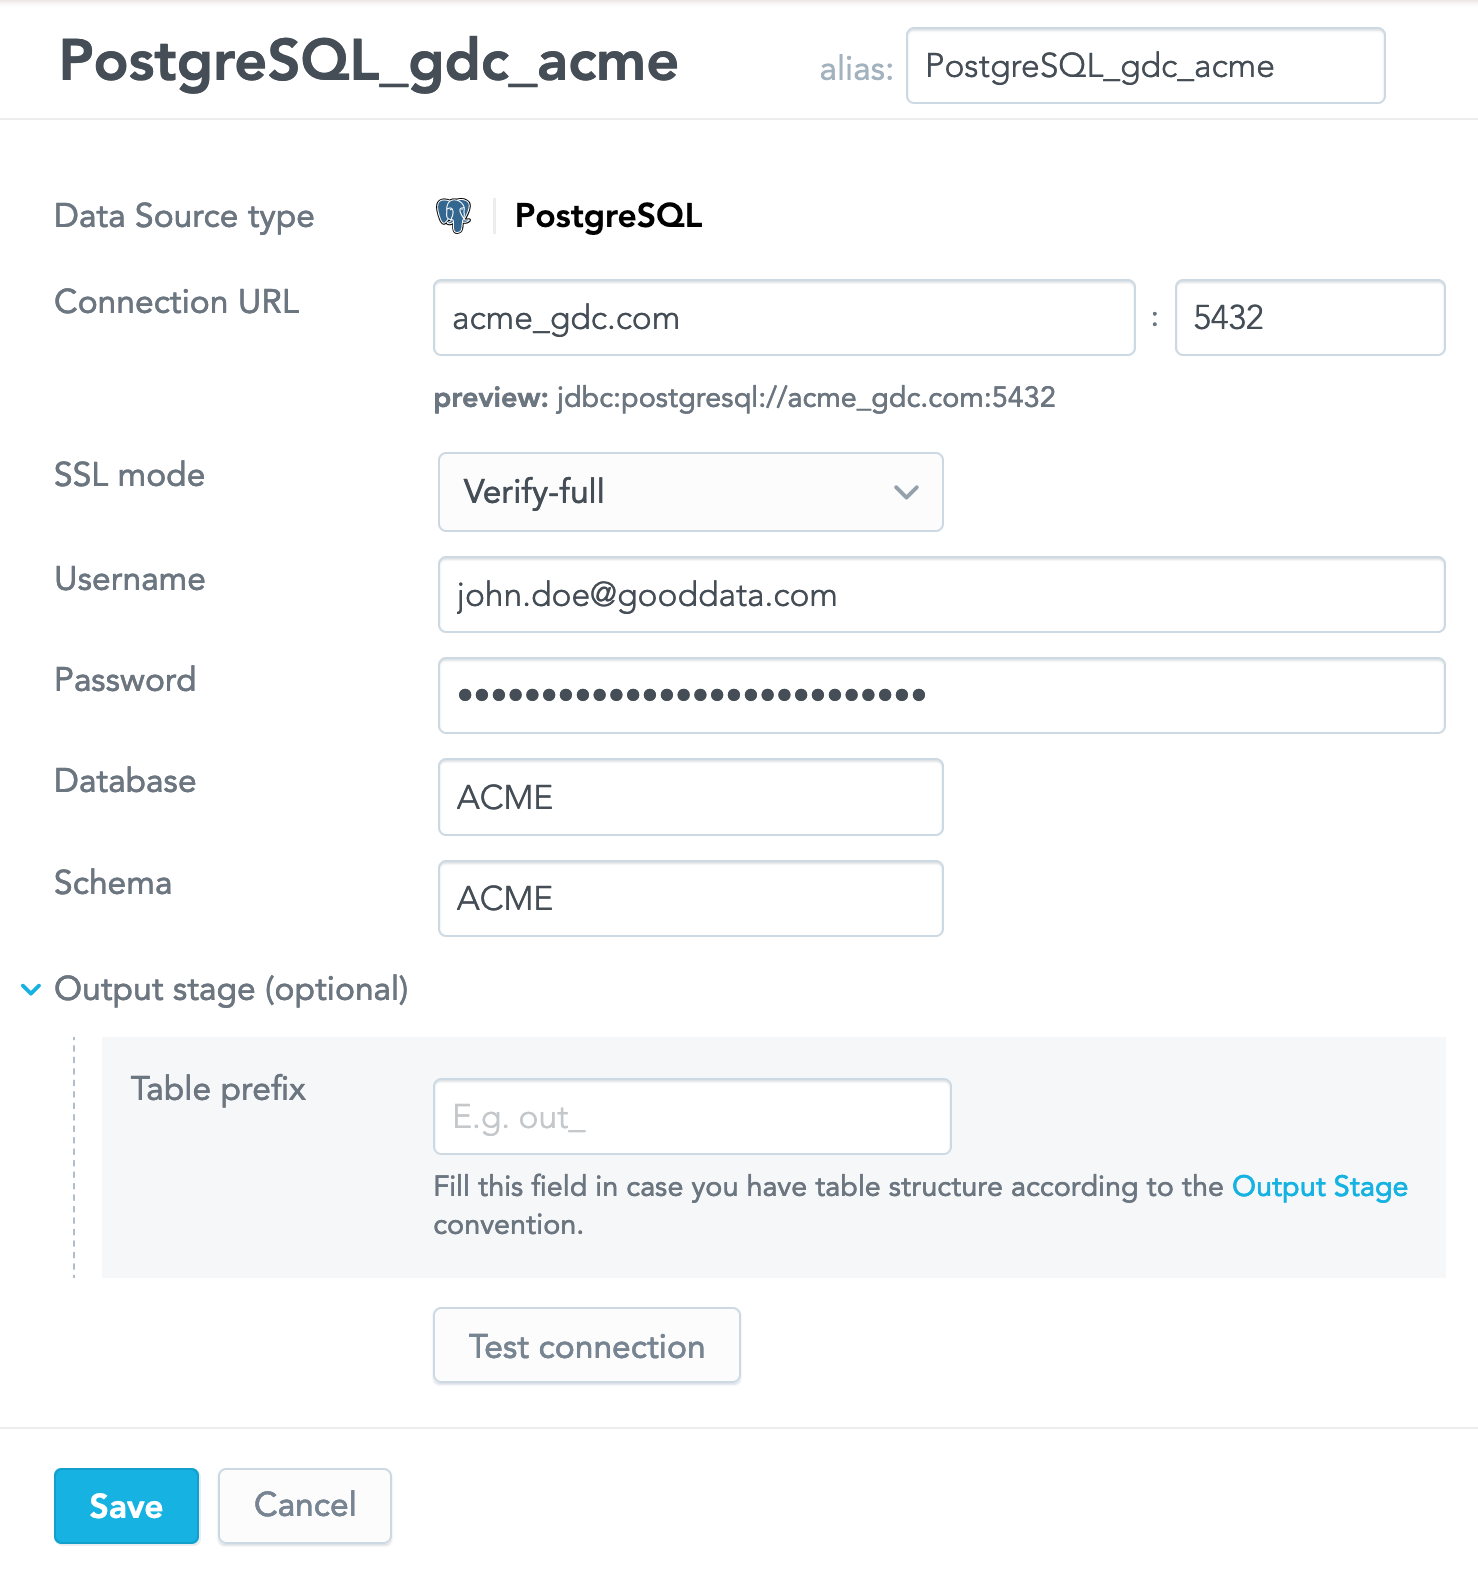
(Optional) If you plan to use the Output Stage (see Direct Data Distribution from Data Warehouses and Object Storage Services), enter the prefix that will be used for the Output Stage tables and views.
Click Test connection. If the connection succeeds, the confirmation message appears.
Click Save. The Data Source is created. The screen with the connection details opens.
Create a Data Source for a Redshift Cluster
Steps:
On the top navigation bar, select Data. The LDM Modeler opens.
Click Sources.
Click the Redshift icon, or click Add data in the left pane and select Amazon Redshift. The connection parameter screen appears.
Enter the name of the Data Source. The alias will be automatically generated from the name. You can update it, if needed.
The alias is a reference to the Data Source, unique within the domain. The alias is used when exporting and importing the data pipeline (see Export and Import the Data Pipeline).Enter the details of your connection to the Redshift cluster. For more information, see GoodData-Redshift Integration Details.
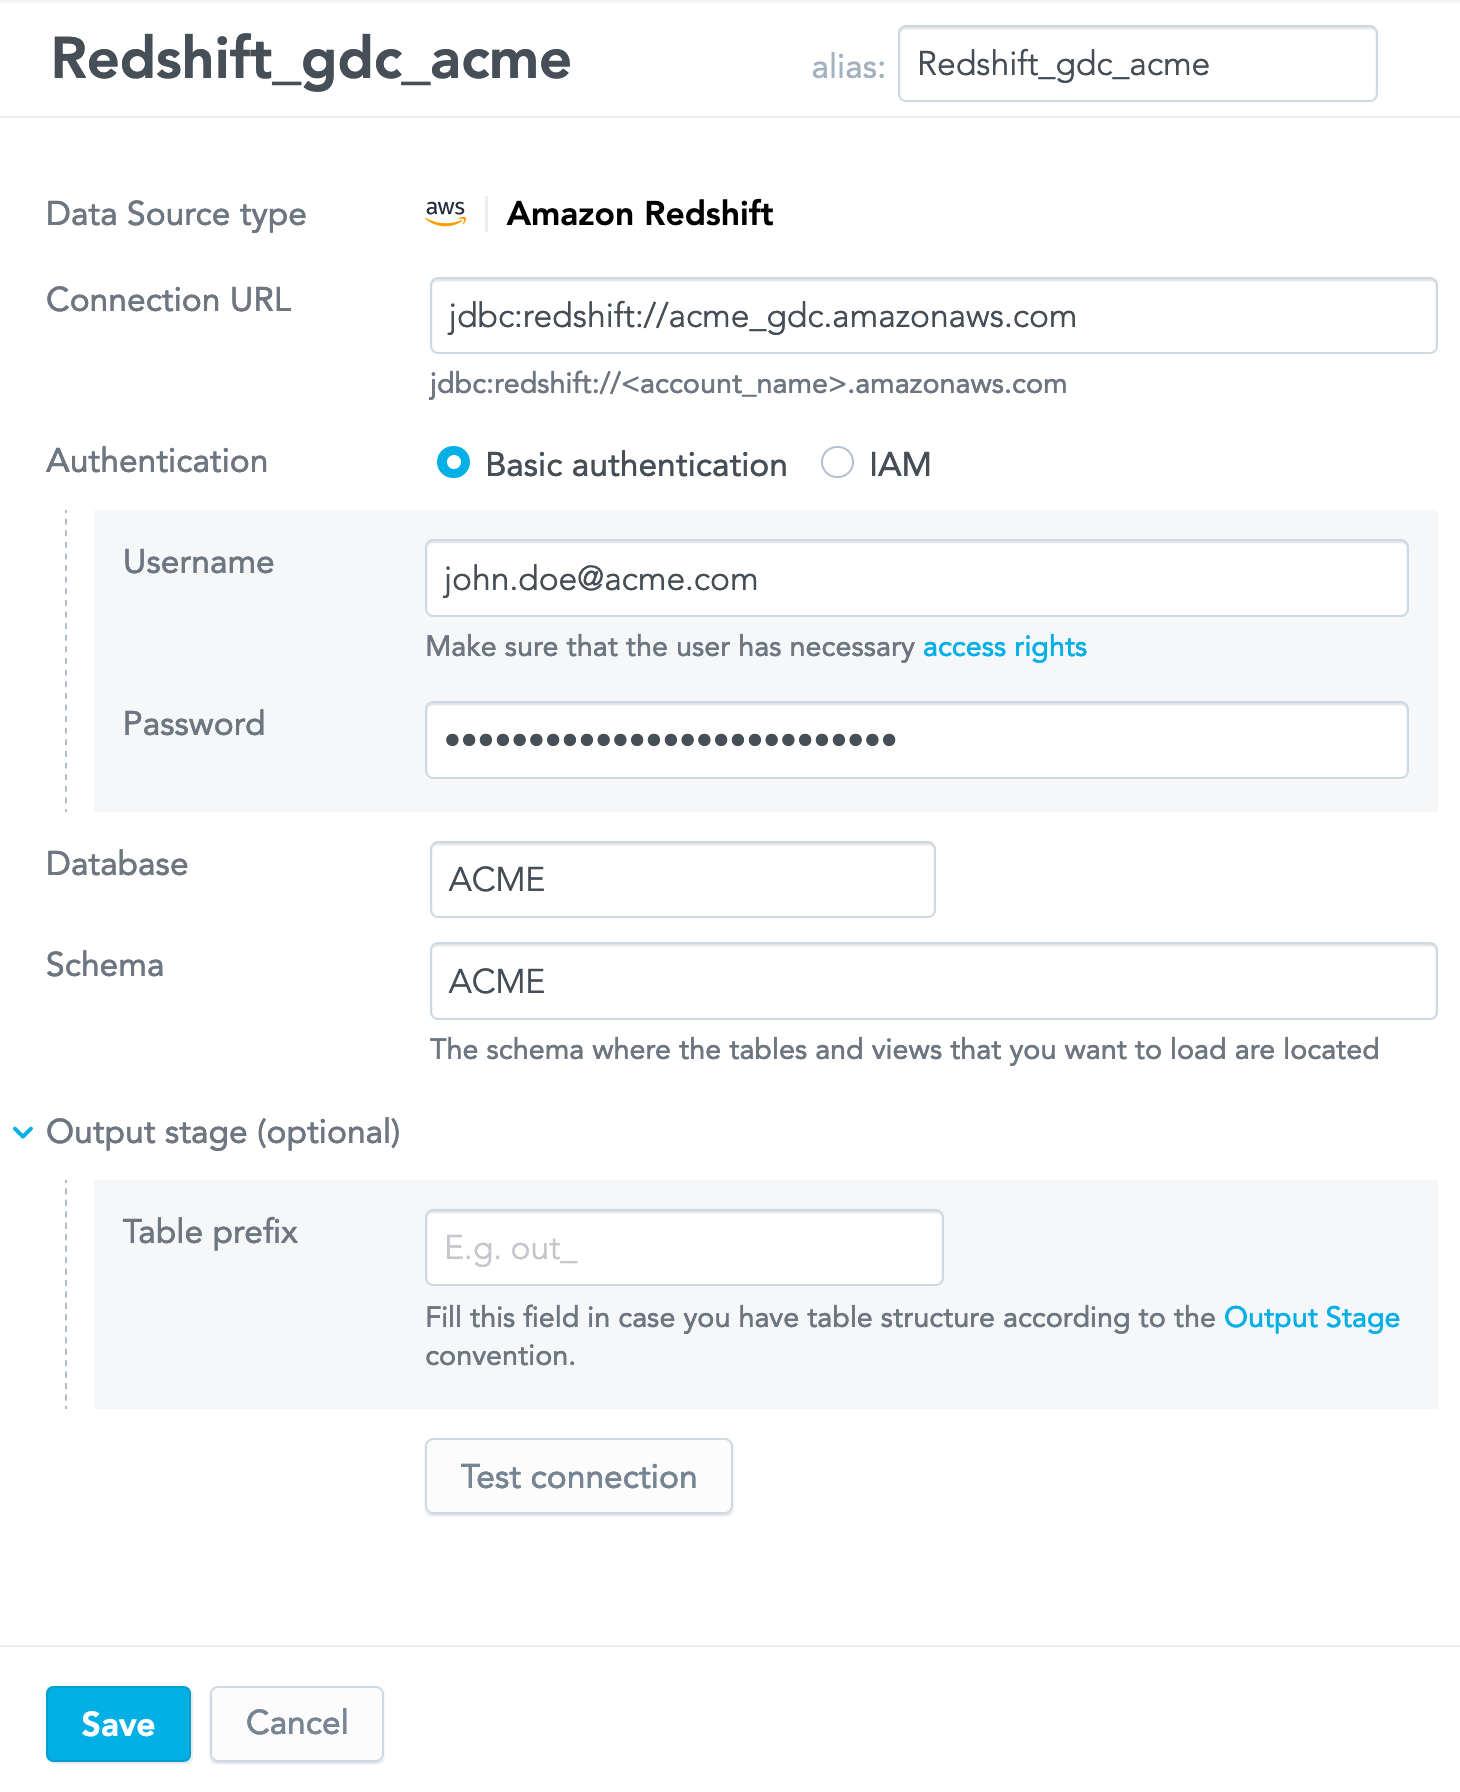
(Optional) If you plan to use the Output Stage (see Direct Data Distribution from Data Warehouses and Object Storage Services), enter the prefix that will be used for the Output Stage tables and views.
Click Test connection. If the connection succeeds, the confirmation message appears.
Click Save. The Data Source is created. The screen with the connection details opens.
Create a Data Source for an S3 Bucket
Steps:
On the top navigation bar, select Data. The LDM Modeler opens.
Click Sources.
Click the S3 icon, or click Add data in the left pane and select Amazon S3. The connection parameter screen appears.
Enter the name of the Data Source. The alias will be automatically generated from the name. You can update it, if needed.
The alias is a reference to the Data Source, unique within the domain. The alias is used when exporting and importing the data pipeline (see Export and Import the Data Pipeline).Enter the path to your S3 bucket, the access key, and the secret key. For more information, see GoodData-S3 Integration Details.
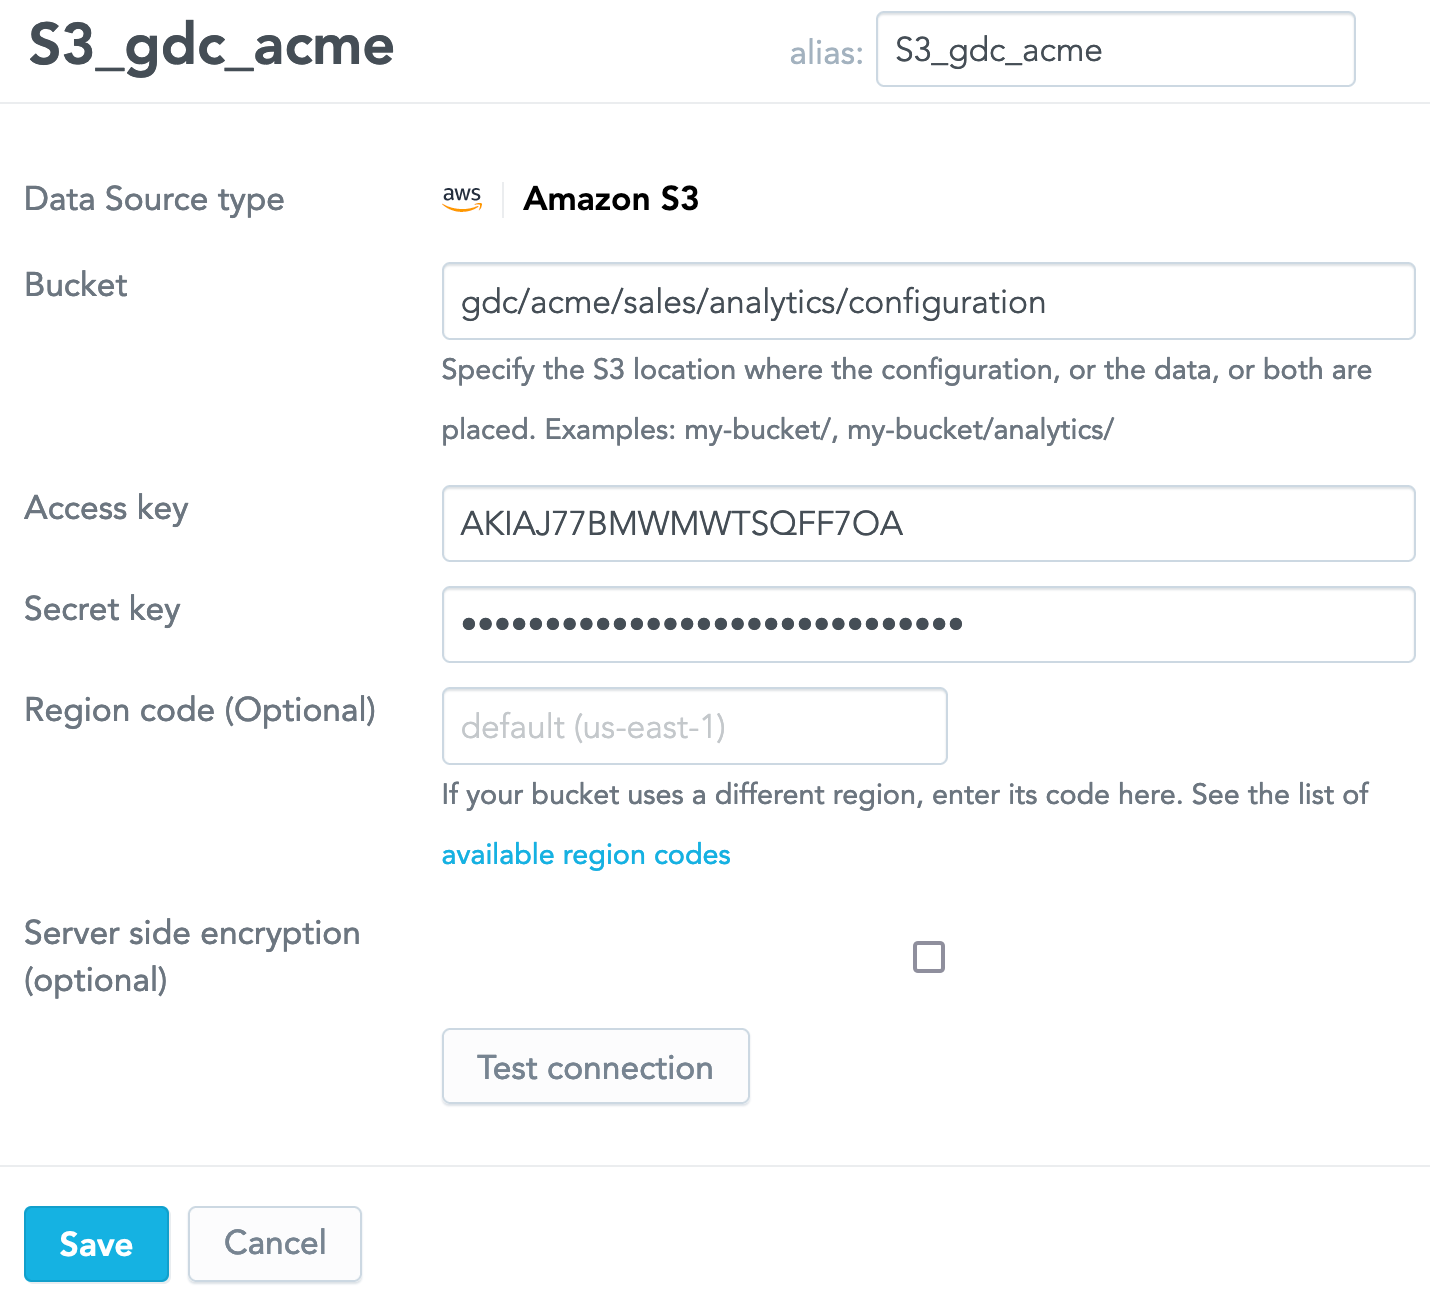
If your S3 bucket uses a region different from the default US East (N. Virginia) one, enter the code of the bucket region. For the list of the region codes, see AWS Service Endpoints.
If your S3 bucket supports server-side encryption, select the Server side encryption check-box.
Click Test connection. If the connection succeeds, the confirmation message appears.
Click Save. The Data Source is created. The screen with the connection details opens.
Create a Data Source for a Snowflake Instance
Steps:
On the top navigation bar, select Data. The LDM Modeler opens.
Click Sources.
Click the Snowflake icon, or click Add data in the left pane and select Snowflake. The connection parameter screen appears.
Enter the name of the Data Source. The alias will be automatically generated from the name. You can update it, if needed.
The alias is a reference to the Data Source, unique within the domain. The alias is used when exporting and importing the data pipeline (see Export and Import the Data Pipeline).Enter the details of your connection to the Snowflake instance. For more information, see GoodData-Snowflake Integration Details.
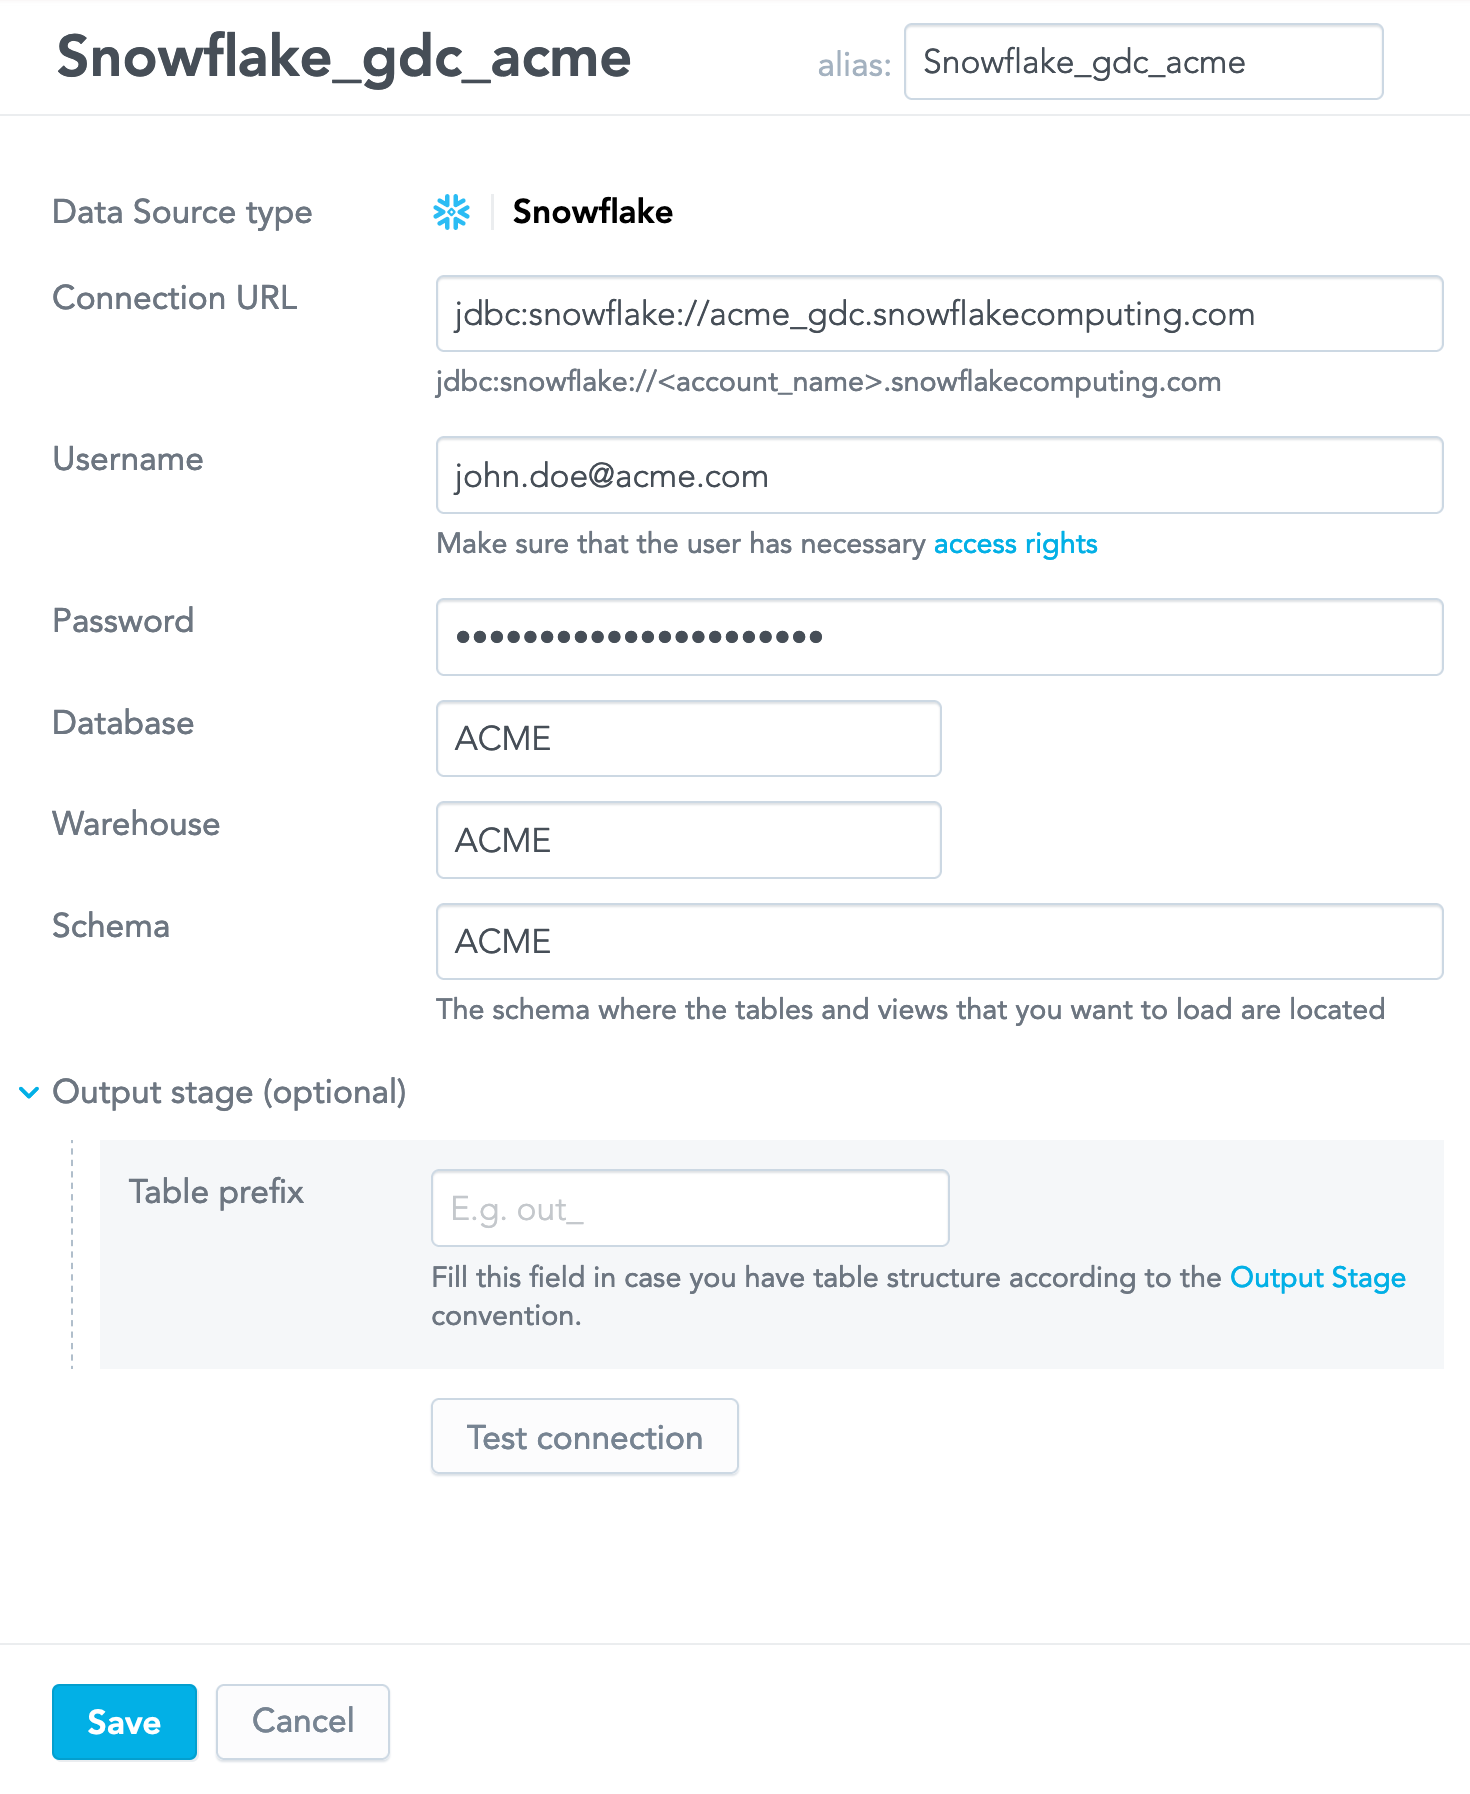
(Optional) If you plan to use the Output Stage (see Direct Data Distribution from Data Warehouses and Object Storage Services), enter the prefix that will be used for the Output Stage tables and views.
Click Test connection. If the connection succeeds, the confirmation message appears.
Click Save. The Data Source is created. The screen with the connection details opens.
Create a Generic Data Source
Generic Data Sources (Data Sources for an arbitrary location) are used in more complex scenarios. For example, when you need to specify access credentials for an ADS instance or a WebDAV location and then reference them from other components (see Reuse Parameters in Multiple Data Loading Processes).
Steps:
On the top navigation bar, select Data. The LDM Modeler opens.
Click Sources.
Click the generic Data Source icon, or click Add data in the left pane and select Generic Data Source. The connection parameter screen appears.
Enter the name of the Data Source. The alias will be automatically generated from the name. You can update it, if needed.
The alias is a reference to the Data Source, unique within the domain. The alias is used when exporting and importing the data pipeline (see Export and Import the Data Pipeline).Enter the parameters. You can add regular parameters and secure parameters. Use secure parameters for passing in sensitive data, such as passwords and secret keys. These parameter values are encrypted and do not appear in clear-text form in any GUI, API responses, or log entries. Before saving the Data Source, use the show value check-box to display the value of a secure parameter for review purposes. When the Data Source is saved, secure parameter values are hidden.
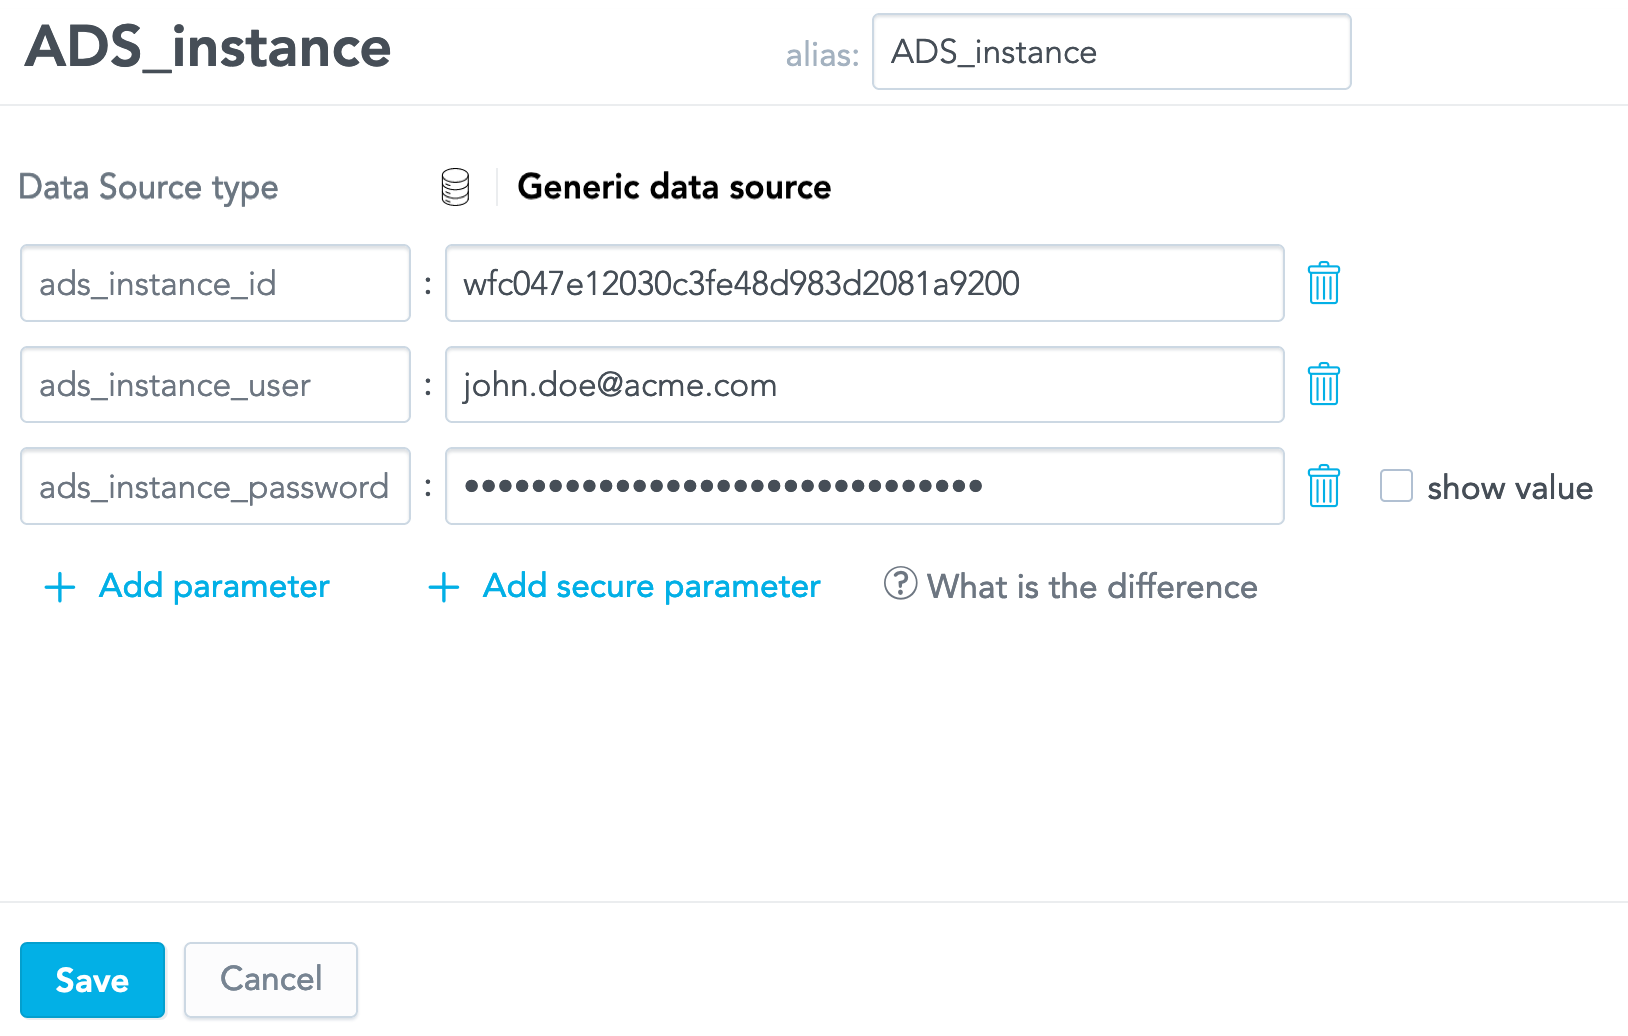
Click Save. The Data Source is created. The screen with the connection details opens.
Create a Data Source for Agile Data Warehouse Service (ADS)
If you have the ADS export add-on, you can create an ADS Data Source to export data from your ADS Instance. For more information on the ADS export add-on, see Exporting Data from Data Warehouse.
This Data Source is unavailable as a selection when the enableADSDataSource platform setting is set to false. For more information on how to configure platform settings, see Configure Various Features via Platform Settings.
Only the creator the ADS Data Source can edit the data source after it is created.
Steps:
On the top navigation bar, select Data. The LDM Modeler opens.
Click Sources.
Click the ADS icon, or click Add data in the left pane and select Agile Data Warehouse Service Data Source. The connection parameter screen appears.
Enter the name of the Data Source. The alias will be automatically generated from the name. You can update it, if needed.
The alias is a reference to the Data Source, unique within the domain. The alias is used when exporting and importing the data pipeline (see Export and Import the Data Pipeline).
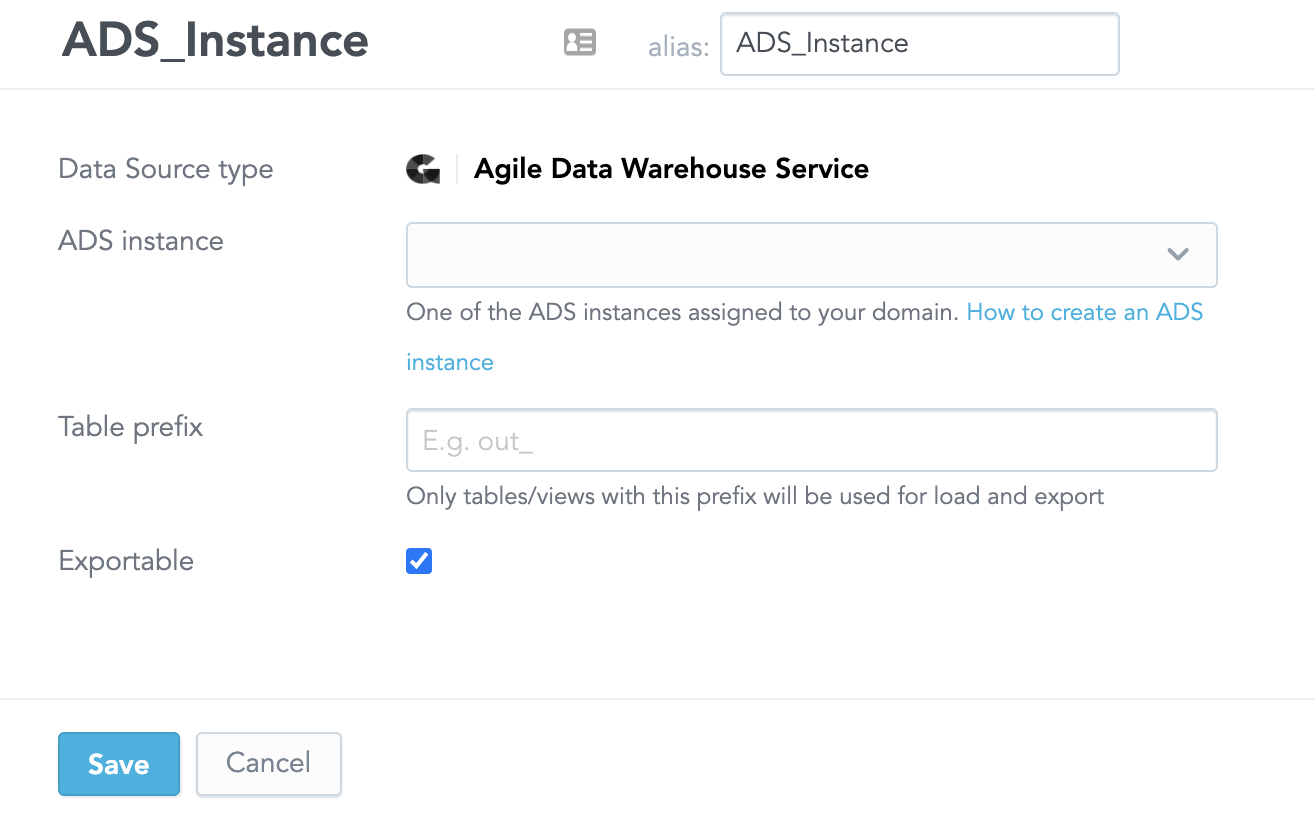
Select the ADS instance you want to export. Only ADS instances assigned to your domain will appear.
Specify the prefix for the tables or views that you want to export.
If you want to use this Data Source for export, select the exportable check-box.
Click Save. The Data Source is created. The screen with the connection details opens.