You are viewing our older product's guide. Click here for the documentation of GoodData Cloud, our latest and most advanced product.
Create a Logical Data Model Manually
For workspace administrators only
This tutorial guides you through the process of creating a logical data model (LDM) in your workspace using the LDM Modeler. A newly created workspace does not have an LDM, therefore you are going to create an LDM from scratch.
For the purpose of this tutorial, you are going to create a simple LDM with three datasets and publish it to your workspace.
You create an LDM in the LDM Modeler. To do so, perform the following steps:
- Add datasets with facts and attributes.
- Create a relationship between the datasets.
- Add a Date dataset.
- Map the datasets to source tables.
- Publish the LDM.
You can also create an LDM from:
- CSV files with data (see Create a Logical Data Model from CSV Files)
- Your cloud data warehouse (see Create a Logical Data Model from Your Cloud Data Warehouse)
- You cloud object storage service (see Create a Logical Data Model from Your Cloud Object Storage Service)
- The Output Stage if you use it (see Create a Logical Data Model from the Output Stage)
When you are working on your LDM:
- The changes are automatically saved as a draft as you are making them. The draft is saved under your GoodData user, on the machine and in the browser it was created, and you can continue editing it whenever you are ready. When the LDM Modeler saves your draft, it displays a message and the time the draft was last saved. The draft is kept until you either publish the changes to the workspace or manually discard the draft (in this case, the last published version of the LDM is loaded in the LDM Modeler).
- The LDM is validated as you are making changes. You are warned you if there is an issue (for example, an empty dataset or a dataset with a missing title).
Add Datasets with Facts and Attributes
You are going to create two datasets and fill them with facts and attributes. For more information about the facts and attributes, see Logical Data Model Components in GoodData, but to quickly remind what they are:
- Facts are numerical data that is to be used in computed functions in your reporting (for example, payment amounts).
- Attributes are data that is to be used in grouping or segmenting the values resulting from the computed functions. In almost all use cases, this data is non-numerical (for example, employee IDs).
Steps:
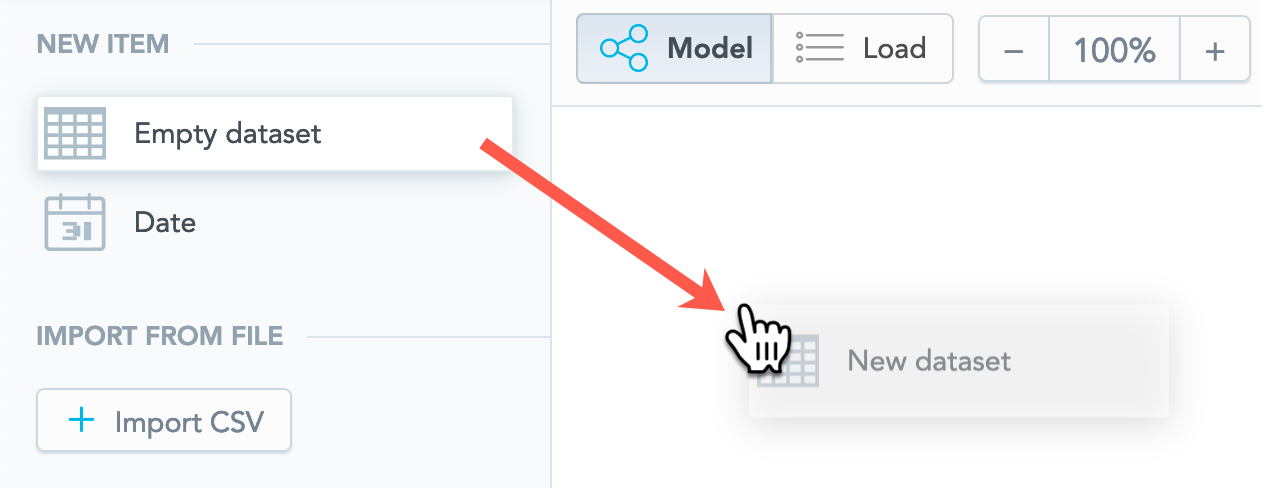
- On the top navigation bar, select Data. The LDM Modeler opens. You see a blank canvas area in view mode.
- Click Edit. The LDM Modeler is switched to edit mode.
- To add your first dataset, drag Empty dataset from the left panel and drop it in the blank canvas area. An empty untitled dataset is added.
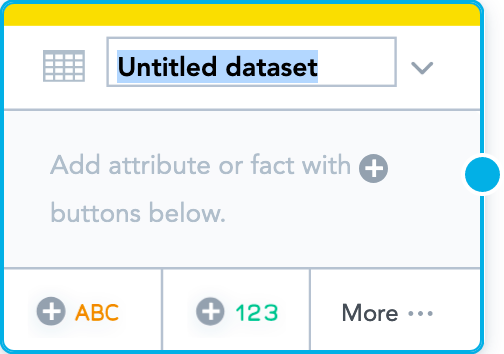
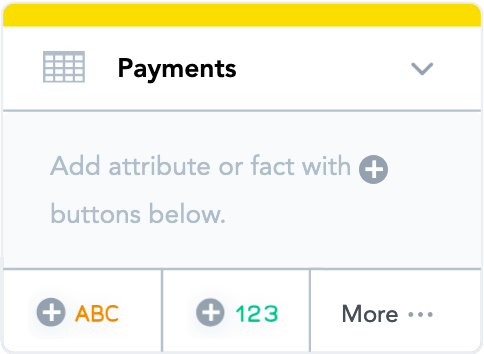
- Enter “Payments” for the dataset name. You can change the name any time later, if needed, by double-clicking it and updating the name. The dataset object should look like the following:
- To add an attribute, click the ABC button.
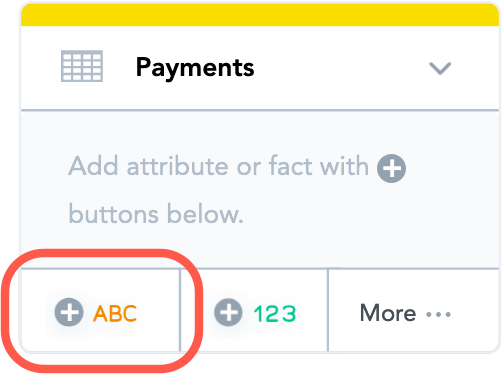
- Enter “Department ID” for the attribute name. You can change the name any time later, if needed. When you add an attribute, it is added with a single default label, which has the same name as the attribute itself. Attribute labels are out of scope of this tutorial. For more information about them, see Attributes in Logical Data Models.
- To add a fact, click the 123 button.
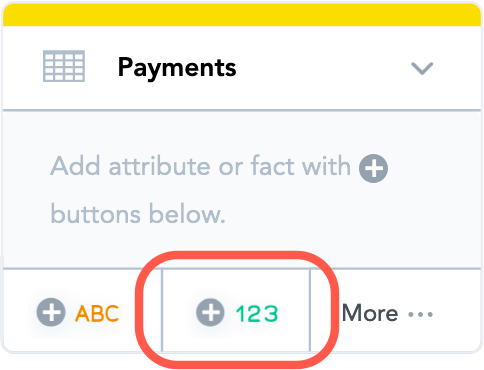
- Enter “Payment” for the fact name. You can change the name any time later, if needed. The finished
Paymentsdataset should look like the following:
Notice that the color of the top strip has changed from orange to green. This is because datasets containing at least one fact are marked with green. You are now going to review the details of the dataset.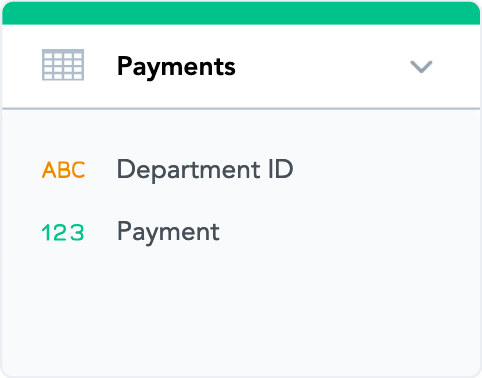
- Click More… and then click View details. The dataset details dialog opens that lists all the dataset facts and attributes.
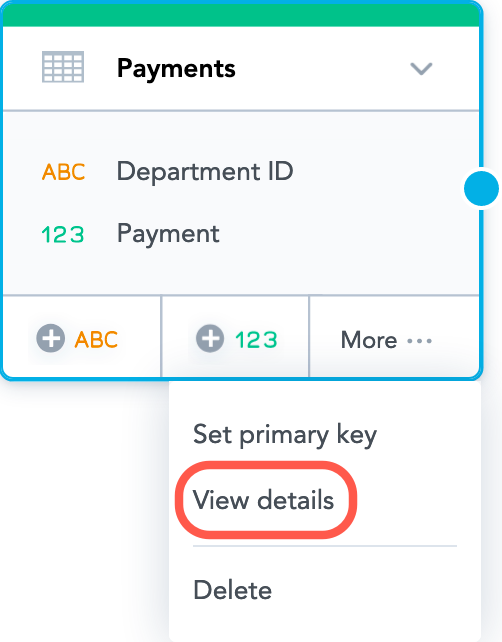 This dialog allows you to manage the facts and attributes in the dataset and edit their properties. Those actions are out of scope of this tutorial. For more information about them, see Update a Logical Data Model.
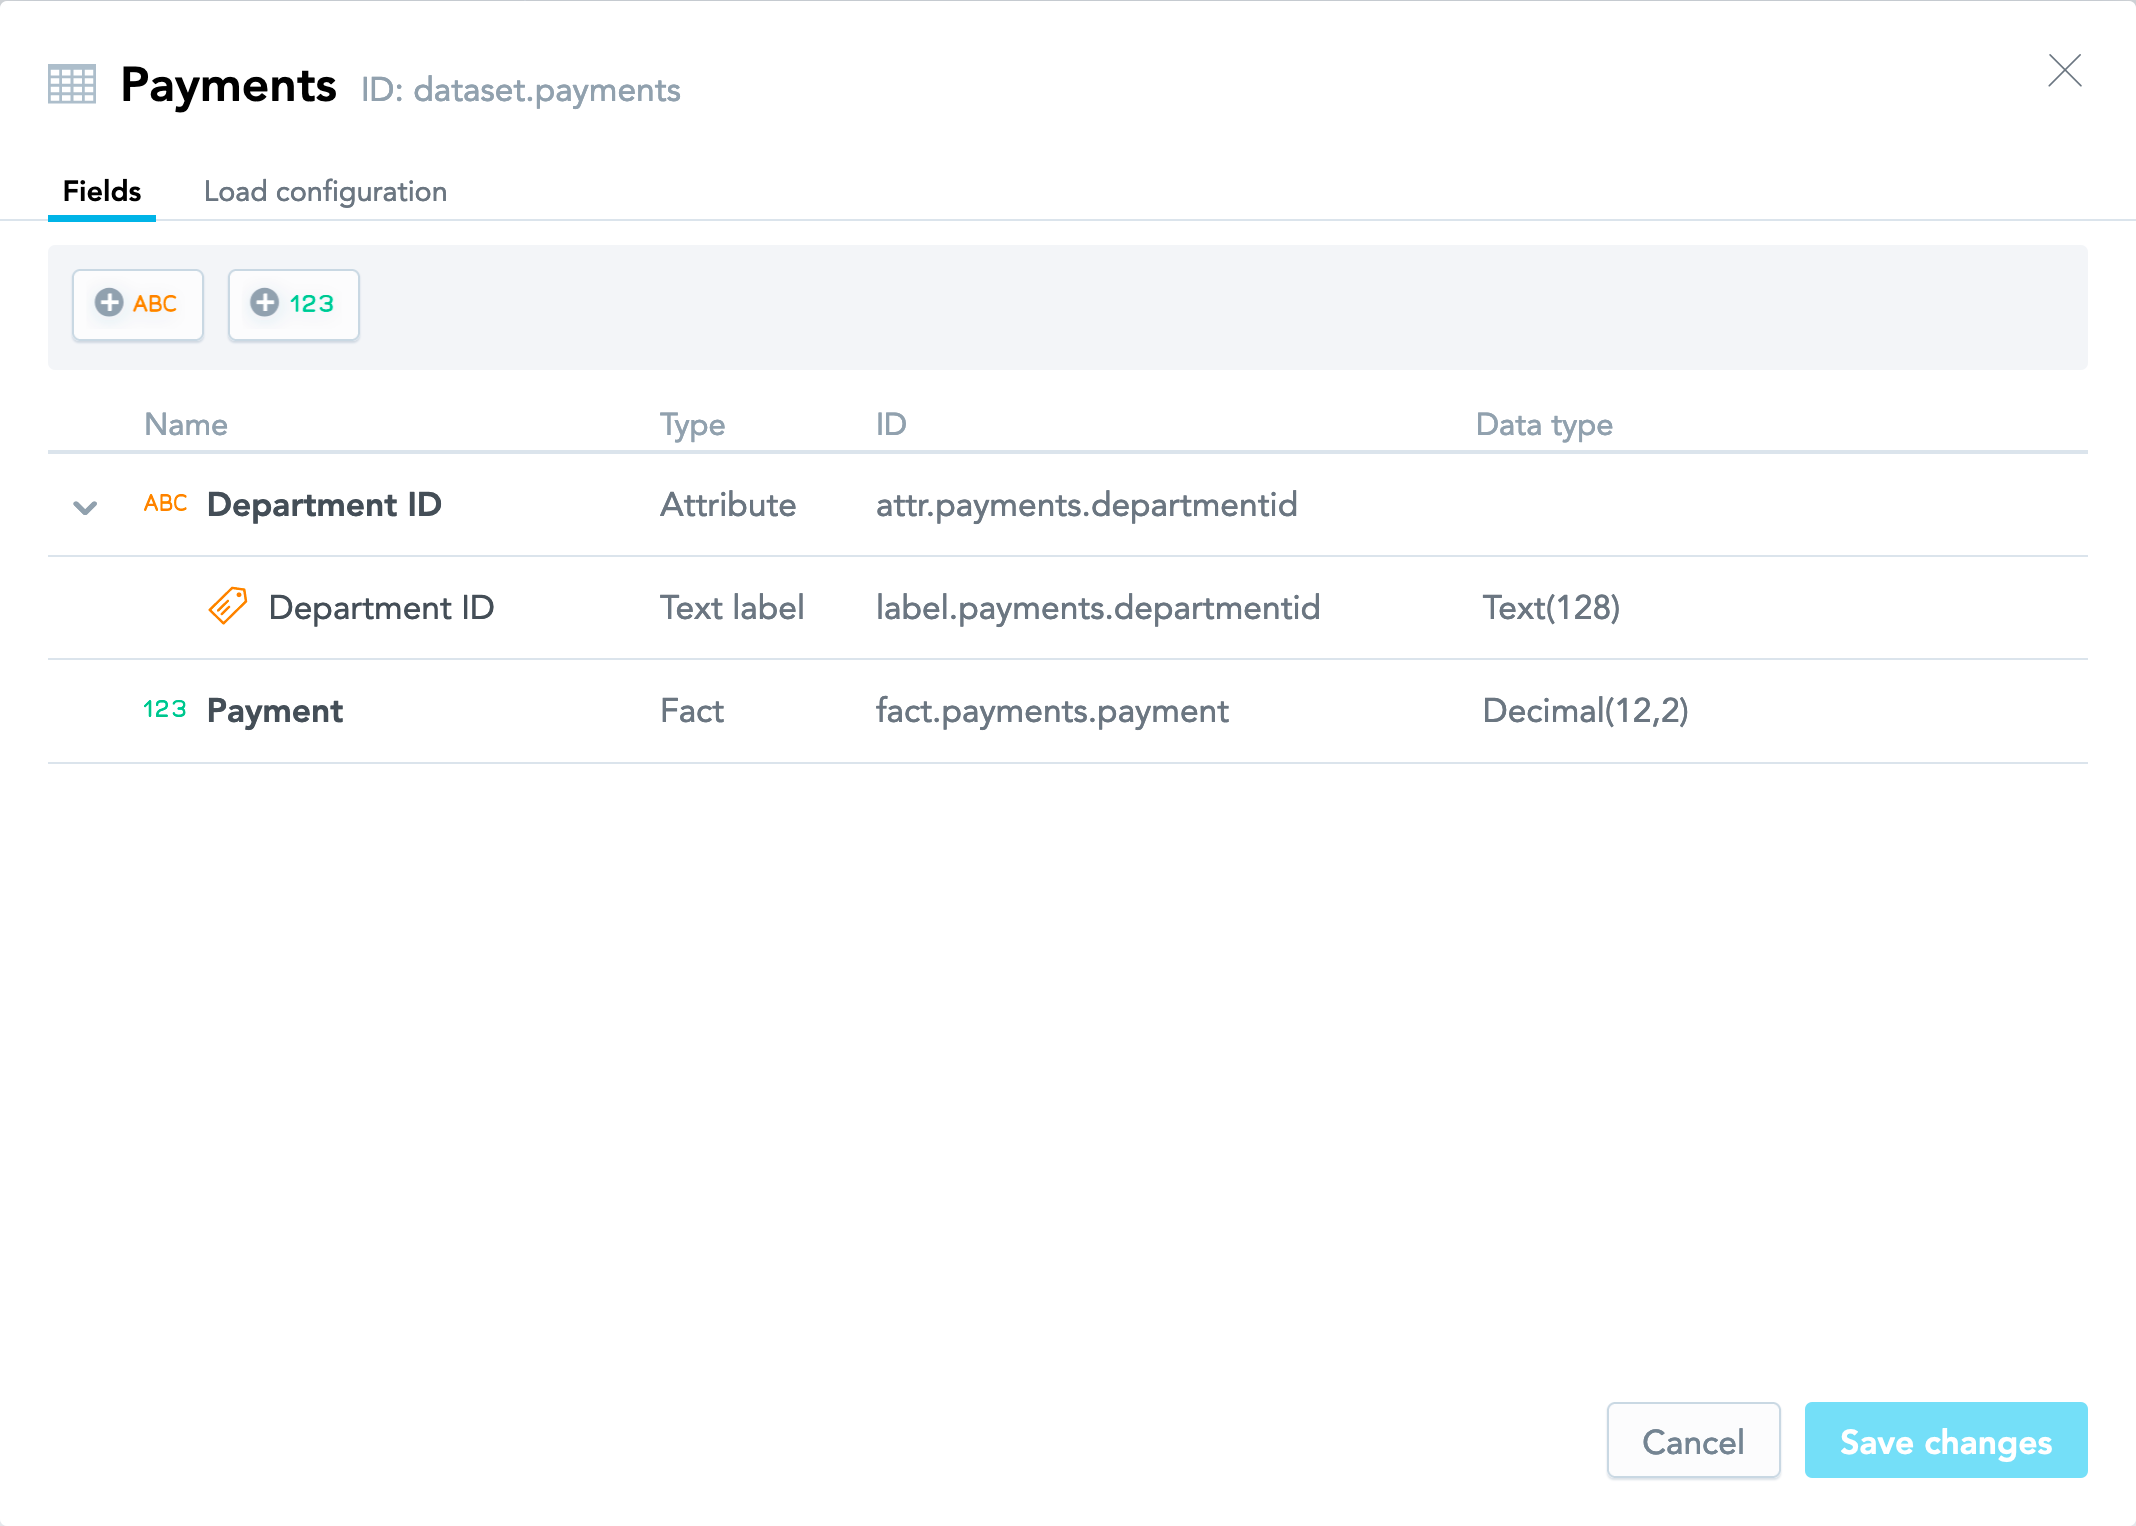
- Familiarize yourself with this dialog and its options, then close the dialog. You now have one complete dataset.
- Create another dataset. Name it “Employee”, and add two attributes, “Employee ID” and “Employee name”. You are now going to create a relationship between the two datasets.
Create a Relationship between the Datasets
You now have two datasets, but they are not connected. A relationship between two datasets allows you to use information from one dataset to slice the data in the other dataset.
In this tutorial, you are going to create a relationship between your datasets so that you can later use the attributes from the Employee dataset to slice the data in the Payments dataset (that is, create an insight showing payments per employee).
Primary Key
Creating a relationship requires a primary key in one of those datasets. You cannot create a relationship between two datasets if none of them has the primary key set. At this point, neither of your datasets has a primary key. You will be setting a primary key while creating a relationship between the datasets. For more information about primary keys, see Connection Points in Logical Data Models.
To decide what dataset must have the primary key, decide what data you want to analyze (slice) and what data you want to use to help analyze. The dataset with the data that you want to use to help analyze the other data is the one that must have a primary key. Because you want to be able to use the attributes from the Employee dataset to slice the data in the Payments dataset, you have to add the primary key to the Employee dataset, and therefore you should start creating the relationship from the Employee dataset.
Reference
When a relationship is created, a reference is set in the other dataset (the Payment dataset in this case). The reference is an attribute in the Payment dataset that is associated with the primary key of the Employee dataset.
When deciding on how to set the reference, you can choose one of the following options:
- Create a new attribute in the
Paymentsdataset based on the primary key from theEmployeedataset, and make it a reference. This new attribute in thePaymentsdataset is populated by references to the primary key values from theEmployeedataset. Each value in the reference attribute must have a corresponding value of the primary key in theEmployeedataset. In this tutorial, you are going to use this option. - Reuse an existing attribute from the
Paymentsdataset, and make it a reference. Once the relationship is created, the primary key from theEmployeedataset is merged with the attribute in thePaymentsdataset that you made the reference.
Relationship Type
A relationship between two datasets can be one of the following types:
- A 1:N (one-to-many) relationship, which is a one-directional relationship between the datasets when the data from one dataset can be used to analyze the data from the other dataset, but not the other way round. This is the default type of the relationship. In this tutorial, you are going to use this relationship type.
- An M:N (many-to-many) relationship that allows you to use the data from either dataset to analyze the data from the other dataset. M:N relationships are out of scope of this tutorial. For more information about them, see Many-to-Many in Logical Data Models.
Steps:
- Select the
Employeedataset. Click the blue dot on the right border of the dataset and drag the arrow that appears to connect theEmployeedataset to thePaymentsdataset.The following dialog opens: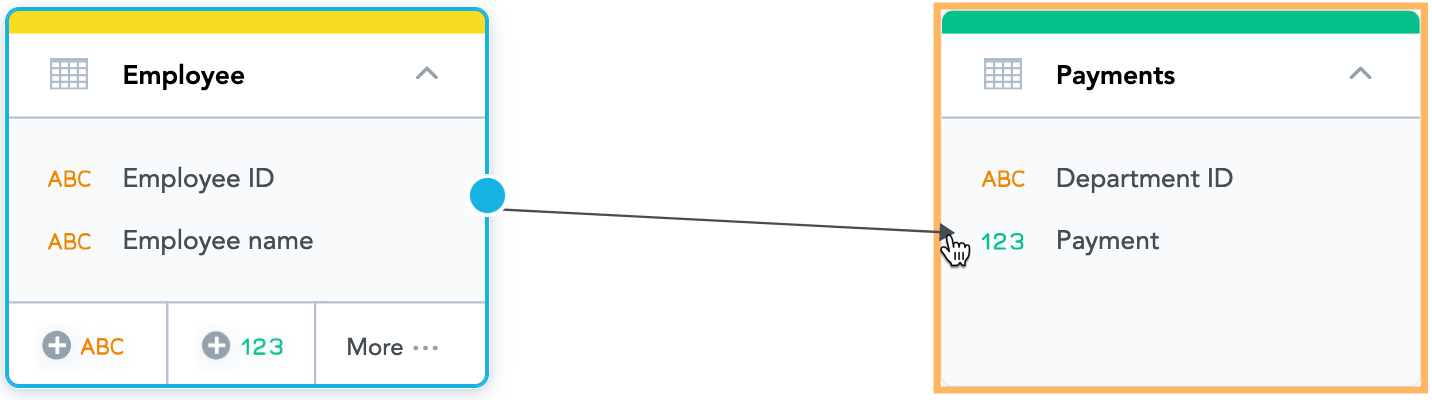
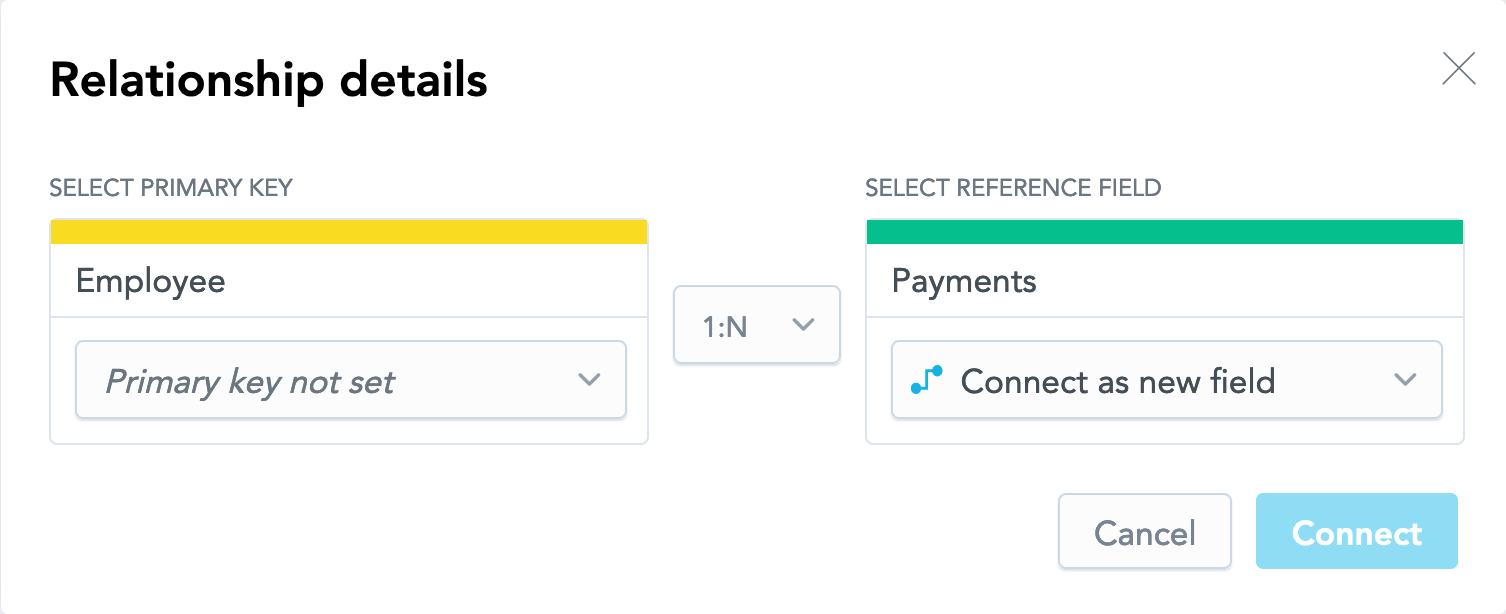
- For the
Employeedataset, click Primary key not set, and select the attribute that should become the primary key. In the destination of the relationship, the primary key defines the unique identifier for a row of data. In this model, the unique identifier is theEmployee IDfield. Therefore, select theEmployee IDattribute.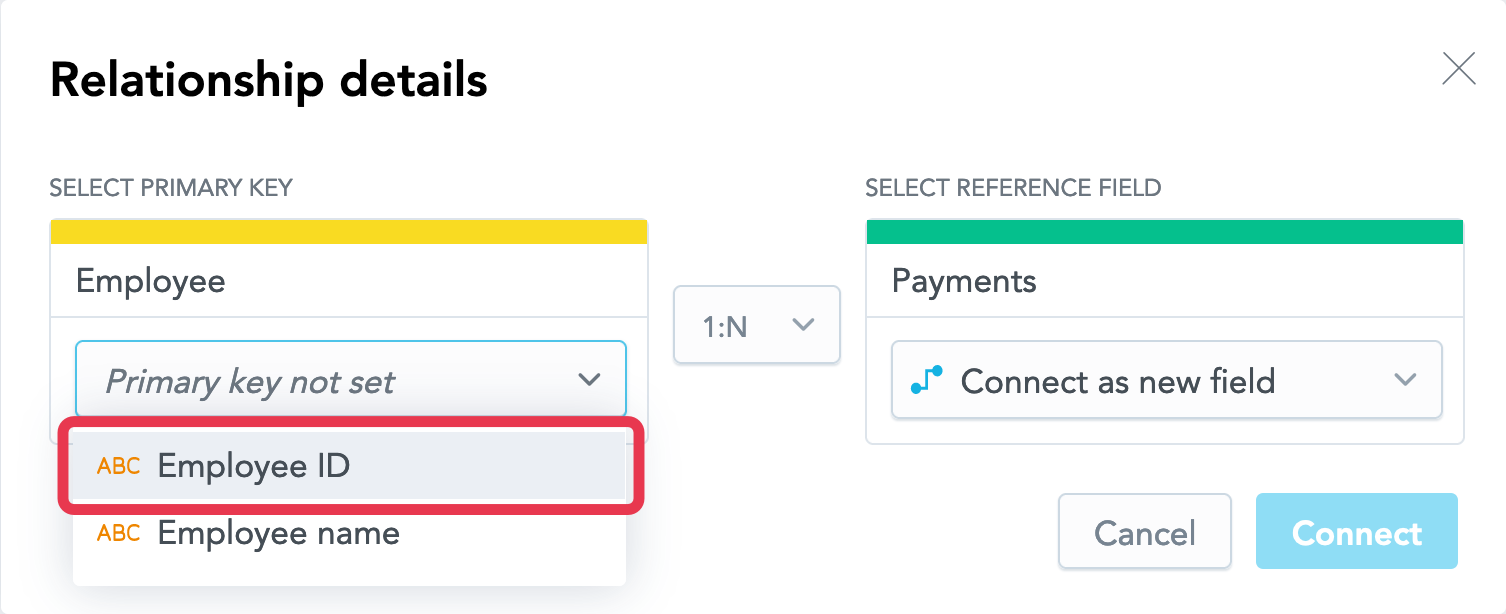
- For the
Paymentsdataset, leave the Connect as new field option selected. This option will create a new attribute in thePaymentsdataset based on the primary key from theEmployeedataset and make it a reference.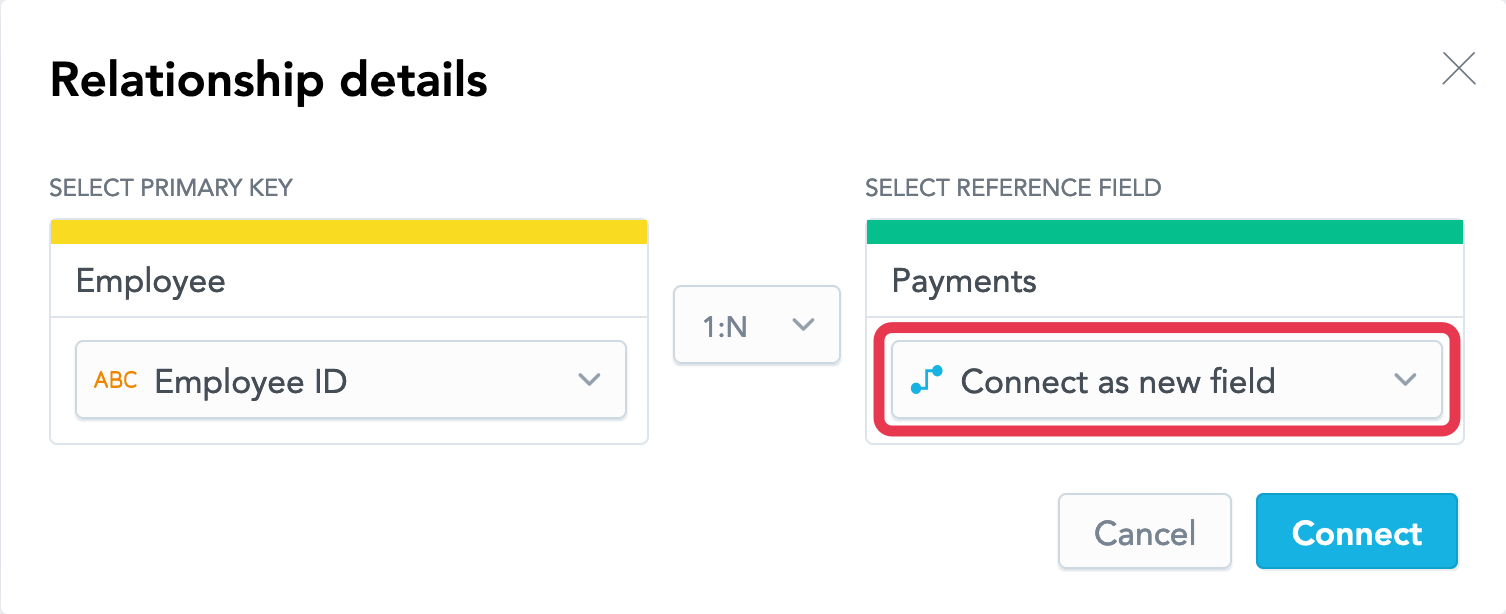
- In the dropdown that sets the type of the relationship between the two datasets, leave the 1:N option selected. This option will create a one-directional relationship between the datasets.
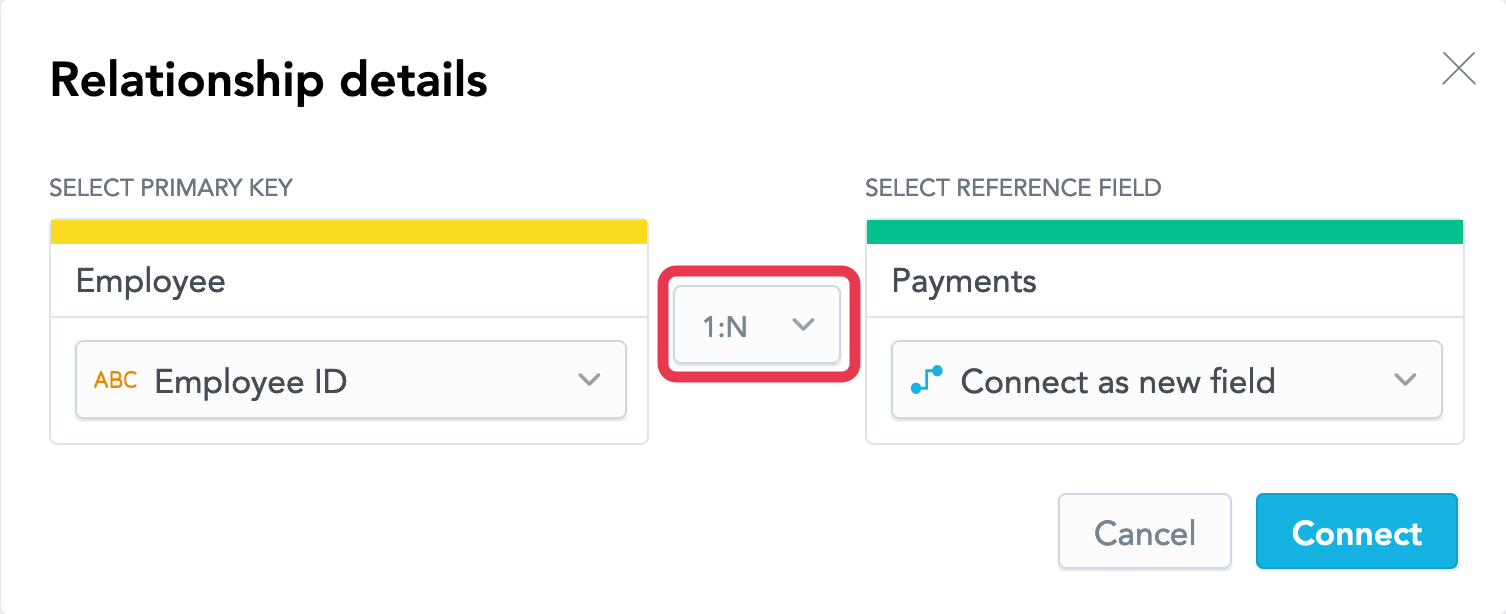
- Click Connect. The relationship is created. The LDM should now look like the following:
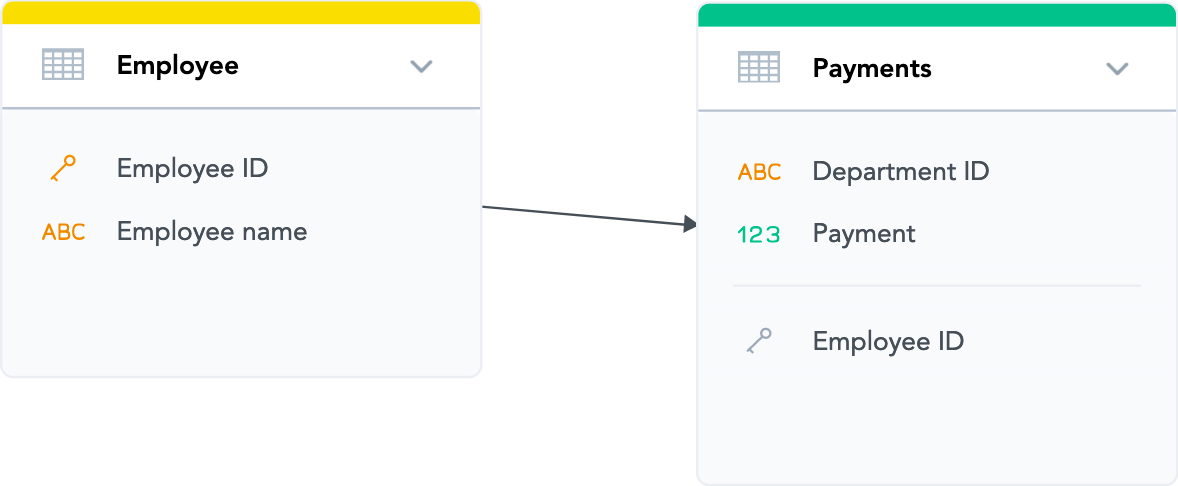
- The direction of the arrow determines which dataset’s data can be used to analyze (slice) the data from the other dataset. You have created a relationship that allows you to slice payments (an incoming relationship to the
Paymentsdataset) by employee (an outgoing relationship from theEmployeedataset). - The primary key has been set in the
Employeedataset. Notice how the icon for theEmployee IDattribute has changed: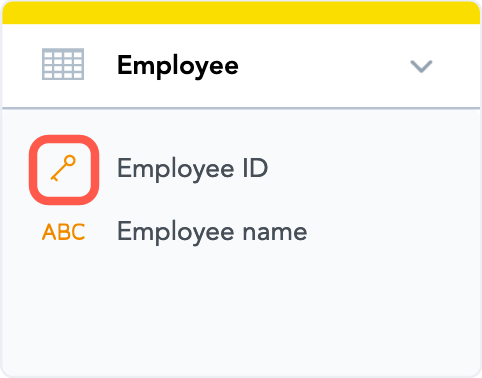
- A reference to the
Employee IDattribute has been added to thePaymentsdataset. This reference indicates that theEmployee IDfield is a reference attribute in thePaymentsdataset, with theEmployee IDvalues from theEmployeedataset as the key values.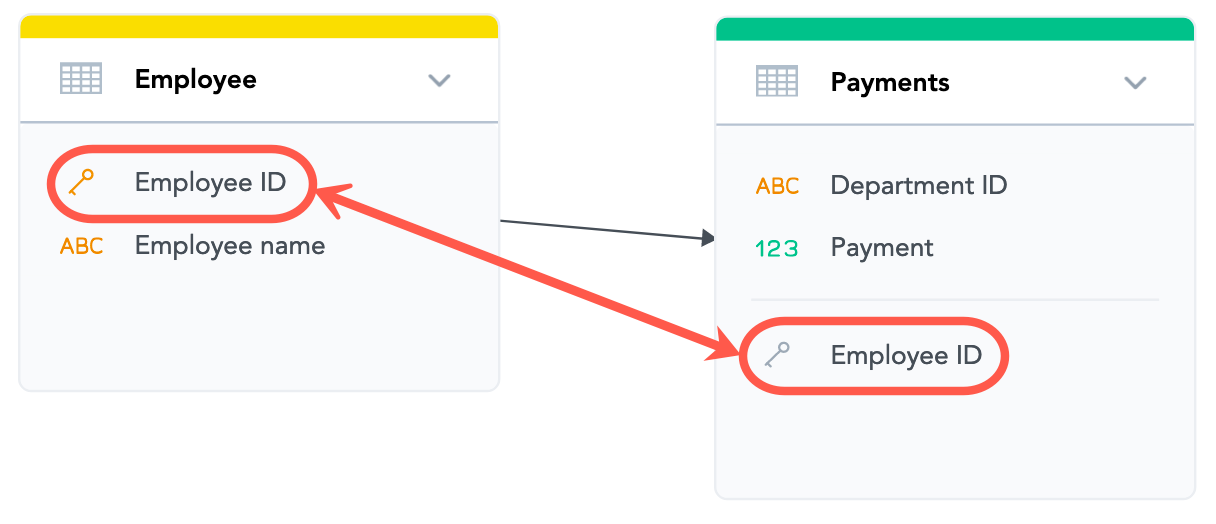
- The direction of the arrow determines which dataset’s data can be used to analyze (slice) the data from the other dataset. You have created a relationship that allows you to slice payments (an incoming relationship to the
You are now going to add a date to your model.
Add a Date Dataset
Dates are managed through a separate object, the Date dataset. These objects are very simple to implement, yet they have a significant structure internally (see Dates in Logical Data Models).
Steps:
- Drag Date from the left panel and drop it in the blank canvas area. A Date dataset is added. By default, it is named “Date”.
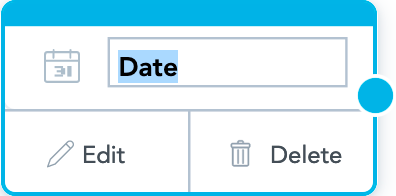
- Enter “Pay date” for the dataset name. You are now going to connect the Date dataset to some of your datasets.
- Select the
Pay datedataset. Click the blue dot on the right border of the dataset and drag the arrow that appears to connect the dataset to thePaymentsdataset. The relationship is created. The LDM should now look like the following: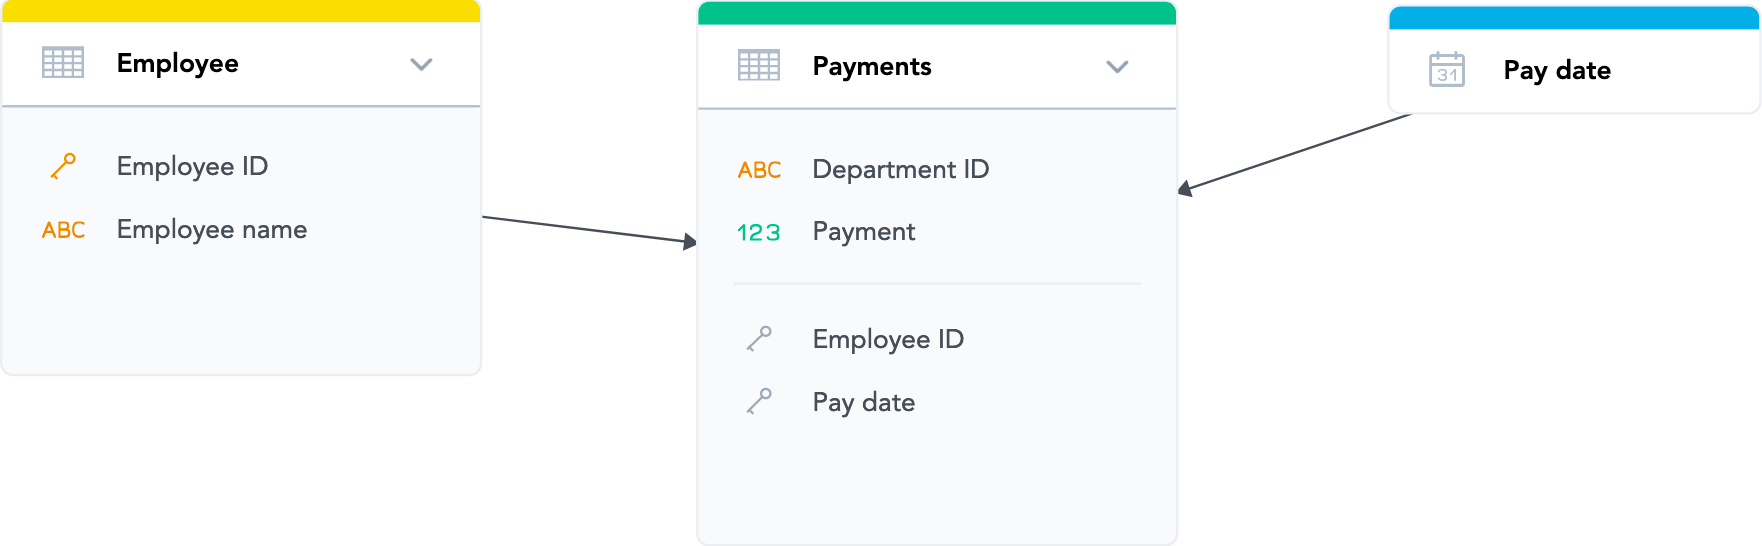
- The direction of the arrow determines which dataset’s data can be used to analyze (slice) the data from the other dataset. You have created a relationship that allows you to slice payments (an incoming relationship to the
Paymentsdataset) by time unit, such as day, month, quarter and so on (an outgoing relationship from thePay datedataset). - A reference to the
Pay datedataset has been added to thePaymentsdataset. This reference indicates that thePay datedataset is a foreign key in thePaymentsdataset, with thePay datevalues from thePay datedataset as the key values.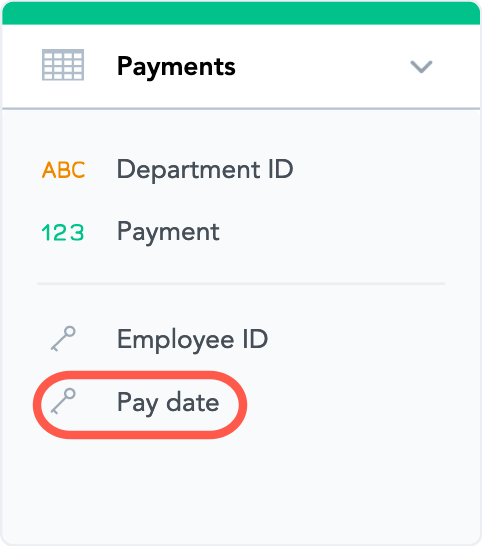
- The direction of the arrow determines which dataset’s data can be used to analyze (slice) the data from the other dataset. You have created a relationship that allows you to slice payments (an incoming relationship to the
You can now map the datasets to source tables.
Map the Datasets to Source Tables
Any dataset in your LDM must have each field (a fact or an attribute) unambiguously mapped to a column in a source table (represented by a table in your data warehouse or a CSV file). The dataset itself must be mapped to this source table.
During data load, the data from the columns in the source table will be loaded to the corresponding facts or attributes in the dataset.
In a dataset that was created manually, the dataset fields are not mapped to any columns, and the name of the source table is generated based on the dataset name. Set up mapping for all the datasets in your LDM. For more information, see Mapping between a Logical Data Model and the Data Source.
Always keep the LDM synchronized with the source of the data. Whenever you change the source of the data, update the LDM accordingly.
For example, if you add a column to a source table, add a corresponding field (attribute or fact) to the dataset mapped to this table, and then map this field to the table column. Otherwise, you will not be able to load data from this column to your workspaces.
Similarly, if you delete a column from a source table or delete a whole table, delete the corresponding field from the mapped dataset or the mapped dataset itself.
For more information about updating the LDM, see Update a Logical Data Model.
Once mapping is set for all the datasets in your LDM, your LDM is ready, and you can publish it.
Publish the LDM
To publish the LDM, follow the instructions from Publish a Logical Data Model.