Use Computed Attributes
Computed attributes allow you to create buckets that are defined by ranges of a metric. A computed attribute breaks the underlying attribute into logical thresholds.
For example, you may want to group companies into three sizes based on their number of employees:
- Small – up to 50 employees
- Medium – up to 200 employees
- Large – more than 200 employees
To do so, you use computed attributes.
Computed attributes appear together with all your attributes under the Manage tab, and you can use and manage them like other attributes (for example, apply as dashboard filters).
In GoodData, terms workspace and project denote the same entity. For example, project ID is exactly the same as workspace ID. See Find the Workspace ID.
Computed Attributes and Underlying Metrics
Computed attributes are dynamic. When you change the definition of the metric that a computed attribute is computed from, the buckets are recalculated according to the new metric. For example, if you are ranking sales representatives by quarterly revenue, then change the metric to rank them by monthly revenue.
When you upload new data, this data is grouped into the buckets in the computed attribute.
Limitations
- Computed attributes do not appear and cannot be managed in CloudConnect logical data models.
- You cannot update buckets in a computed attribute. To update buckets, you have to delete the computed attribute and create a new one.
Create a Computed Attribute
When you create a computed attribute, a dataset for that computed attribute is also created as a separate attribute in the logical data model.
A computed attribute can contain only one metric and only one attribute.
Steps:
Click Manage on the workspace toolbar.
The administration page opens.
On the Data tab, click Attributes. The list of all workspace attributes opens.
Click Create Computed Attribute.
The screen for creating a computed attribute opens.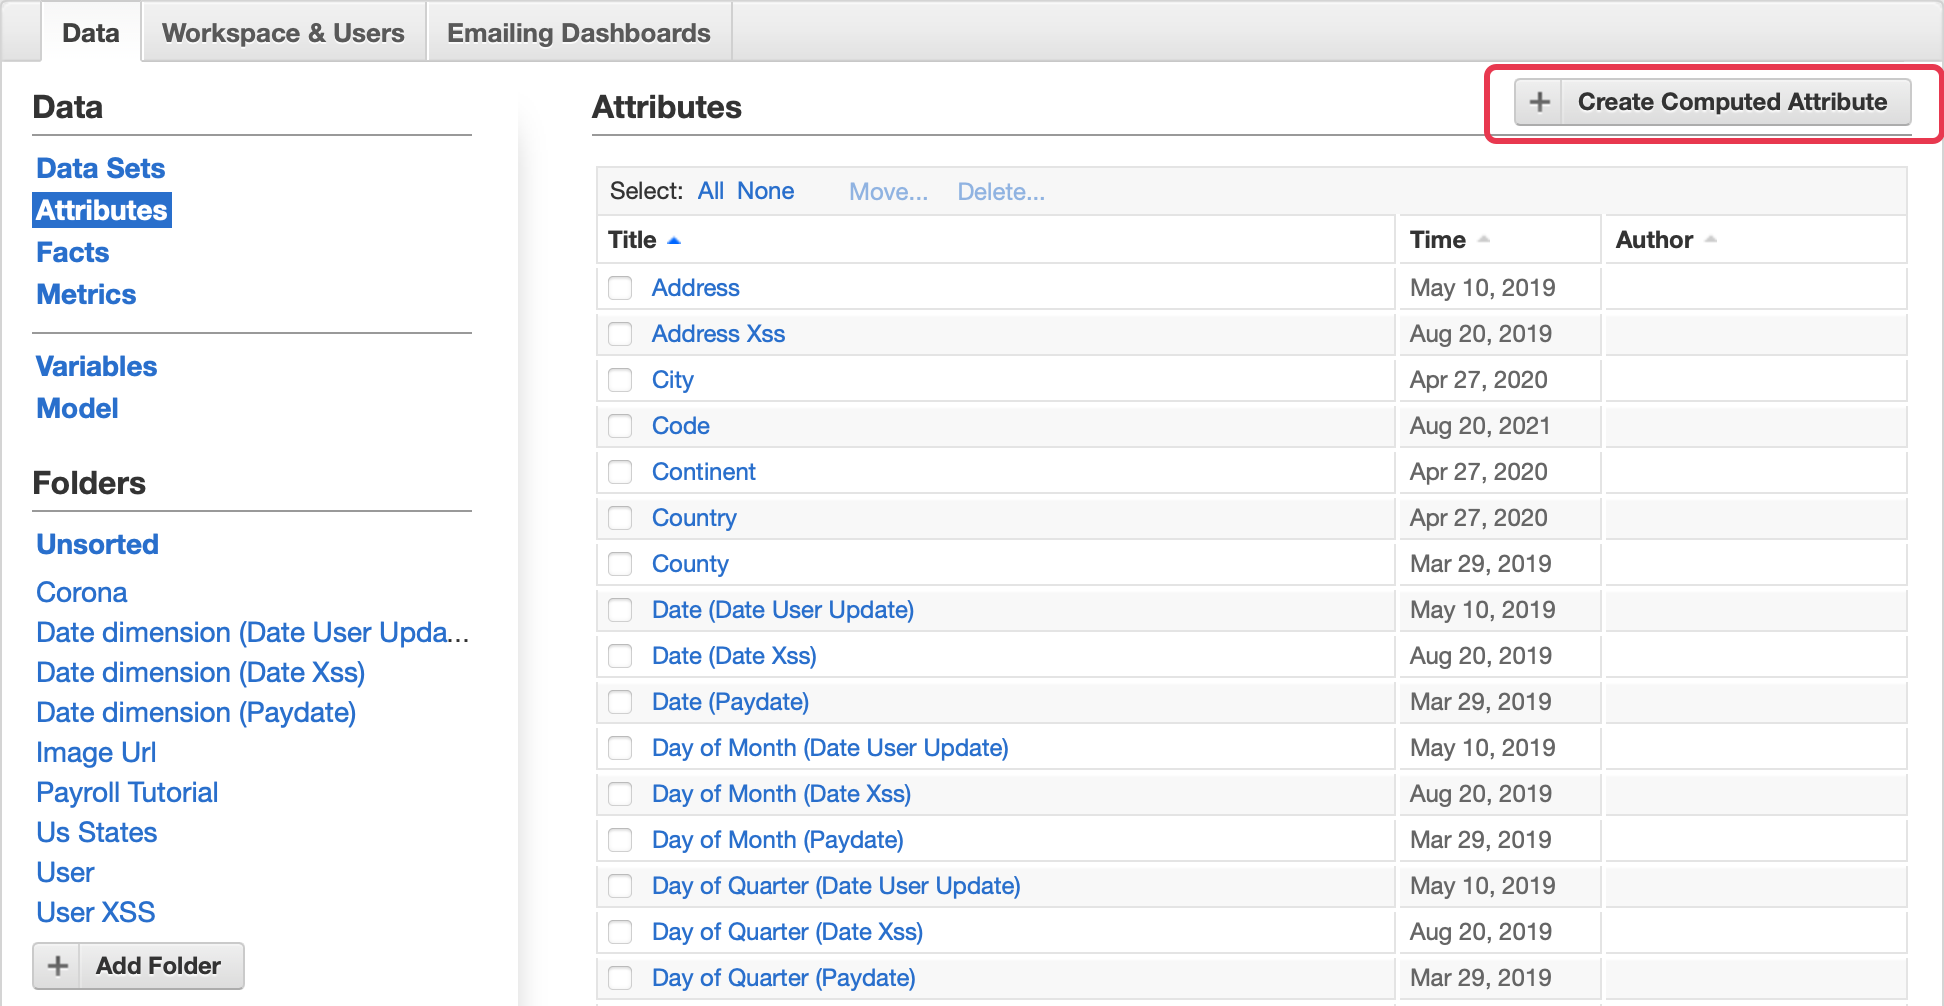
Select the attribute to break into buckets.
Select the metric to break the attribute by.
Define the buckets and their threshold values.
You can use negative ranges using the ‘up to’ argument. The structure must represent the inverse of positive ranges. For example:
- Small – up to -5
- Medium – up to 0
- Large – more than 0
Enter a meaningful name for the computed attribute.
Give your computed attribute an easily identifiable name. Computed attributes cannot be filtered out from other regular attributes.Click Create Computed Attribute. The attribute is created, and the attribute details page opens. A dataset for that computed attribute with the same name is created. You can review it under the Data Sets page (see Manage Datasets).
You can immediately start using the computed attribute.
Delete a Computed Attribute
You cannot directly delete a computed attribute. To delete a computed attribute, you have to delete its dataset. Deleting the dataset deletes both the dataset and its associated computed attribute.
If you delete a computed attribute used by a report, the report will also be deleted. For more information about deleting computed attributes, contact GoodData Support.
Steps:
- Click Manage on the toolbar. The administration page opens.
- On the Data tab, click Data Sets. The list of all workspace datasets opens.
- Click the dataset that is related to the computed attribute you want to delete. By default, the dataset has the same name as the related computed attribute. The dataset details page opens.
- Click Delete. You are asked to confirm the deletion.
- Click Delete to confirm. The dataset and related computed attribute are deleted from the workspace. The list of available workspace datasets opens.
Migrate Computed Attributes between Workspaces
This procedure applies to you only if you do not have Life Cycle Management (LCM) (see Managing Workspaces via Life Cycle Management) implemented on your site.
If you are using LCM to manage your workspaces, LCM bricks manage and migrate computed attributes automatically, and you can skip this procedure.
Computed attributes are built on attributes, metrics, and a relation between the metric values and the attribute and its values. When migrating objects (reports, dashboards) that contain computed attributes, you have to migrate the components of the computed attributes separately (by updating the logical data model and by direct object migration) and in a predefined order so that the computed attributes are correctly assembled in the target workspace.
The following procedure describes how to migrate computed attributes and the objects that use them (dashboards, reports) between workspaces. This procedure alternates between two workspaces: source and target. It may be helpful to use a text editor for staging the code that you copy and paste.
The following procedure assumes that you access your workspaces at https://secure.gooddata.com/. If you are a white-labeled customer, replace secure.gooddata.com with your white-labeled domain in the procedure steps.
In GoodData, terms workspace and project denote the same entity. For example, project ID is exactly the same as workspace ID. See Find the Workspace ID.
Steps:
In the source workspace, go to the gray page for getting a link to view the logical data model (LDM) of the workspace with computed attributes included:
https://secure.gooddata.com/gdc/projects/{source_workspace_id}/model/view?includeCA=true&includeDeprecated=true&includeGrain=trueincludeCA=trueincludes computed attributes in the workspace LDM.includeDeprecated=trueincludes deprecated attributes and facts in the workspace LDM.includeGrain=trueincludes the Fact Table Grain in the workspace LDM.
The link to a polling resource that displays the workspace LDM is returned.
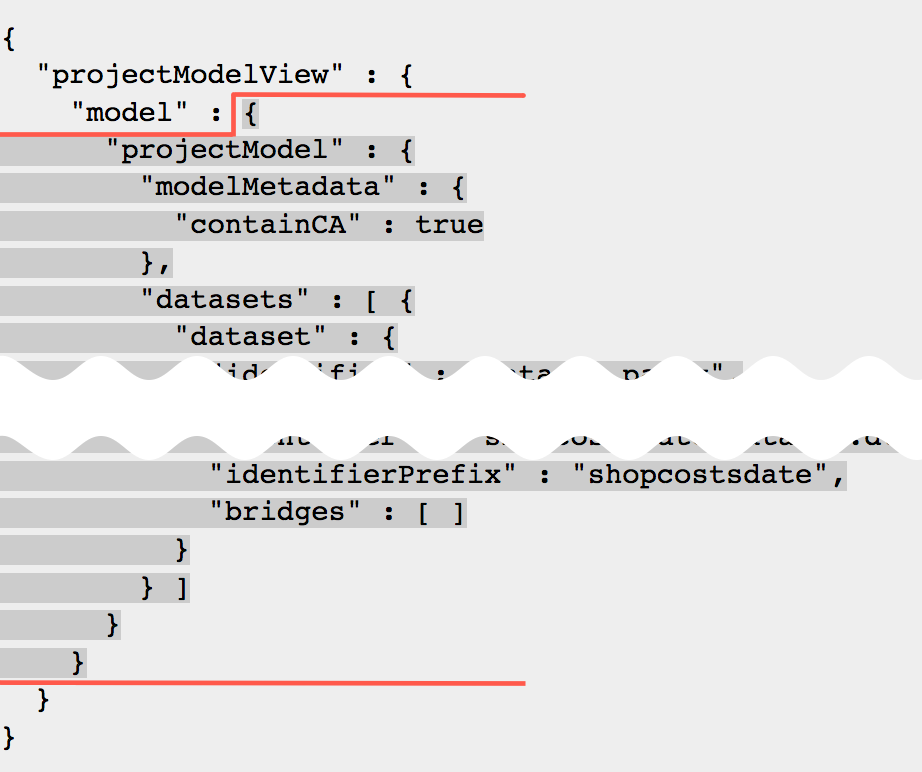
Click the polling link. The JSON structure that describes the workspace LDM is displayed. The JSON contains the
modelMetadatasection that confirms that the returned LDM includes computed attributes."projectModel": { "modelMetadata": { "containCA": true } ...Copy the section of the returned JSON structure starting with the following segment:
{
  "projectModel": {
    ...
Do not copy theprojectModelViewandmodelkeys.
In the target workspace, go to the gray page for generating a MAQL DDL script with computed attributes included:
https://secure.gooddata.com/gdc/projects/{target_workspace_id}/model/diff?includeCA=true&includeDeprecated=true&includeGrain=trueincludeCA=trueincludes computed attributes in the workspace LDM.includeDeprecated=trueincludes deprecated attributes and facts in the workspace LDM.includeGrain=trueincludes the Fact Table Grain in the workspace LDM.
Paste the copied JSON structure from the source workspace into the gray page form, and click Create Diff. The link for polling for status of the diff and MAQL DDL generation is returned.
Poll for the status until the gray page returns the diff and MAQL DDLs. The diff between the source workspace LDM and the target workspace LDM is represented by script operations that you can execute on the target workspace LDM to make it equal to the source workspace LDM (specifically, to recreate the components of the computed attributes from the source workspace in the source workspace).
In the returned MAQL DDLs, locate the
updateScript->maqlDdlChunkssection. For example:"updateScript": { "maqlDdlChunks": [ "CREATE FOLDER {ffld.employee} VISUAL(TITLE \"Employee\") TYPE FACT;\nCREATE FACT {fact.employee.age} VISUAL(TITLE \"Employee Age\", FOLDER {ffld.employee}) AS {f_employee.f_age};\nALTER DATASET {dataset.employee} ADD {fact.employee.age};\nSYNCHRONIZE {dataset.employee};" ] }Copy and store the MAQL statement (we will refer to this statement as “MAQL statement 1” further in this procedure):
CREATE FOLDER {ffld.employee} VISUAL(TITLE \"Employee\") TYPE FACT;\nCREATE FACT {fact.employee.age} VISUAL(TITLE \"Employee Age\", FOLDER {ffld.employee}) AS {f_employee.f_age};\nALTER DATASET {dataset.employee} ADD {fact.employee.age};\nSYNCHRONIZE {dataset.employee};Go back to the returned MAQL DDLs, and locate the
computedAttributesScript->maqlDdlChunkssection. For example:"computedAttributesScript": { "maqlDdlChunks": [ "alter attribute {attr.comp.nPhsOoM} add relations to {attr.payroll.store} as case when {aabqCCZAJaKw} <= 1000 then {attr.comp.nPhsOoM?\"Small\"}, when {aabqCCZAJaKw} <= 2000 then {attr.comp.nPhsOoM?\"Medium\"}, when {aabqCCZAJaKw} > 2000 then {attr.comp.nPhsOoM?\"Large\"} else {attr.comp.nPhsOoM?\"\"} end" ] }Copy and store the MAQL statement (we will refer to this statement as “MAQL statement 2” further in this procedure):
"alter attribute {attr.comp.nPhsOoM} add relations to {attr.payroll.store} as case when {aabqCCZAJaKw} <= 1000 then {attr.comp.nPhsOoM?\"Small\"}, when {aabqCCZAJaKw} <= 2000 then {attr.comp.nPhsOoM?\"Medium\"}, when {aabqCCZAJaKw} > 2000 then {attr.comp.nPhsOoM?\"Large\"} else {attr.comp.nPhsOoM?\"\"} endUse any free online JSON escape tool to make the following changes in both MAQL statement 1 and MAQL statement 2:
- Remove all instances of
\n. - Replace
\"with".
You are now ready to apply the MAQL statement to the target workspace LDM to recreate the components of the computed attribute.
- Remove all instances of
In the target workspace, go to the gray page for updating the LDM:
https://secure.gooddata.com/gdc/md/{target_workspace_id}/ldm/manage2Paste the fixed MAQL statement 1 into the gray page form, and click submit. The link for polling for status of the LDM update is returned.
Poll for the status until the gray page returns OK as task status. The LDM of the target workspace is updated and now contains the non-metric part of the computed attributes from the source workspace (that is, the attribute that the migrated computed attribute is built on). You are now going to migrate the objects that use the computed attributes (dashboards, reports, including the metric that the migrated computed attribute uses).
Read Migrate Selected Objects between Workspaces and migrate the objects that use the computed attributes from the source workspace to the target workspace. To do so, perform partial metadata export from the source workspace and partial metadata import to the target workspace. The metrics that the computed attributes are built on are migrated as part of the migrated objects. When you are done, the target workspace contains the metrics that are used in the computed attributes and the objects that use the computed attributes.
In the target workspace, go to the gray page for updating the LDM again:
https://secure.gooddata.com/gdc/md/{target_workspace_id}/ldm/manage2Paste the fixed MAQL statement 2 into the gray page form, and click submit. The link for polling for status of the LDM update is returned.
Poll for the status until the gray page returns OK as task status. The LDM of the target workspace is updated and now contains the metric-attribute relation part of the computed attributes from the source workspace.
Log in to the GoodData Portal and go to the target workspace. Verify that the migrated objects are displayed correctly, and the computed attributes are applied.