Export and Import the Data Pipeline
For workspace administrators only
The data pipeline usually consists of multiple data pipeline bricks such as CSV Downloader, ADS Integrator and so on (see Brick Reference). It may also include Life Cycle Management (LCM) bricks (see Bricks) or processes for loading data from cloud data warehouses and object storage services (see Direct Data Distribution from Data Warehouses and Object Storage Services). Those bricks and processes rely on data loading processes deployed in a workspace and scheduled to run at a certain time and also on the Data Sources that exist in the domain (see Setting Up Data Loading Processes).
You can export the whole data pipeline from the workspace to a JSON file. You can also import the data pipeline from a JSON file into another workspace.
Here are some situations when you may want to export or import the data pipeline:
You need to recreate the same pipeline in another workspace - in the same or even a different domain and across the data centers. If you have multiple environments, you may need to recreate the same pipeline in different workspaces (for example, moving the pipeline from development to testing and then to production). To do so, export the data pipeline from the source workspace and then import it from the JSON file into the target workspace.
- Make sure that any parameter values which are environment-specific are externalized to Data Sources. There should be no difference between the pipelines in your environments other than values in the Data Sources. To hold environment-specific or custom parameters, use a generic Data Source (see Create a Data Source).
- Export the pipeline from a lower-level environment, then import it to a higher-level environment. If new secure parameters or Data Source parameters that were not there previously get imported, you will be notified and will have to provide their values manually. This should only be needed during the very first import into the target workspace or when a new secure parameter or a Data Source parameter is introduced.
You want to keep a version of the data pipeline that exists at a certain point or create a backup file. Export the data pipeline and store the JSON file in a versioning system or a dedicated location.
Passwords and values of other secure parameters as well as values of Data Source parameters are not exported and not included in the JSON file.You want to have a template data pipeline with preconfigured components that other users can use in their workspaces (for example, for a set of LCM bricks). Export the data pipeline and modify the JSON file to create a template pipeline. You can add a description of the pipeline and predefine parameters. When importing a pipeline from the template, you will be asked to review the parameters and enter or update their values.
How Export Works
You export the data pipeline from a workspace to a JSON file.
What Is Exported
The following components are exported and appear in the JSON file:
- Processes deployed in the workspace for:
- Data pipeline bricks (see Brick Reference)
- LCM bricks (see Bricks)
- Automated Data Distribution (ADD) v2 (see Automated Data Distribution v2 for Data Warehouses and Automated Data Distribution v2 for Object Storage Services)
- Ruby scripts deployed from a Git path
- Data Sources that are used in these processes
- Schedules for these processes
All these components are exported altogether. You cannot choose to export some processes or schedules and to not export the others. If you do not want to have a certain component in the export, remove it from the JSON file manually (see Pipeline File Example).
What Is NOT Exported
The following components are not exported and do not appear in the JSON file:
- Processes deployed in the workspace for:
- CloudConnect graphs
- Ruby scripts deployed from a ZIP file
- Automated Data Distribution v1
- Schedules for these processes
- Notification rules for any schedules (even for the schedules that have been exported)
How Parameters Are Exported
The processes, Data Sources, and schedules are exported with their parameters, both regular and secure (see Configure Schedule Parameters).
Process Parameters
For a regular parameter, both the name and the value are exported:
"path": "gdc/acme"
For a secure parameter, only the name is exported. The value is replaced with a >>FIXME<< placeholder.
"secretKey": ">>FIXME<<"
In addition, the following rules are applied to the exported ADD v2 processes:
- For the ADD v2 processes with the Current Workspace option selected (see Deploy a Data Loading Process for Automated Data Distribution v2), the value of the client ID of the workspace is not exported.
- For the ADD v2 processes with the Segment (LCM) option selected (see Deploy a Data Loading Process for Automated Data Distribution v2), the segment is not exported and replaced with a
>>FIXME<<placeholder.
After you have imported the data pipeline into a workspace, the processes that are missing values will be highlighted to prompt you to re-introduce those values.
Schedule Parameters
For a regular parameter, both the name and the value are exported:
"path": "gdc/acme"
For a secure parameter, only the name is exported. The value is replaced with a >>FIXME<< placeholder.
"secretKey": ">>FIXME<<"
After you have imported the data pipeline into a workspace, the schedules that are missing values will be highlighted to prompt you to re-introduce those values.
If a process schedule has another schedule that must be executed first (see Configure Schedule Sequences, Runs after {schedule_name} ends successfully) and this triggering schedule is not exported (for example, because it executes a CloudConnect process), the dependency is replaced with Runs manually (see Schedule a Data Load for Manual Execution Only). You can change it in the target workspace after importing the data pipeline.
Data Source Parameters
For all parameters (both regular and secure), only the name is exported. The value is replaced with a >>FIXME<< placeholder.
"url": ">>FIXME<<"
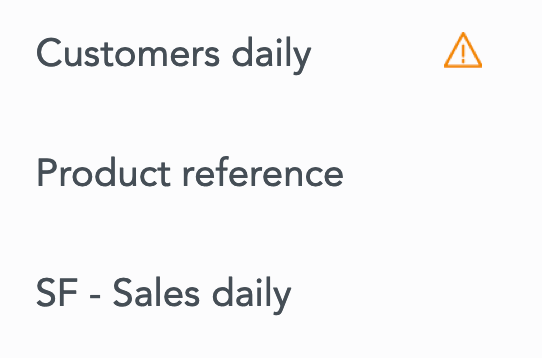
After you have imported the data pipeline into a workspace, you will be warned about missing values in the Data Sources and asked to re-introduce those values. The Data Sources that are missing values will be marked with a warning icon.
Pipeline File Example
The JSON file describes the components of the exported data pipeline.
Imagine that you have a pipeline with a data loading process that uses a Data Source for a Redshift cluster and has one schedule. When the data pipeline is exported, the following JSON file is generated:
{
  "pipeline": {
    "dataSources": [
      {
        "dataSource": {
          "alias": "Redshift_acme",
          "name": "Redshift_acme",
          "prefix": "",
          "connectionInfo": {
            "redshift": {
              "url": ">>FIXME<<",
              "authentication": {
                "basic": {
                  "userName": ">>FIXME<<",
                  "password": ">>FIXME<<"
                }
              },
              "database": ">>FIXME<<",
              "schema": ">>FIXME<<"
            }
          }
        }
      }
    ],
    "processes": [
      {
        "process": {
          "alias": "Redshift_ACME",
          "name": "Redshift ACME",
          "type": "ETL",
          "component": {
            "name": "gdc-data-distribution",
            "version": "1",
            "config": {
              "dataDistributionAlias": {
                "dataSourceAlias": "Redshift_acme"
              }
            }
          },
          "schedules": [
            {
              "schedule": {
                "alias": "Redshift_ACME_all",
                "name": "Redshift ACME all",
                "state": "ENABLED",
                "params": {
                  "GDC_DE_SYNCHRONIZE_ALL": "true"
                },
                "hiddenParams": {
                  "mySecureParameter": ">>FIXME<<"
                }
              }
            }
          ]
        }
      }
    ]
  }
}
Export the Data Pipeline
Steps:
- Click your name in the top right corner, and select Data Integration Console. Alternatively, go to
https://{your.domain.com}/admin/disc/. - On the top navigation bar, select Workspaces, and click the name of the workspace from which you want to export the pipeline. The page with deployed processes opens.
- Click the menu button, then click Export pipeline. A summary of what will be exported opens.
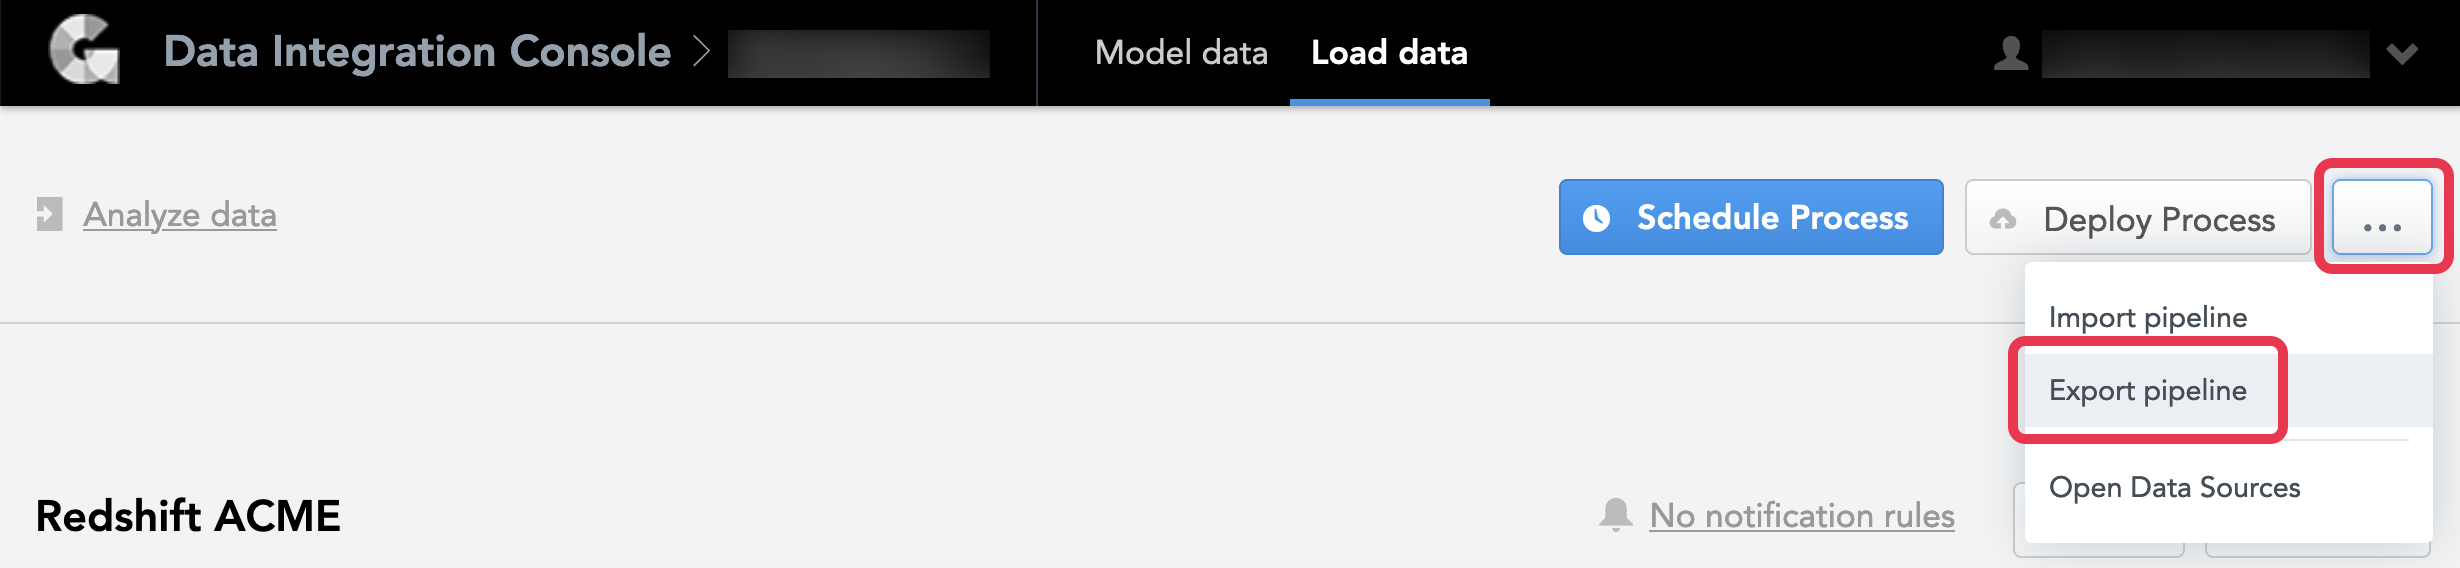
- Review the summary, and click Export. A JSON file with the pipeline is generated.
- Follow the instructions in your browser to save the generated file. Your pipeline is exported.
You can also export the data pipeline via the API.
How Import Works
The Data Sources specified in the JSON file are imported differently than the processes and schedules.
How Processes and Schedules Are Imported
When you import a pipeline into a workspace where no processes exist, no conflicts with the imported processes/schedules are expected. If the imported pipeline contained values that were replaced with a >>FIXME<< placeholder, the processes/schedules that are missing values will be highlighted to prompt you to re-introduce those values.
When you import a pipeline into a workspace where some processes and schedules exist, you will be asked to choose one of the following strategies:
- Replace All the existing processes and schedules are deleted from the workspace. The processes and schedules specified in the JSON file are added to the workspace.
- Merge The processes and schedules from the JSON file are merged into the processes and schedules existing in the workspace. The processes and schedules to merge are detected based on the alias.
The alias is a reference to a process or a schedule that is autogenerated based on the process or schedule name. The alias must be unique within a workspace but does not have to be unique within a domain. That is, a process/schedule with the alias of RS_ACME can exist in multiple workspaces in the same domain.
During import, the process/schedule in the workspace and the process/schedule in the JSON file that have the same alias are considered the same process/schedule.
In the JSON file generated at pipeline export, the values of secure parameters of a process/schedule are replaced with a >>FIXME<< placeholder. After you have imported the data pipeline into a workspace, you will be prompted to re-introduce those missing values in the target workspace.
Here is how the processes/schedules are imported when the Merge strategy is selected:
- The process/schedule from the JSON file is merged into the process/schedule with the same alias in the workspace.
- The regular parameters specified for the process/schedule in the JSON file replace the corresponding parameters in the same process/schedule in the workspace.
- The secure parameters specified for the process/schedule in the JSON file do not replace the corresponding parameters in the same process/schedule in the workspace. The values of the secure parameters in the imported JSON file are replaced with a
>>FIXME<<placeholder, which does not get propagated to the target workspace at import. Therefore, the original parameter values remain untouched. - The parameters that are specified in the JSON file but do not exist in the process/schedule in the workspace are added to this process/schedule in the workspace.
- The parameters that exist in the process/schedule in the workspace but are not specified in the JSON file are deleted from this process/schedule in the workspace.
- The process/schedule in the workspace that does not have a process/schedule with the same alias in the JSON file remains untouched.
- The process/schedule in the JSON file that does not have a process/schedule with the same alias in the workspace is added to the workspace.
Example:
| Workspace before import | JSON file | Workspace after import with Merge strategy |
|---|---|---|
Process_A
| Process_A
| Process_A
|
Schedule_B
| Schedule_B
| Schedule_B
|
Process _C
| Process _C
| |
Schedule_D
| Schedule_D
|
How Data Sources Are Imported
Data Sources exist in the context of a domain and are not tied to any specific workspace. The import strategy selected for the processes/schedules in the context of the workspace does not apply to the Data Sources.
At import, the Data Sources specified in the JSON file are merged into the Data Sources existing in the domain. The Data Sources to merge are detected based on the alias.
The alias is a reference to a Data Source that is autogenerated based on the Data Source name. The alias must be unique within a domain but does not have to be unique across different domains. That is, a Data Source with the alias of RS_ACME can exist in multiple domains.
During import, the Data Source in the domain and the Data Source in the JSON file that have the same alias are considered the same Data Source.
In the JSON file generated at pipeline export, the values of all parameters of a Data Source are replaced with a >>FIXME<< placeholder. After you have imported the data pipeline into a workspace, you will be warned about missing values in the Data Sources and asked to re-introduce those values. The Data Sources that are missing values will be marked with a warning icon.
Here is how the Data Sources are imported:
- The Data Source from the JSON file is merged into the Data Source with the same alias in the domain.
The parameters specified for the Data Source in the JSON file do not replace the corresponding parameters in the same Data Source in the domain. The values of the Data Source parameters in the imported JSON file are replaced with a
>>FIXME<<placeholder, which does not get propagated to the domain at import. Therefore, the original parameter values remain untouched.The parameters that are specified in the JSON file but do not exist in the Data Source in the domain are added to this Data Source in the domain.
So that the parameters get added to the Data Source, you must be either the owner of the Data Source or a user with whom this Data Source is shared with the manage access (see Share a Data Source with Other Users). Otherwise, the parameters are not added.The parameters that exist in the Data Source in the domain but are not specified in the JSON file remain untouched.
- The Data Source in the domain that do not have a Data Source with the same alias in the JSON file remains untouched.
- The Data Source in the JSON file that do not have a Data Source with the same alias in the domain is added to the domain. You are becoming the owner of the newly added Data Source.
Example:
| Domain before import | JSON file | Domain after import |
|---|---|---|
Data_Source_A
| Data_Source_A
| Data_Source_A
|
Data_Source_B
| Data_Source_B
| |
Data_Source_C
| Data_Source_C
|
Import the Data Pipeline
Steps:
Click your name in the top right corner, and select Data Integration Console. Alternatively, go to
https://{your.domain.com}/admin/disc/.On the top navigation bar, select Workspaces, and click the name of the workspace into which you want to import the pipeline. The page with deployed processes opens.
Click the menu button, then click Import pipeline.
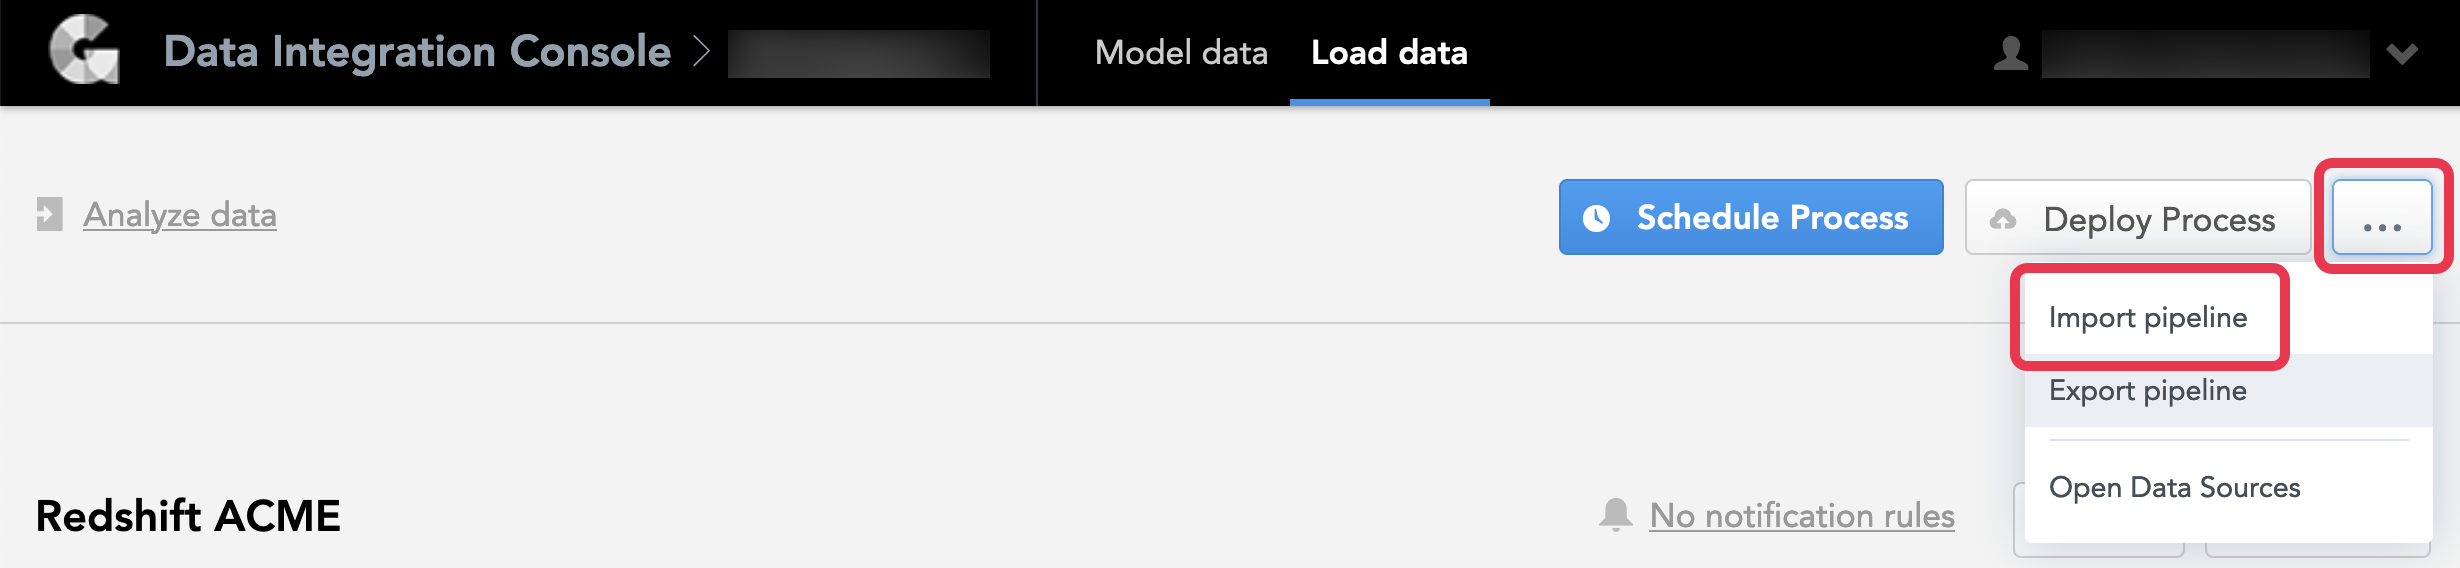 If your workspace does not have any deployed processes, the main data load page opens. On this page, click Import pipeline.
Click Browse, navigate to the JSON file, and upload it. A summary of what will be imported opens.
Review the summary, and choose the import strategy.
Use the Replace strategy carefully. When Replace is used, all the processes and schedules are deleted from the workspace and replaced with the processes and schedules specified in the JSON file. The deleted processes and schedules cannot be restored.If your workspace does not have any deployed processes, the import strategy options are not displayed.Click Import. The pipeline is imported. If the imported pipeline contained values that were replaced with a
>>FIXME<<placeholder, you are asked to re-introduce those missing values in the workspace and/or the Data Sources:- The processes/schedules that are missing values will be highlighted.

- A message on the top will warn you about missing values in the Data Sources. The Data Sources that are missing values will be marked with a warning icon.
- The processes/schedules that are missing values will be highlighted.
Provide the missing values:
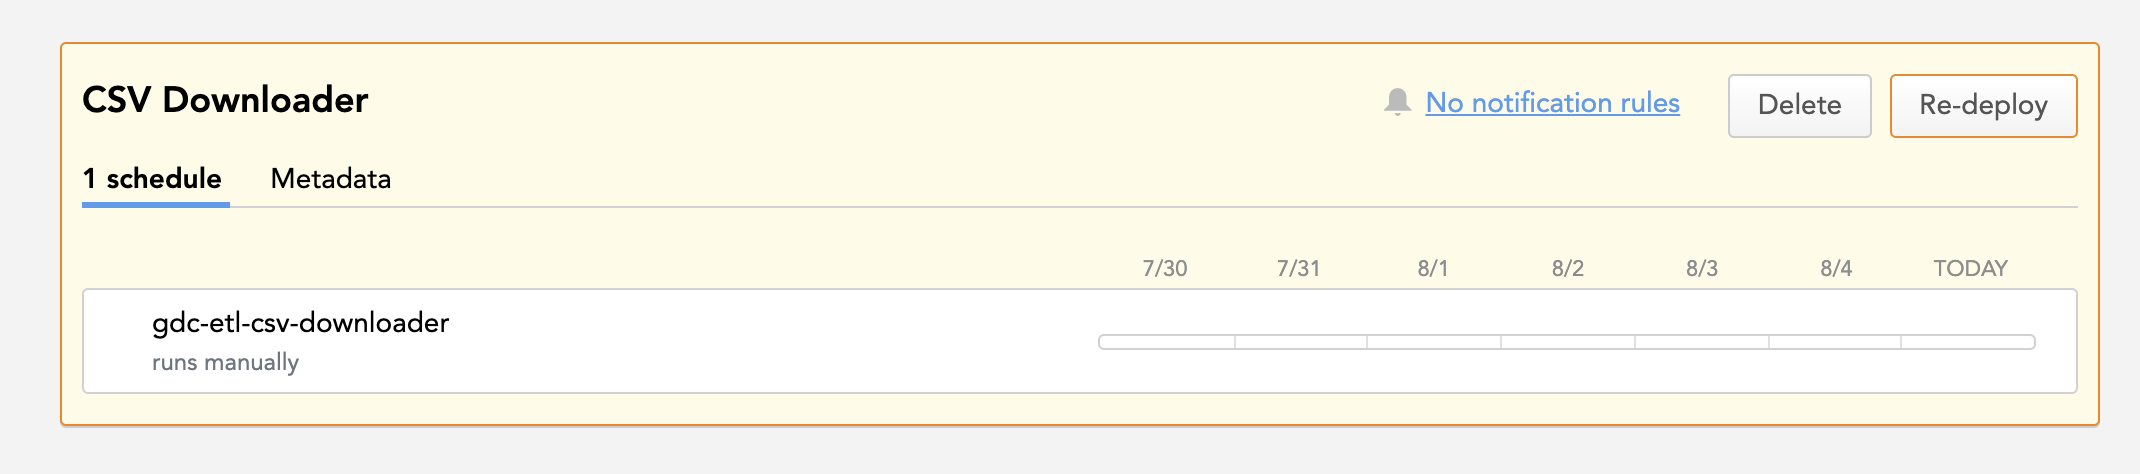
- For a process:
- Click Re-deploy next to the process.
- In the deployment dialog, fill in the missing values, and click Re-deploy.
- For a schedule:
- Locate the data loading process that contains the schedule, and click the name of the schedule.
- In the schedule dialog, fill in the missing values, and click Save.
- For a Data Source:
- Click the menu button, then click Open Data Sources.
- In the list of the Data Sources on the left, click the Data Source.
- Click the menu button, then click Edit.
- Fill in the missing values, and click Save.
- For a process:
You can also import the data pipeline via the API.
Data Pipeline Templates
A data pipeline template allows you to create a pipeline definition with predefined parameters and their values. You or another user can then import the pipeline template and enter or update the parameter values according to the configuration of your workspace.
You create an importable pipeline template as a JSON file based on the JSON file of an existing pipeline.
Template Structure
Pipeline Description and Parameters
In addition to the standard pipeline components such as Data Sources, processes, and schedules, you can add a pipeline description and parameters to the pipeline template JSON file.
To do so, add the following sections under the pipeline section of the JSON file:
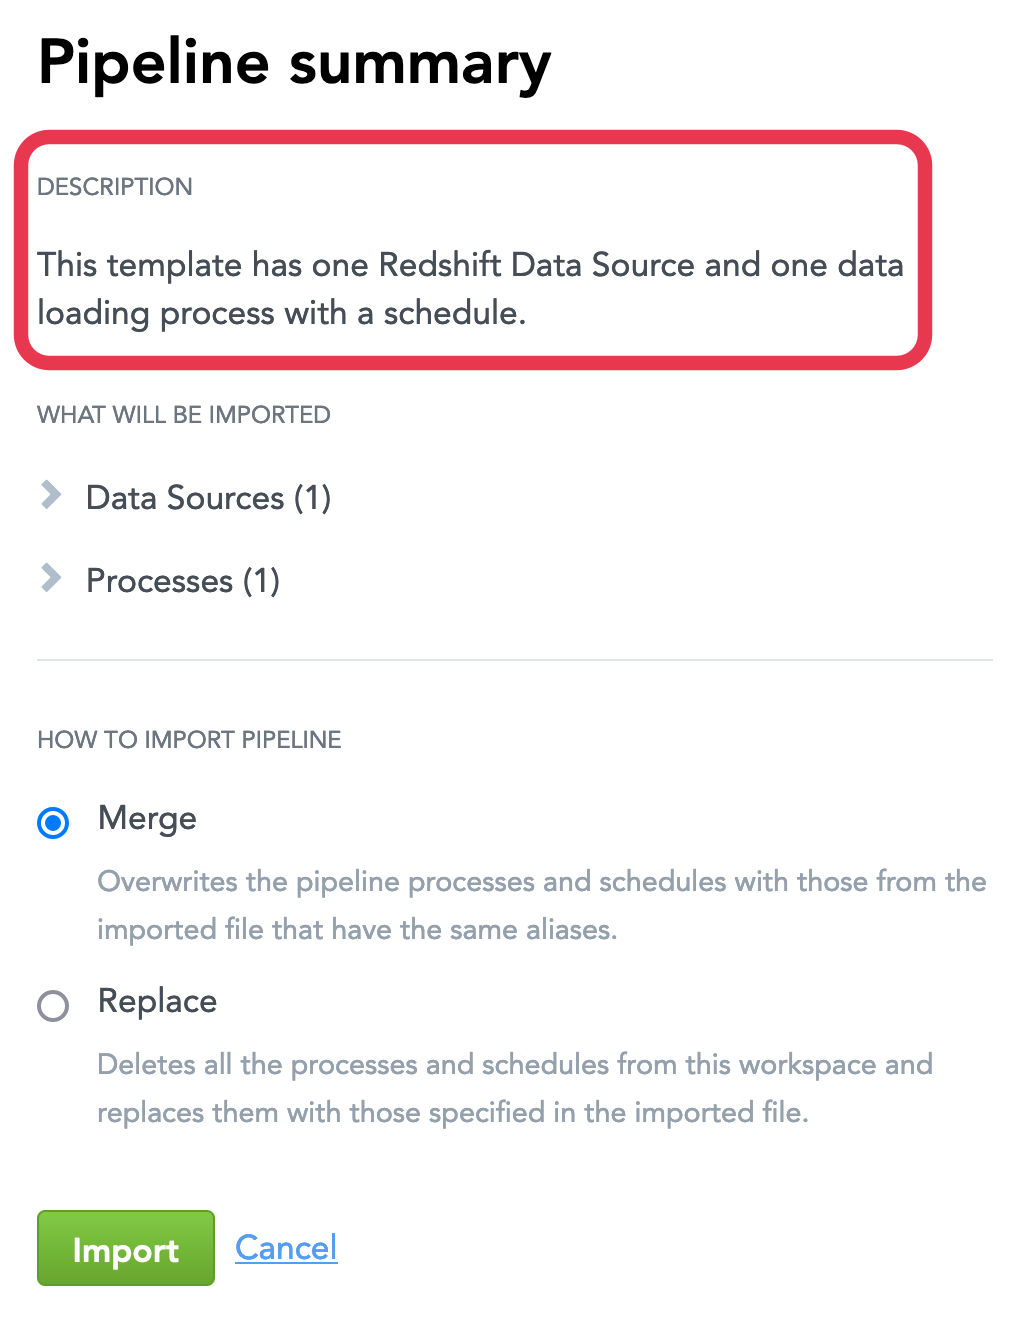
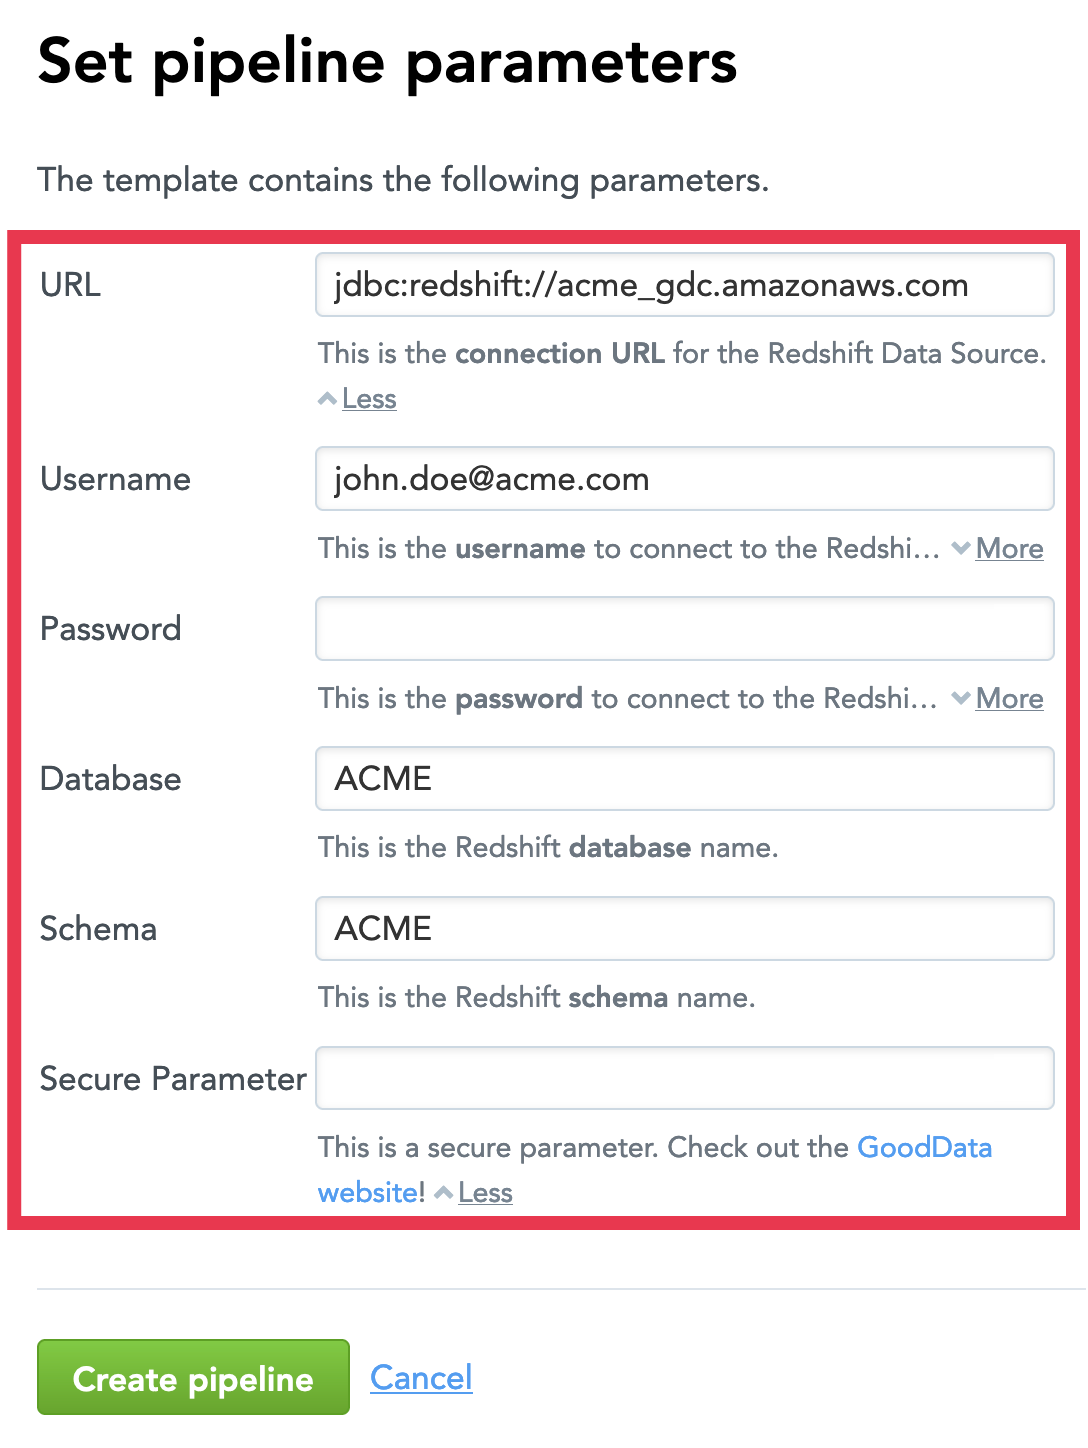
description(string, optional) is a description of the template that will be displayed on the top of the import summary dialog. Can contain only plain text.parameters(array) is a section where you can specify pipeline parameters as separate objects. Eachparameterobject contains the following properties:name(string) is the name of the parameter as it will be displayed in the pipeline parameter dialog. You can use the parameter name to reference this parameter in a Data Source, process, or schedule in the pipeline template.value(string, optional) is the value of the parameter that will be pre-filled in the pipeline parameter dialog. You will be able to edit this value when importing the pipeline from the template. If you do not provide thevalueparameter, the field for the parameter value in the pipeline parameter dialog will be empty, and you will be able to enter its value.meta(object) is a section where you can define the parameter’s metadata. The metadata can contain:description(string, optional) is a description of the parameter that will be displayed under the parameter value field in the pipeline parameter dialog. Can contain plain text, bold text (<b>this is bold</b>) and hyperlinks leading to a page within the*.gooddata.comdomain (<a href='https://www.gooddata.com/' target='_blank'>this is the GoodData website</a>).secure(boolean, optional) is a flag that defines whether the parameter should be treated as regular (false) or secure (true). If set totrue, the value entered in the pipeline parameter dialog will not appear in clear-text form. If not explicitly specified, defaults tofalse.
{
  "pipeline": {
    "description": "{pipeline_template_description}",
    "parameters": [
      {
        "parameter": {
          "name": "{parameter_name}",
          "value": "{parameter_value}",
          "meta": {
            "description": "{parameter_description}",
            "secure": true|false
          }
        }
      }
    ],
    "dataSources": [
      ...
    ],
    "processes": [
      ...
    ]
  }
}
Parameter References
Once you have set up the parameters, you can reference them in the Data Sources, processes, and schedules in the pipeline template instead of providing their values explicitly.
The reference to a parameter is built as $${parameter_name}. For example, the reference to the User Name parameter is $${User Name}.
During the import of the data pipeline from the template, you will be asked to enter or update the parameter values. Those values will be used in the imported Data Sources, processes, and schedules that contain the references to the parameters.
{
  "pipeline": {
    "parameters": [
      {
        "parameter": {
          "name": "User Name",
          "value": "john.doe@acme.com",
          "meta": {
            "description": "This is the username to connect to the database.",
            "secure": false
          }
        }
      }
    ],
    "dataSources": [
      {
        "dataSource": {
          ...
          "connectionInfo": {
            "redshift": {
              "authentication": {
                "basic": {
                  "userName": "$${User Name}"
                  ...
                }
              }
            }
          }
        }
      }
    ],
    "processes": [
      ...
    ]
  }
}
Pipeline Template File Example
The following JSON file describes a pipeline template with a data loading process that uses a Data Source for a Redshift cluster and has one schedule. The pipeline template defines six parameters that are referenced in the Data Source and schedule.
{
  "pipeline": {
    "description": "This template has one Redshift Data Source and one data loading process with a schedule.",
    "parameters": [
      {
        "parameter": {
          "name": "URL",
          "value": "jdbc:redshift://acme_gdc.amazonaws.com",
          "meta": {
            "description": "This is the <b>connection URL</b> for the Redshift Data Source.",
            "secure": false
          }
        }
      },
      {
        "parameter": {
          "name": "Username",
          "value": "john.doe@acme.com",
          "meta": {
            "description": "This is the <b>username</b> to connect to the Redshift cluster.",
            "secure": false
          }
        }
      },
      {
        "parameter": {
          "name": "Password",
          "meta": {
            "description": "This is the <b>password</b> to connect to the Redshift cluster.",
            "secure": true
          }
        }
      },
      {
        "parameter": {
          "name": "Database",
          "value": "ACME",
          "meta": {
            "description": "This is the Redshift <b>database</b> name.",
            "secure": false
          }
        }
      },
      {
        "parameter": {
          "name": "Schema",
          "value": "ACME",
          "meta": {
            "description": "This is the Redshift <b>schema</b> name.",
            "secure": false
          }
        }
      },
      {
        "parameter": {
          "name": "Secure parameter",
          "meta": {
            "description": "This is a secure parameter. Check out the <a href='https://www.gooddata.com/' target='_blank'>GoodData website!</a>",
            "secure": true
          }
        }
      }
    ],
    "dataSources": [
      {
        "dataSource": {
          "alias": "Redshift_acme",
          "name": "Redshift_acme",
          "prefix": "",
          "connectionInfo": {
            "redshift": {
              "url": "$${URL}",
              "authentication": {
                "basic": {
                  "userName": "$${Username}",
                  "password": "$${Password}"
                }
              },
              "database": "$${Database}",
              "schema": "$${Schema}"
            }
          }
        }
      }
    ],
    "processes": [
      {
        "process": {
          "alias": "Redshift_ACME",
          "name": "Redshift ACME",
          "type": "ETL",
          "component": {
            "name": "gdc-data-distribution",
            "version": "1",
            "config": {
              "dataDistributionAlias": {
                "dataSourceAlias": "Redshift_acme"
              }
            }
          },
          "schedules": [
            {
              "schedule": {
                "alias": "Redshift_ACME_all",
                "name": "Redshift ACME all",
                "state": "ENABLED",
                "params": {
                  "GDC_DE_SYNCHRONIZE_ALL": "true"
                },
                "hiddenParams": {
                  "mySecureParameter": "$${Secure parameter}"
                }
              }
            }
          ]
        }
      }
    ]
  }
}
Create a Data Pipeline Template
Steps:
- Export the data pipeline that you want to use as a base of your template pipeline. You get a JSON file that describes the components of the exported data pipeline.
- Modify the JSON file to build the template structure:
- Add a
parameterssection, and add parameters for:- Each parameter with a
>>FIXME<<value placeholder that appears in the Data Sources, processes, or schedules in the template. For example, all the values of Data Source parameters are replaced with>>FIXME<<. - Any other parameter that appears in the Data Sources, processes, or schedules in the template and whose value you want to be entered or edited during the template import.
- Each parameter with a
- Replace each
>>FIXME<<placeholder with a reference to the corresponding parameter from theparameterssection. For example,"userName": ">>FIXME<<"may become"userName": "$${User Name}". - Replace the values of the other parameters with references to the corresponding parameters from the
parameterssection. - (Optional) Add a template description.
- Add a
- Save the changes in the JSON file. Your data pipeline template is ready.
Import a Data Pipeline from a Pipeline Template
When you are importing a data pipeline from a template that contains Data Sources, be aware of the following:
- If a Data Source in the template does not have a Data Source with the same alias in the domain, the Data Source is added to the domain. You are becoming the owner of the newly added Data Source.
- To be able to update a Data Source in the domain with the information for the Data Source with the same alias in the template, you must be either the owner of the Data Source or a user with whom this Data Source is shared with the manage access (see Share a Data Source with Other Users). Otherwise, the Data Source is not updated.
Steps:
Click your name in the top right corner, and select Data Integration Console. Alternatively, go to
https://{your.domain.com}/admin/disc/.On the top navigation bar, select Workspaces, and click the name of the workspace into which you want to import the pipeline from a pipeline template. The page with deployed processes opens.
Click the menu button, then click Import pipeline.
If your workspace does not have any deployed processes, the main data load page opens. On this page, click Import pipeline.Click Browse, navigate to the JSON file with the pipeline template, and upload it. A summary of what will be imported opens.
Review the summary, and choose the import strategy.
Use the Replace strategy carefully. When Replace is used, all the processes and schedules are deleted from the workspace and replaced with the processes and schedules specified in the JSON file. The deleted processes and schedules cannot be restored.If your workspace does not have any deployed processes, the import strategy options are not displayed.Click Import. The pipeline parameter dialog opens.
Review the parameters. Enter the missing values and update the pre-filled ones, if needed.
Click Create pipeline. The pipeline is imported.
You can also import the data pipeline from the template via the API.