Automated Data Distribution
What Automated Data Distribution Is
Automated Data Distribution (ADD) enables you to quickly upload data from Data Warehouse to one or multiple workspaces.
When you have multiple workspaces to upload data to, you have to specify the Client ID parameter for each workspace. ADD uses the Client ID parameter to distinguish what data should be loaded to what workspace.
The Client ID parameter is one of the parameters that you have to set up to start using ADD. For more information, see Use Automated Data Distribution.
ADD supposes that you have already run all the needed transformations on top of the data in Data Warehouse.
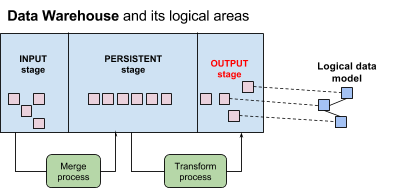
Data Warehouse is typically divided into the following logical areas:
- Input stage
- Persistent stage
- Output stage
To be able to use ADD, you must have the output stage area in place and configured.
If your Data Warehouse is not divided into three logical areas as mentioned above, use the whole Data Warehouse as your output stage.
Object (tables and views) in the output stage are usually identified by a special prefix that distinguishes these objects from the objects belonging to other logical areas of Data Warehouse. When you need to load data to a workspace with a specific logical data model, you can map all datasets from the logical data model to the objects in the output stage using the output stage object naming convention.
Each workspace where ADD is used for data population has to have the corresponding data warehouse instance specified as an output stage. Once the output stage is set for a particular workspace, data can be regularly loaded to this workspace using ADD.
You can set up ADD to be able to delete old data while uploading new data. See Delete Data from Datasets in Automated Data Distribution.
ADD Load Modes
ADD supports the following load modes:
- Full load: All data is loaded to the datasets. The datasets are completely rewritten.
- Incremental load: Only data after a certain point in time is loaded using the UPSERT method.
ADD automatically selects the load mode for a particular dataset depending on whether the x__timestamp column is present in the mapped output stage table:
If the x__timestamp column is present, incremental load mode will be used for all created ADD schedules.
If the x__timestamp column is not present, full load mode will be used.
When ADD runs for the first time, data is uploaded in full mode.
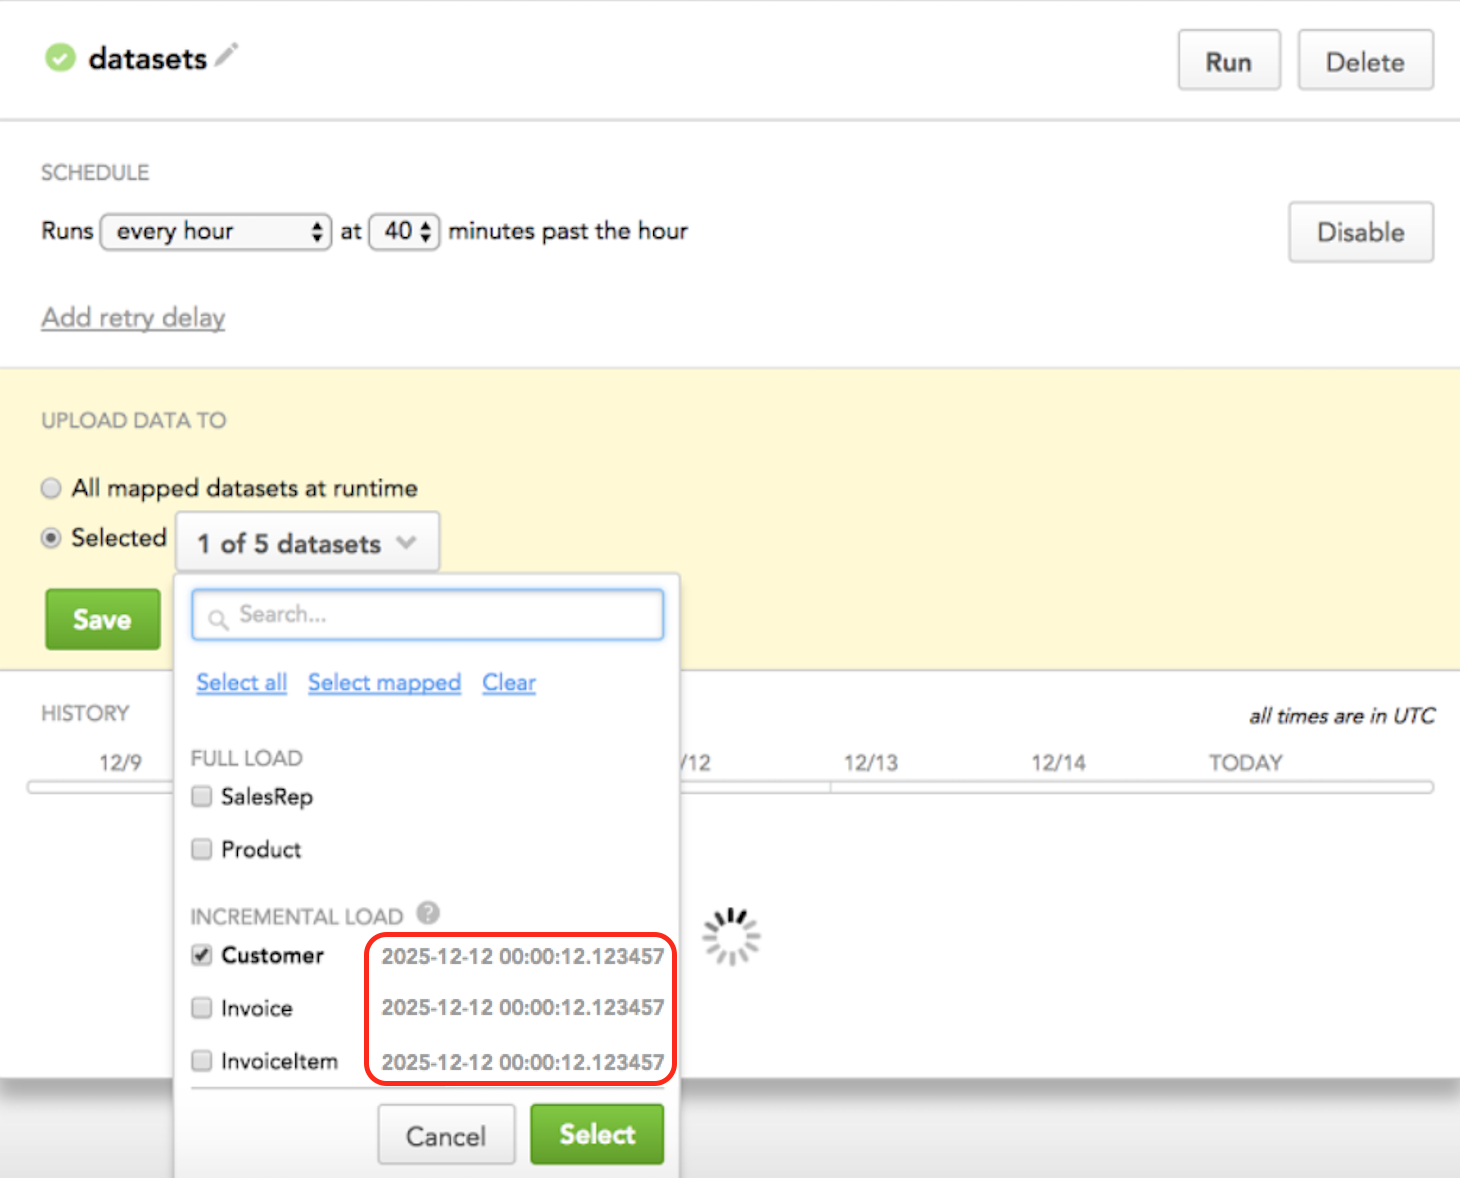
You can check in Data Integration Console, in a schedule’s configuration, whether the x__timestamp column exists and what mode is pre-selected for each dataset.
For the datasets with incremental load mode, a timestamp with the last successful data load (LSLTS - Last Successfully Loaded Time Stamp) is displayed.
Overriding Incremental Load Mode
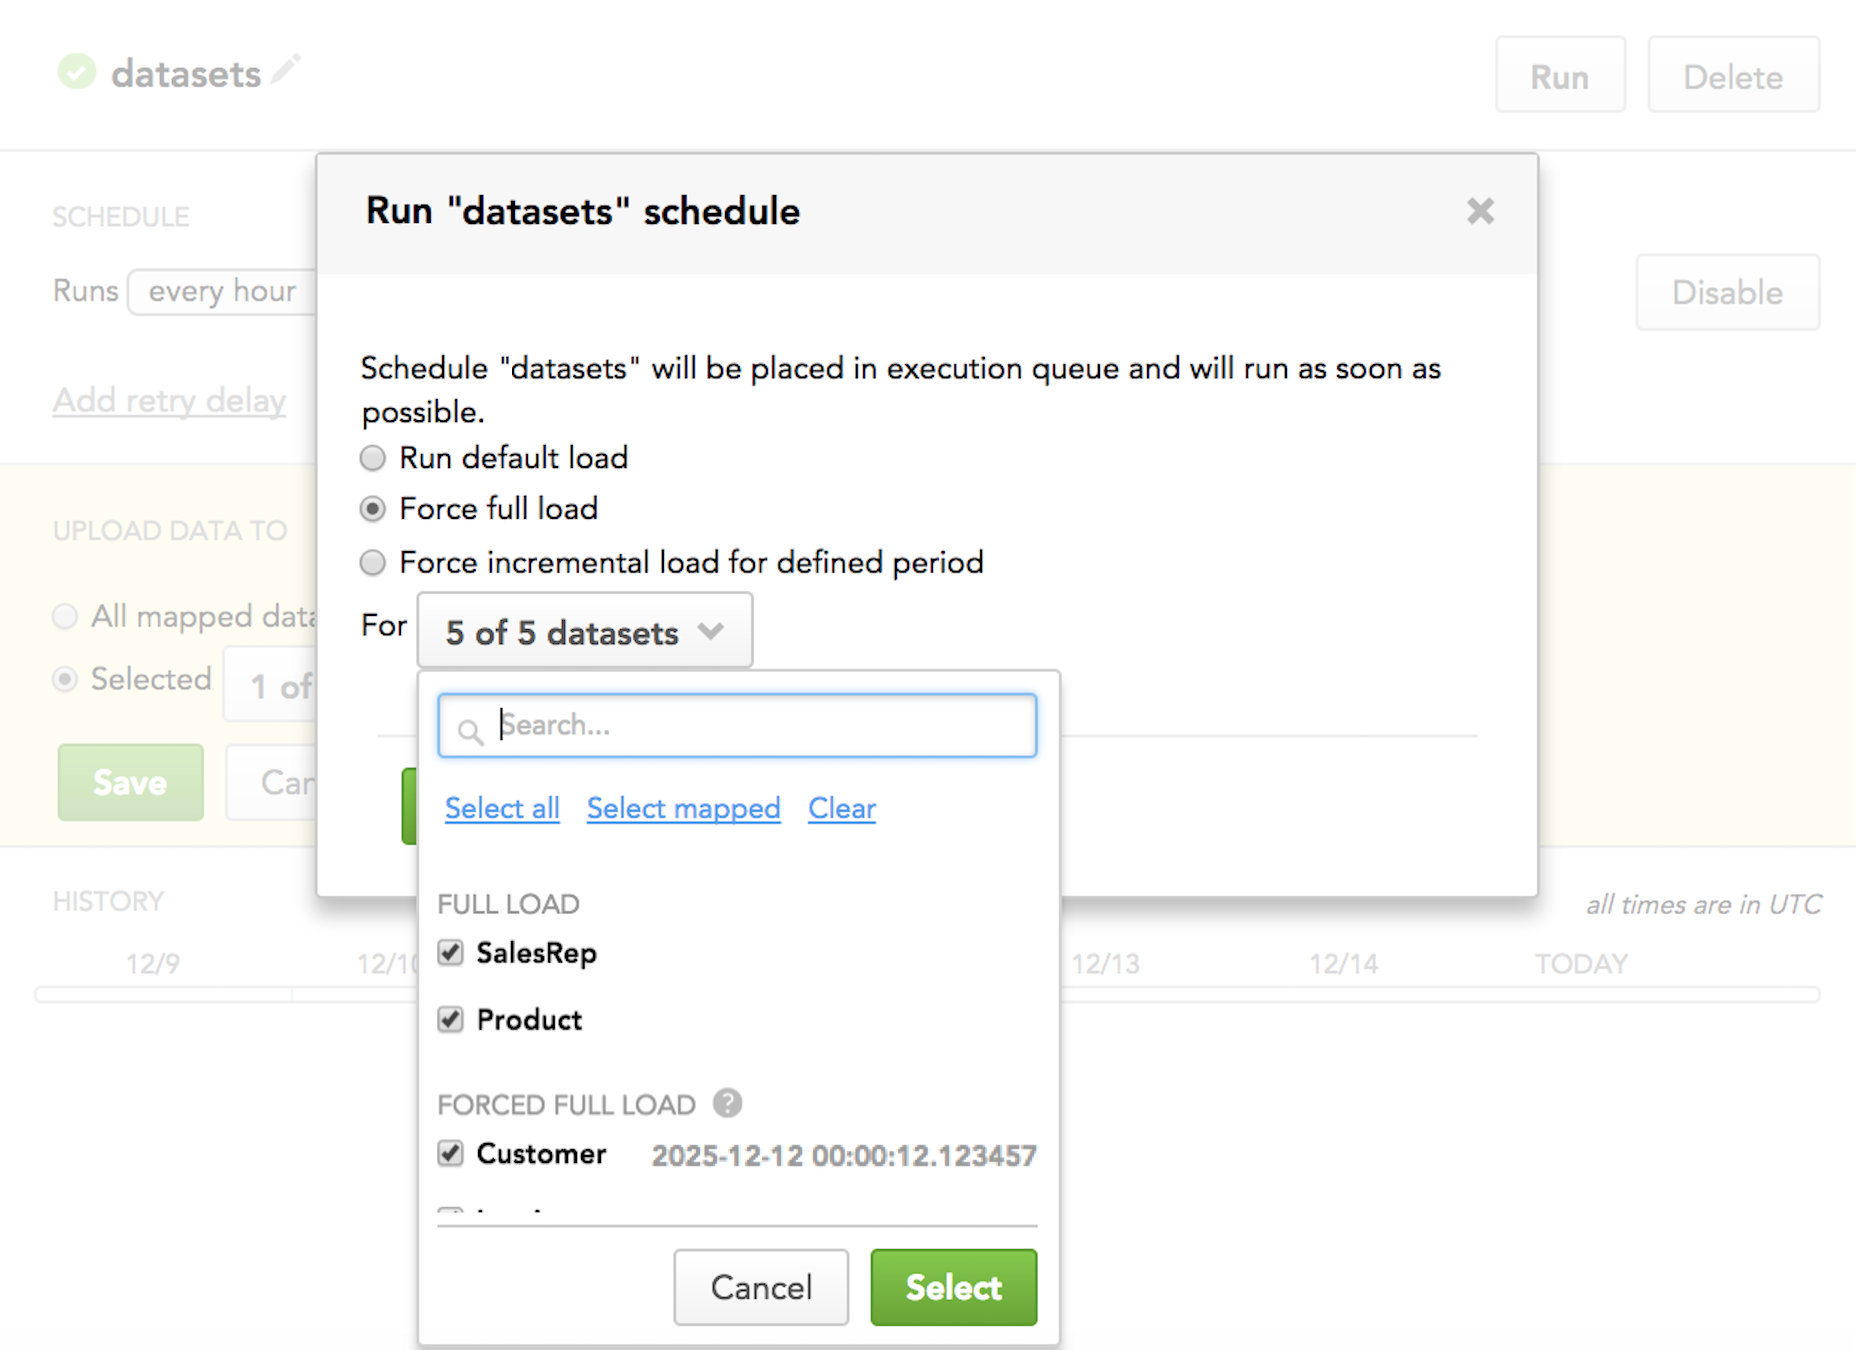
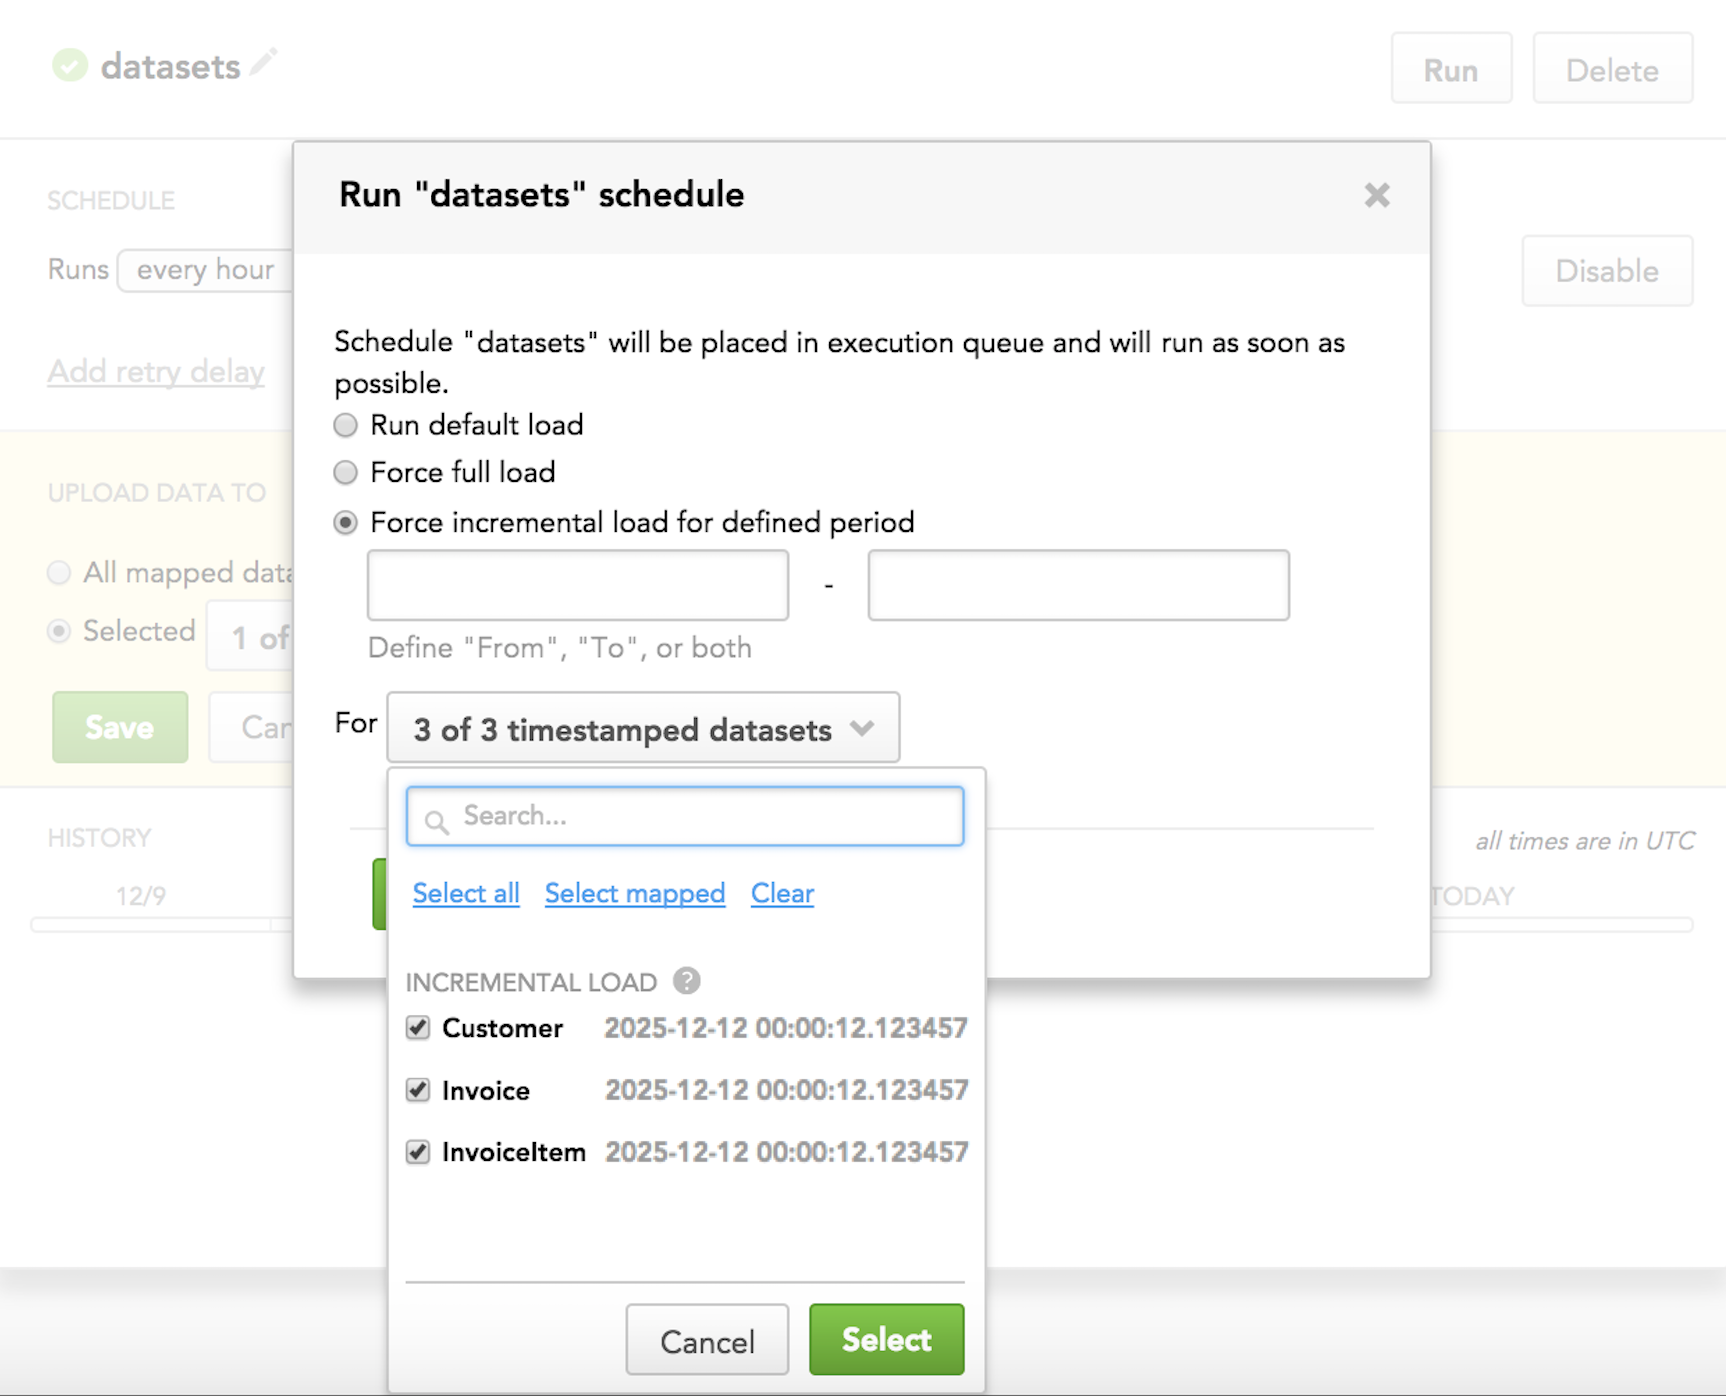
When you run a scheduled ADD process, you can override the pre-selected incremental load mode for particular datasets with full load mode (when you need to completely overwrite data in the datasets) or with loading data for a specific time interval.
Forcing full load:
Forcing incremental load for a specific time interval:
How ADD Loads Data
Let’s look at the following example to see how ADD loads data and choose load mode.
Imagine you want to use ADD to load data about invoices including invoice ID, customer ID, and total price.

Last Successfully Loaded Time Stamp
- The INVOICE output stage table (on the left) contains your source data. Note the x__timestamp column that indicates when the records were created in the output stage table.
- The corresponding INVOICE_DATA dataset (on the right) is the target dataset where the source data will be loaded to. It also shows load mode and Last Successfully Loaded Time Stamp (LSLTS).
- The ADD table (in the middle) shows when ADD is triggered.
Let’s see how ADD uploads the source data and applies load modes:
- First run: ADD runs on December 2, 2016, at 7:00 AM (2016-12-02 7:00:00). This is the first time ADD runs in your workspace.
- ADD checks the target dataset. As ADD has not run before, LSLTS is not set (no initial state). Therefore, ADD selects full mode for data load.
- ADD checks the output stage table and finds three records that exist by the moment the ADD process started: cp__invoice_id 100, 101, and 102 with x__timestamp of 2016-12-01 0:00:00.000000, 2016-12-01 0:00:00.000000, and 2016-12-02 0:00:00.000000, correspondingly.
- ADD uploads the three records to the target dataset in full mode.
- In the target dataset, ADD records the final state of LSLTS as the greatest value among x__timestamp of all the uploaded records. It is 2016-12-02 0:00:00.000000.

- For the second time, ADD runs on December 3, 2016, at 7:00 AM (2016-12-03 7:00:00).
- ADD checks the target dataset and finds LSLTS for the last data load, which is 2016-12-02 0:00:00.000000. ADD selects incremental mode for data load.
- ADD checks the output stage table and finds three records that have been created between the last LSLTS and now: cp__invoice_id 103, 101, and 104 with x__timestamp of 2016-12-03 0:00:00.000000 for each of the records. Note that the record with cp__invoice_id 101 was already uploaded in the first run and will be uploaded again in the second run, because the value of f__totalprice has changed from 109 to 119. Most likely, the invoice with ID 101 was first created with a wrong price (109) and was fixed the next day to the correct price (119).
- ADD uploads the three records to the target dataset in incremental mode.
- In the target dataset, ADD records the final state of LSLTS as the greatest value among x__timestamp of all the uploaded records. As x__timestamp is the same for all the records, LSLTS is set to 2016-12-03 0:00:00.000000.

- For the third time, ADD runs on December 4, 2016, at 7:00 AM (2016-12-04 7:00:00).
- ADD checks the target dataset and finds LSLTS for the last data load, which is 2016-12-03 0:00:00.000000. ADD selects incremental mode for data load.
- ADD checks the output stage table and finds one record that has been created been created between the last LSLTS and now: cp__invoice_id 105 with x__timestamp of 2016-12-04 0:00:00.000000.
- ADD uploads this record to the target dataset in incremental mode.
- In the target dataset, ADD records the final state of LSLTS as the greatest value among x__timestamp of all the uploaded records. As only one record was uploaded, and its x__timestamp is 2016-12-04 0:00:00.000000, LSLTS is set to 2016-12-04 0:00:00.000000.

How to Start Using ADD
To start using ADD, see Use Automated Data Distribution.
Read next: Use Automated Data Distribution
This may also help: