Build Your Data Pipeline
This tutorial guides you through the process of setting up a simple data integration pipeline that covers extracting data from data sources and distributing it to your workspaces, where you can immediately start consuming it to create reports, insights, and dashboards.
By the end of this tutorial, you should be able to implement various components of the data pipeline, test them, and set up the pipeline to run regularly. This tutorial will show you how to download data from an Amazon S3 bucket to a GoodData workspace. We are going to provide you with all the data needed to finish this tutorial. You will need your own GoodData workspace to use for the purposes of this tutorial and your own Amazon S3 bucket as data and configuration storage.
This tutorial focuses solely on data integration and assumes that you are familiar with basic GoodData concepts and have experience in logical data modeling. To refresh your knowledge, see Data Modeling in GoodData.
Tutorial Scenario
For the purpose of this tutorial, you are going to follow the use case of a data analyst, John Doe, working for ACME, a company selling shoes. The company uses the GoodData platform to better understand their sales process.
In GoodData, terms workspace and project denote the same entity. For example, project ID is exactly the same as workspace ID. See Find the Workspace ID.
The company has an automated process of extracting data from the source database and uploading it to an S3 bucket. The process runs every hour. The files are generated as CSV files named to follow the format orders_{version}_{timestamp}.csv. The timestamp indicates when a data extract was created. Any file collisions within the S3 storage are handled manually.
The company’s goal is to load their data into the GoodData platform and distribute it to their workspace.
You are going to use this tutorial to upload the data to one dataset that accumulates daily data about orders.
This tutorial uses the following resources:
- Amazon S3 bucket:
gdc - Access key to the s3 bucket:
AKIAJ77BMWMWTSQFF7OA - ADS instance: ID
wfc047e12030c3fe48d983d2081a9200 - Workspace ID:
ebyg33vqnls7kp13f1u0nkov2pxf8dbt - User account on the GoodData platform:
john.doe@acme.com, with administrator access to the workspace and ADS instance
These resources are placeholders. When going through the tutorial, replace these resources with your values.
Download Input Data
Download the files that you will be using when going through this tutorial:
- acme.json, which is the logical data model (LDM) Import this LDM to your workspace using the LDM Modeler. See Import and Export a Logical Data Model. `

acme_demo.zip , which is a folder containing data and configuration files needed by the pipeline Extract the contents of this file to your S3 bucket.
You can see the following files there: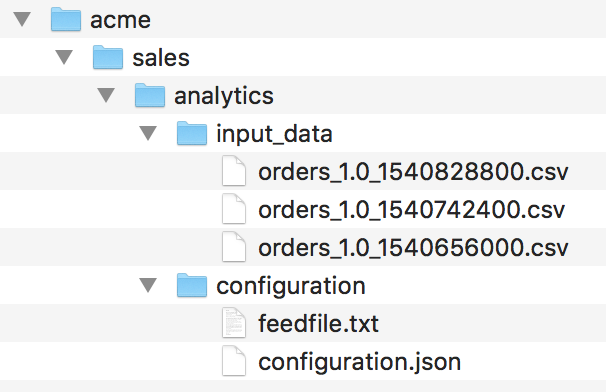
Three source files (
*.csv) that contain sales data from October 27, 2018, till October 29, 2018 (one file per day), for theOrdersdataset (see your logical data model). You are going to upload these files to the GoodData platform during this tutorial. The source files look similar to the following:id,status,channel,price,date 82c223ea3e4009cced9ca5cea4ada7b8f615c0ee4cf4d72cb872a8313f52bf96,confirmed,phone,62011.73,10/27/2018 b9c58b3f7f0282140b4f35669cfeff50a6b6f2259ba073be6f0c4f62084bfb2a,created,phone,79757.68,10/27/2018 dc54609c2509b72116288186deb3400ca4ae28423b6e46684b3719a3777a5ab2,confirmed,phone,61286.69,10/27/2018 d82d7bfd39a8a0739f900025ff3608aabb2f5a1b7a355ca476a1e75a0aad307d,confirmed,website,48092.02,10/27/2018 e2f49e4ca30d0b6cbdc6955261b6d4f879cfb766e8320187b59038d8dfe7e8a8,canceled,phone,67714.87,10/27/2018 ...The configuration file (
configuration.json) and the feed file (feedfile.txt) that determine how the components of the data pipeline behave You will look at these files later in this tutorial. At this point, just keep them as is in your S3 bucket.
Now, you are going to start building you pipeline. To do so, implement CSV Downloader.
Implement CSV Downloader
Because you are going to download data stored in CSV files in S3, you are going to use CSV Downloader. CSV Downloader is a brick, one of the components of the GoodData data pipeline, that downloads CSV files from an S3 bucket. For detailed information about CSV Downloader, you can later check CSV Downloader.
To implement CSV Downloader, you need to complete the following steps:
- Deploy CSV Downloader.
- Create a configuration for CSV Downloader.
- Schedule the deployed CSV Downloader.
- Run CSV Downloader.
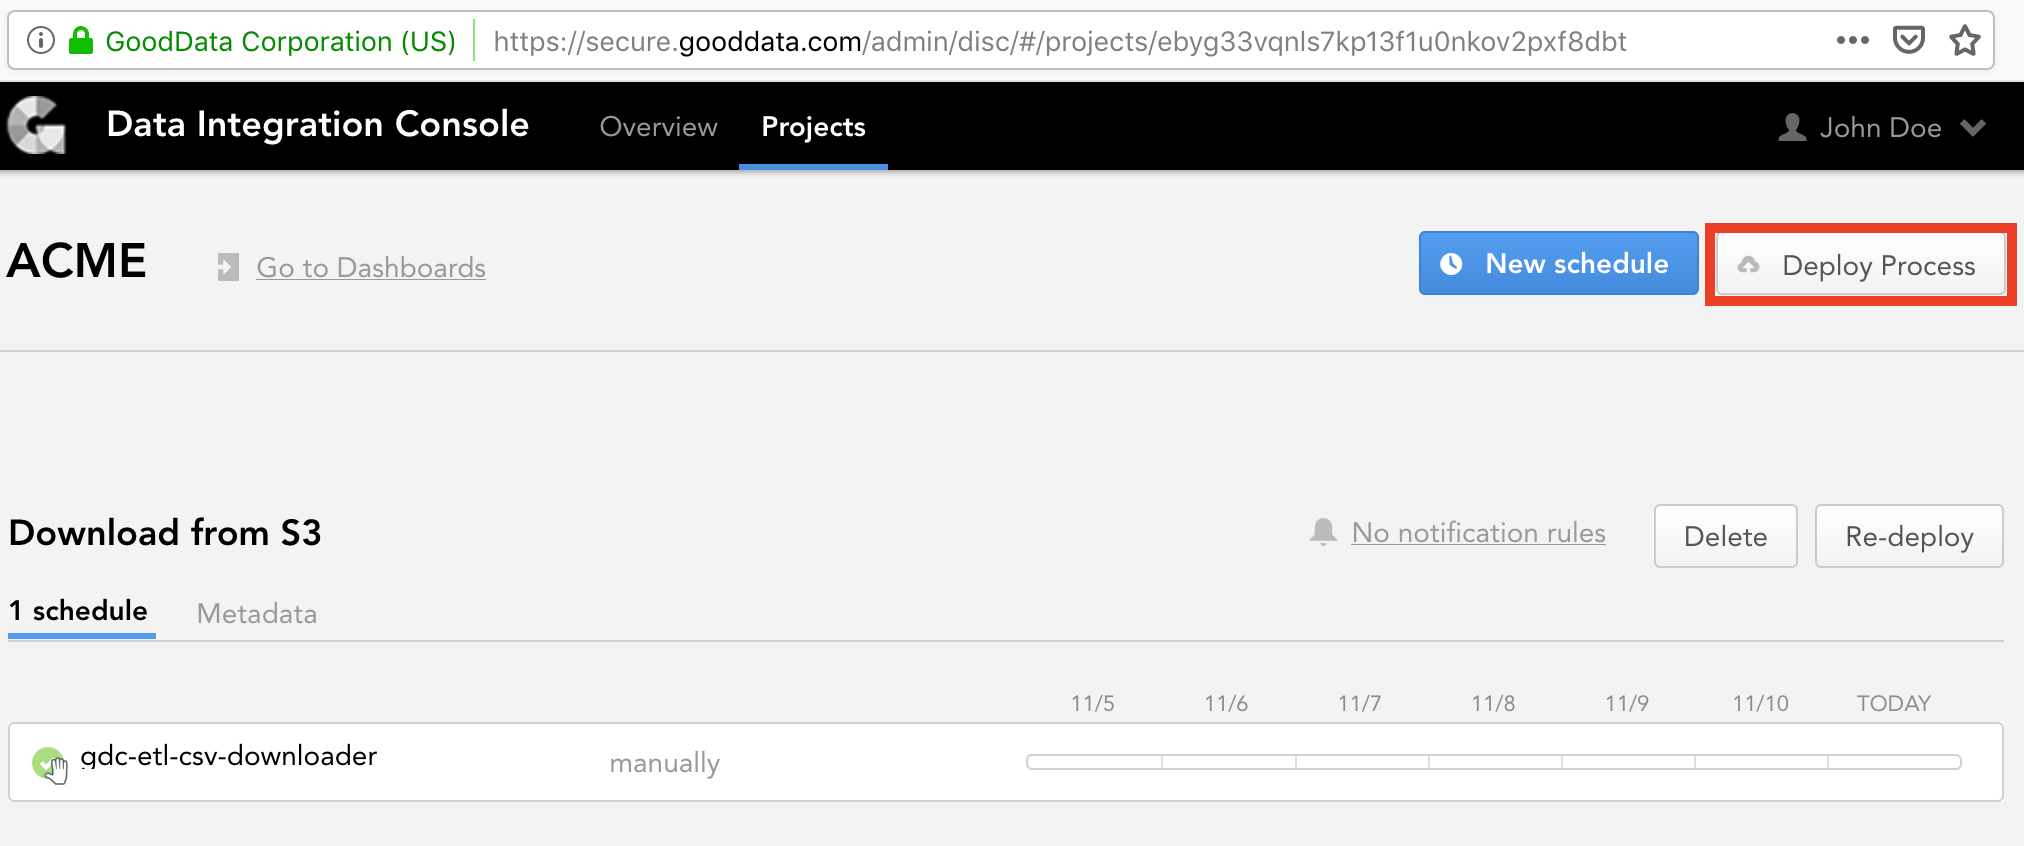
Deploy CSV Downloader
Steps:
From the Workspaces tab of the Data Integration Console (see Accessing Data Integration Console), select your workspace. For the purpose of this tutorial, you are going to use the workspace ACME with the ID of
ebyg33vqnls7kp13f1u0nkov2pxf8dbt.Click Deploy Process.
The deploy dialog opens.
From the Component dropdown, select CSV Downloader.
As a part of deploying CSV Downloader, you need to provide the path to the configuration file (
configuration.json), which you have previously downloaded and stored in your Amazon S3 bucket. This file holds a configuration for all components of your data pipeline, and you are going to look at it in detail later in this tutorial.
For now, enter the path to the configuration file that you have in your S3 bucket (enter only the directory; do not specify the file name itself).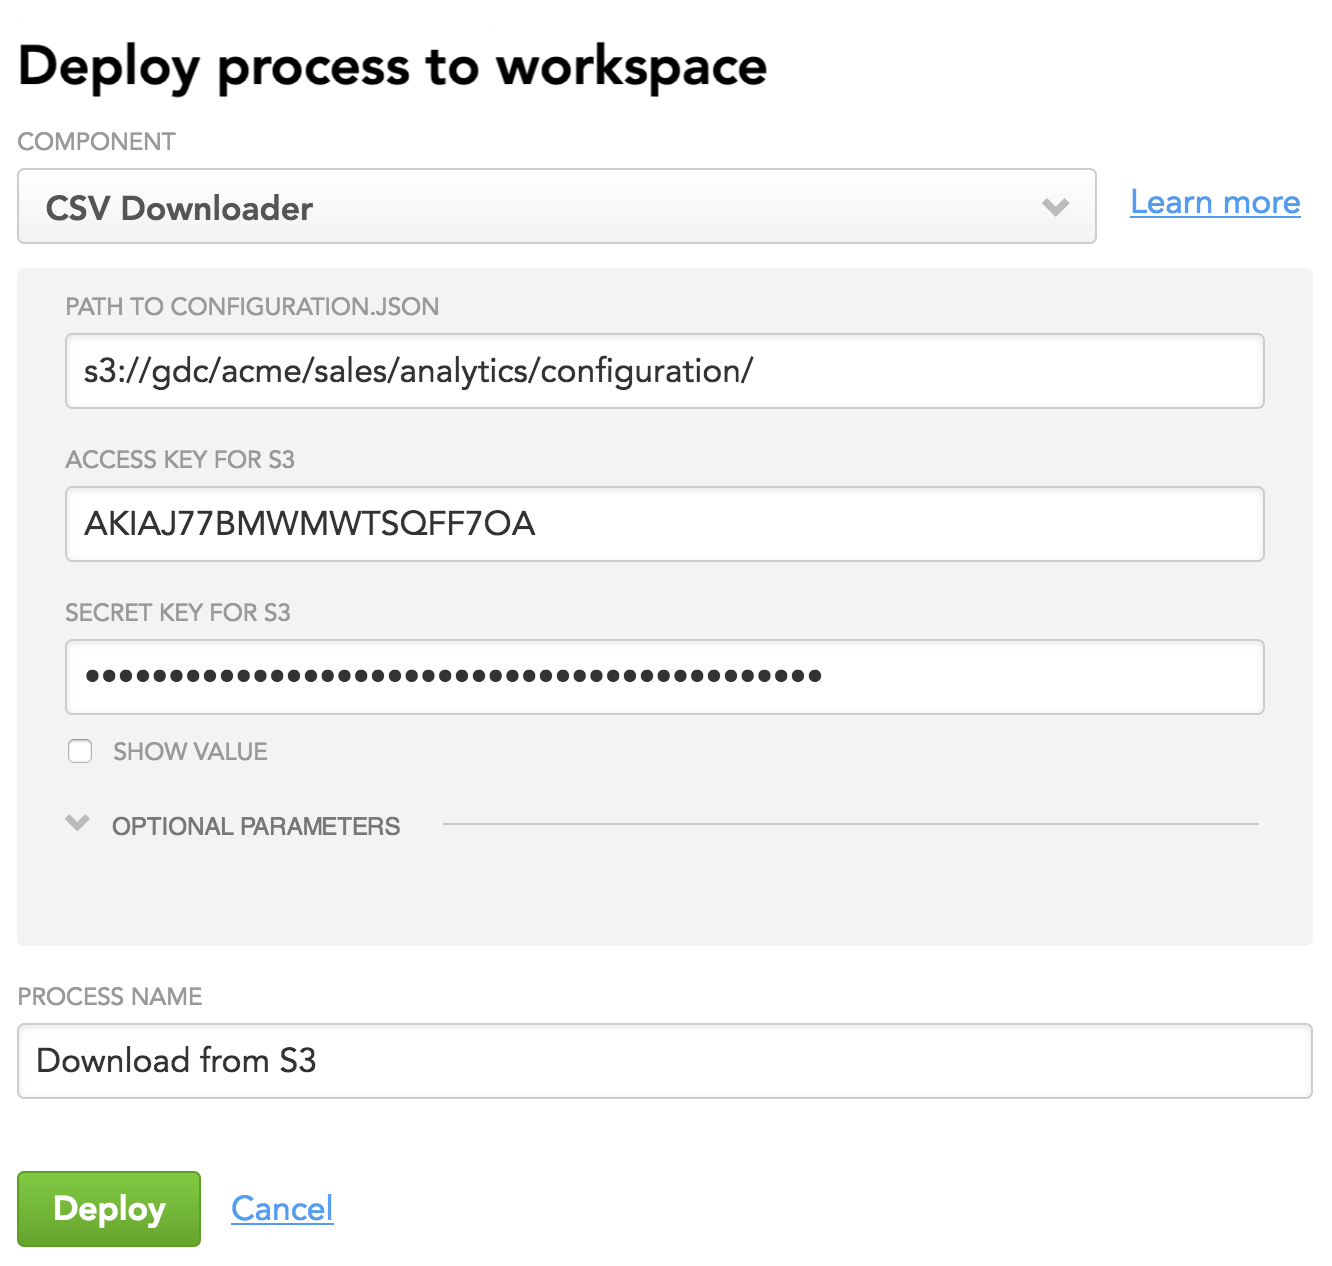
Enter S3 access information (access key and secret key).
In this tutorial, you are not going to use optional parameters, therefore do not provide any values for them.
Enter a descriptive name for the process (for example, “Download from S3”). The process name must be unique within the workspace.
Click Deploy. CSV Downloader is deployed. You are now going to create a configuration for it.
Create a Configuration for CSV Downloader
In the previous step, you deployed CSV Downloader and specified the path to its configuration file. Now, create the configuration file itself. The configuration file is a JSON file that specifies input parameters for CSV Downloader (remote location, access credentials, source data structure, load mode, and so on). The configuration file also covers a configuration for ADS Integrator, which is another component of the GoodData data pipeline. You will learn more about it further in this tutorial.
For the purpose of this tutorial, the configuration file (configuration.json) is ready for you and is available at s3://gdc/acme/sales/analytics/configuration/ (you downloaded it as part of the input data).
Review the provided configuration file. Here is a quick overview of its sections:
- entities specifies the input data to download (sales orders).
- downloaders describes the instance of CSV Downloader that you are configuring.
- csv defines Amazon S3 as input data storage, specifies your S3 location, the structure of the input data, and processing details.
- integrators and ads_storage describe the ADS instance where the data will be integrated into and ADS Integrator that will be integrating the data.
For general information about the configuration file, see Configure a Brick. For detailed information about each parameter in the configuration file, see CSV Downloader.
Replace the resource placeholders with your IDs and usernames:
- bucket is the name of your S3 bucket.
- access_key is the access key to your S3 bucket.
- instance_id is the ID of the ADS instance where the data will be loaded to.
- username is the user who has access to the specified ADS instance. You will be providing the password for this user later in this tutorial, when scheduling ADS Integrator.
configuration.json
{
  "entities": {
    "Orders": {
      "global": {
        "custom": {
          "hub": [
            "id"
          ],
          "export_type": "inc"
        }
      }
    }
  },
  "downloaders": {
    "csv_downloader01": {
      "type": "csv",
      "entities": [
        "Orders"
      ]
    }
  },
  "csv": {
    "type": "s3",
    "options": {
      "bucket": "gdc",
      "access_key": "AKIAJ77BMWMWTSQFF7OA",
      "data_structure_info": "acme/sales/analytics/configuration/feedfile.txt",
      "data_location": "acme/sales/analytics/input_data",
      "delete_data_after_processing": true,
      "generate_manifests": true,
      "files_structure": {
        "skip_rows": "1",
        "column_separator": ","
      }
    }
  },
  "integrators": {
    "ads_integrator": {
      "type": "ads_storage",
      "batches": [
        "csv_downloader01"
      ]
    }
  },
  "ads_storage": {
    "instance_id": "wfc047e12030c3fe48d983d2081a9200",
    "username": "john.doe@acme.com",
    "options": {}
  }
}
Feed File
Notice the data_structure_info parameter in the configuration file. This parameter sets the path to the feed file. The feed file describes the structure of source data files and data types in their columns.
For the purpose of this tutorial, the feed file (feedfile.txt) is ready for you and is available at s3://gdc/acme/sales/analytics/configuration/ (you downloaded it as part of the input data).
Review the provided feed file. For detailed information about the feed file, see Feed File.
feedfile.txt
file|version|field|type|order
Orders|1.0|id|varchar(128)|0
Orders|1.0|status|varchar|1
Orders|1.0|channel|varchar|2
Orders|1.0|price|decimal(12,2)|3
Orders|1.0|date|date|4
Now that you have the configuration in place, you are going to schedule the deployed CSV Downloader.
Schedule the Deployed CSV Downloader
Create a schedule for CSV Downloader to automatically execute the data loading process at a specified time.
Steps:
Make sure that you are at the Workspaces tab of the Data Integration Console, and the workspace ACME with the ID of
ebyg33vqnls7kp13f1u0nkov2pxf8dbtis selected.For the deployed CSV Downloader, click Create new schedule.

In the Runs dropdown, set the frequency of execution to manually. This means that the process will run only when manually triggered.
Add parameters to your schedule.
Why do you need to add parameters to the schedule when you already have parameters in the configuration file?
First, the schedule parameters allow you to enrich the configuration file at runtime. Imagine you have several data pipelines that share the same configuration file. You can add a parameter that you already have in the configuration file but set it to a different value. When the schedule starts executing, the value of the schedule parameter overrides the value of the same parameter from the configuration file. Or, you can add a specific parameter only to one schedule. In this case, instead of having it in the shared configuration file, add it to this schedule, and the other schedules will not use it.
Second, the schedule allows you to enter sensitive information (passwords, secret keys, and so on) as secure parameters. Secure parameter values are encrypted and do not appear in clear-text form in any GUI or log entries.
For CSV Downloader, add the following parameters:
- ID is the ID of the CSV Downloader instance being scheduled; must be the same as the ID in the configuration file. In this tutorial, it is
csv_downloader01. - csv|options|secret_key is the access key to your S3 bucket where the source data is stored. Nesting parameters with a vertical bar (
|) specifies where they belong in the JSON hierarchy of the configuration file. Each vertical bar pushed the parameter next to it one level deeper in the configuration file. Because the secret key is sensitive data, add this parameter as secure.
- ID is the ID of the CSV Downloader instance being scheduled; must be the same as the ID in the configuration file. In this tutorial, it is
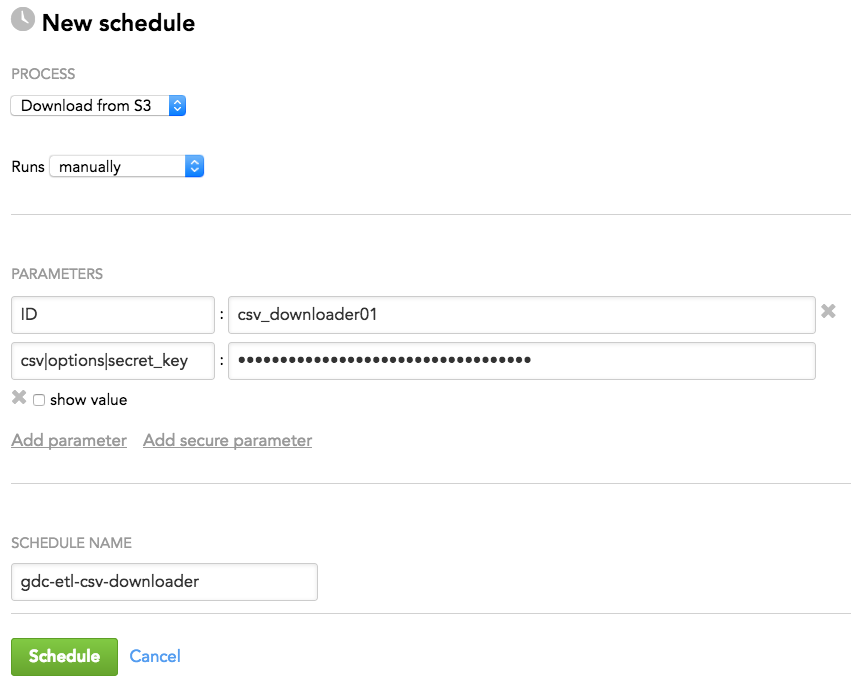
- Click Schedule. The schedule is saved and opens for your preview. You are now going to run the CSV Downloader schedule.
Run CSV Downloader
While on the opened CSV Downloader schedule, click Run. The schedule is queued for execution and is run as platform resources are available.
Wait until the process finishes with a status of OK, which means that CSV Downloader has downloaded the source files from s3://gdc/acme/sales/analytics/input_data/ and placed the data to the Big Data Storage (BDS) location at s3://gdc/acme/sales/analytics/configuration/, the same location where configuration.json is stored.
Next Steps
In the steps described above, you have deployed CSV Downloader, prepared its configuration and iterated the execution until completed successfully.
After the first successful run, CSV Downloader fetched the data from s3://gdc/acme/sales/analytics/input_data/ and put it to the BDS location at s3://gdc/acme/sales/analytics/configuration/. Those files on BDS will be later fetched by the data pipeline component called ADS Integrator.
You are now going to implement ADS Integrator.
Implement ADS Integrator
ADS Integrator takes the data that has been downloaded by CSV Downloader and integrates it into Agile Data Warehousing Service (ADS). For detailed information about ADS Integrator, you can later check ADS Integrator.
To implement ADS Integrator, you need to complete the following steps:
Deploy ADS Integrator
Steps:
- Make sure that you are at the Workspaces tab of the Data Integration Console, and the workspace ACME with the ID of
ebyg33vqnls7kp13f1u0nkov2pxf8dbtis selected. - Click Deploy Process. The deploy dialog opens.
- From the Component dropdown, select ADS Integrator.
- Similarly to CSV Downloader, you need to provide the path to the configuration file (
configuration.json) as a part of deploying ADS Integrator. As mentioned earlier in this tutorial, this file holds a configuration for all components of your data pipeline including ADS Integrator. Review the configuration file, and notice theintegratorsandads_storagesections. For detailed information about the parameters in these sections, see ADS Integrator. Enter the same path to the configuration file that you have entered for CSV Downloader (enter only the directory; do not specify the file name itself).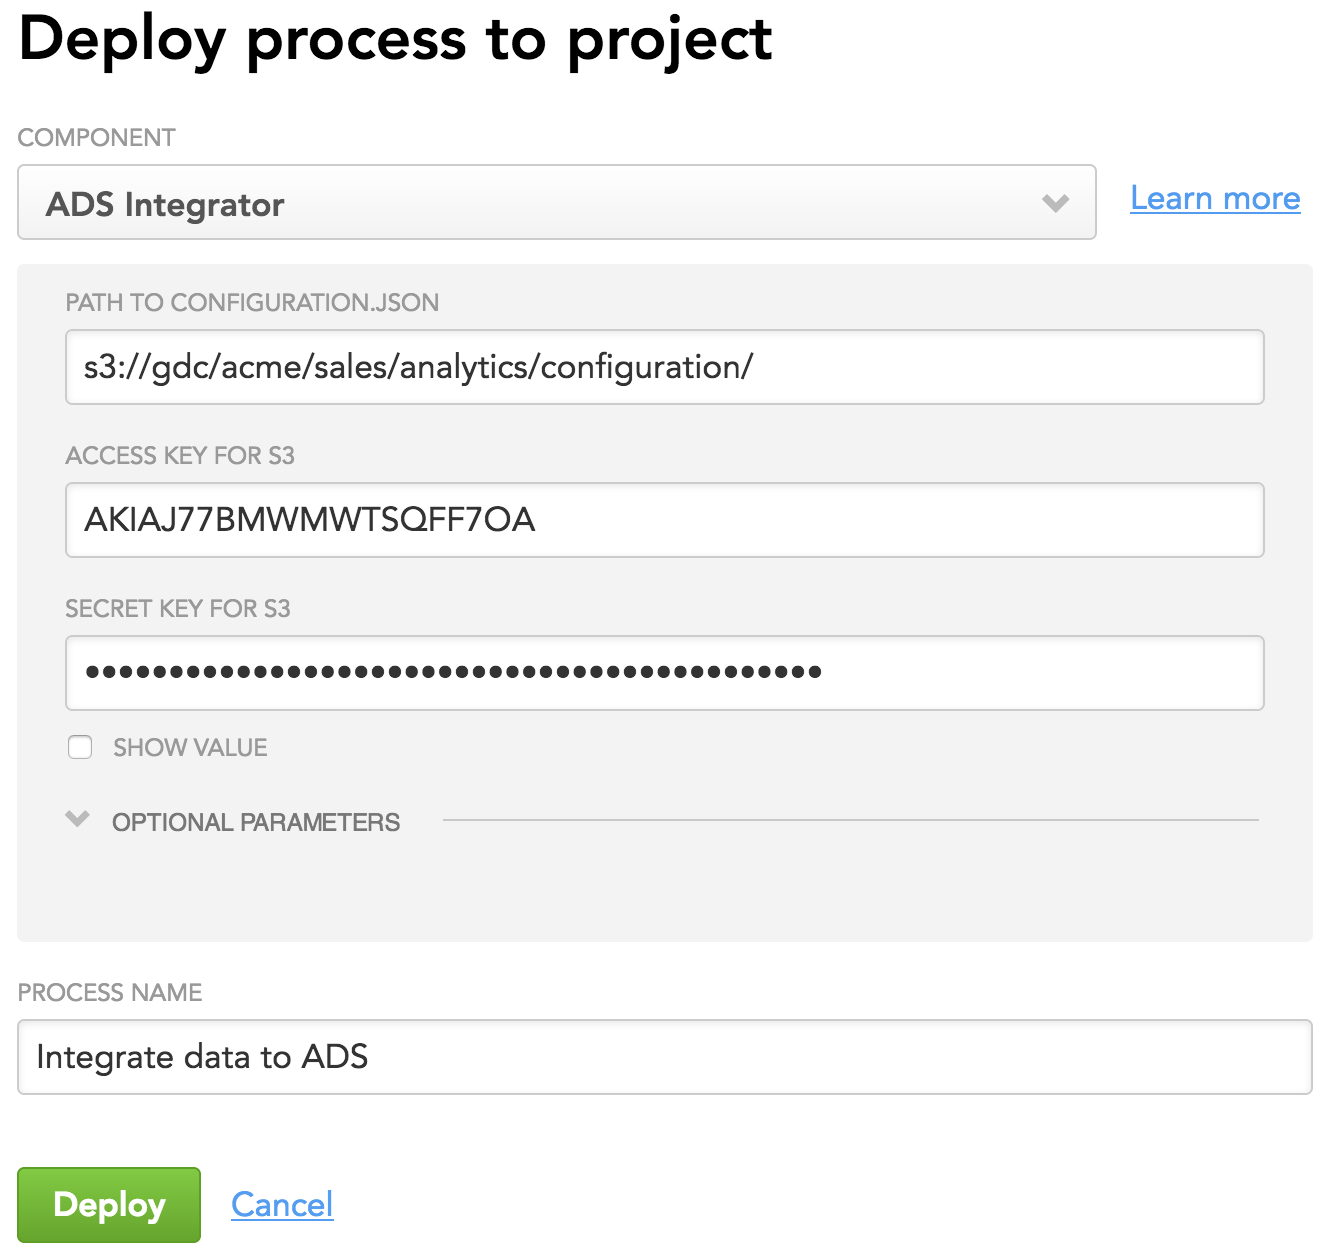
- Enter S3 access information (access key and secret key).
- In this tutorial, you are not going to use optional parameters, therefore do not provide any values for them.
- Enter a descriptive name for the process (for example, “Integrate data to ADS”). The process name must be unique within the workspace.
- Click Deploy. ADS Integrator is deployed. You are now going to schedule the deployed ADS Integrator.
Schedule the Deployed ADS Integrator
Create a schedule for ADS Integrator to automatically execute the data integration process at a specified time.
Steps:
- Make sure that you are at the Workspaces tab of the Data Integration Console, and the workspace ACME with the ID of
ebyg33vqnls7kp13f1u0nkov2pxf8dbtis selected. - For the deployed ADS Integrator, click Create new schedule.

- In the Runs dropdown, set the frequency of execution to manually. This means that the process will run only when manually triggered.
- Add parameters to your schedule:
- ID is the ID of the ADS Integrator instance being scheduled; must be the same as the ID in the configuration file. In this tutorial, it is
ads_integrator. - ads_storage|password is the password for the user that is specified in the configuration file under ads_storage -> username. The user and the password will be used to access the specified ADS instance where the data will be uploaded to. Because the password is sensitive data, add this parameter as secure.
- ID is the ID of the ADS Integrator instance being scheduled; must be the same as the ID in the configuration file. In this tutorial, it is

Run ADS Integrator
While on the opened ADS Integrator schedule, click Run. The schedule is queued for execution and is run as platform resources are available.
Wait until the process finishes with a status of OK, which means that ADS Integrator has taken the data from BDS and integrated it to ADS.
When the schedule finishes with the OK status, check the execution log to make sure that everything worked as expected: you should see that the ADS instance with the ID of wfc047e12030c3fe48d983d2081a9200 has the data from the source files integrated. Connect to the ADS instance using JDBC (see Connecting to Data Warehouse from SQL Client Tools), and review the structures that ADS Integrator created:
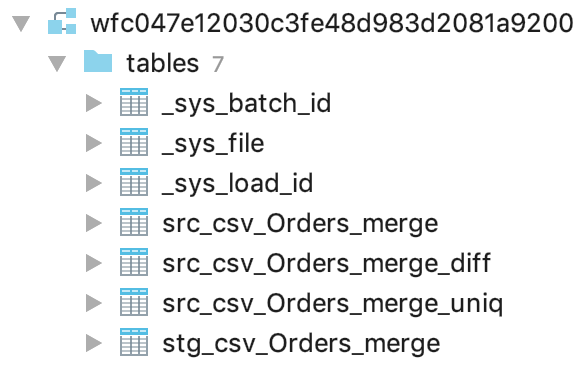
The most important table here is stg_csv_Orders_merge that contains all your data with loading metadata. For detailed information about the structures that ADS Integrator creates, see ADS Integrator.
Next Steps
In the steps described above, you have deployed ADS Integrator and iterated the execution until completed successfully.
After the first successful run, ADS Integrator took the data from the BDS location at s3://gdc/acme/sales/analytics/configuration/, integrated it to ADS, and created structures including the stg_csv_Orders_merge table. This table will be later used by the data pipeline component called Automated Data Distribution (ADD).
You are now going to set up ADD.
Set Up Automated Data Distribution
Automated Data Distribution (ADD) enables you to upload data from ADS and distribute it to one or multiple workspaces. Those workspaces are called “client workspaces”, and they are defined within the Output Stage data. ADD is configured at the client workspace level, which means that ADD must be deployed in each client workspace. For detailed information about ADD, you can later check Automated Data Distribution Reference and Use Automated Data Distribution.
In a more complex data pipeline, you would have a so-called service workspace, which is a workspace where you prepare data for all client workspaces. In this tutorial, you are using only one workspace that serves as a client workspace. If you need only one workspace, you do not need to have the service workspace: your client workspace acts as the service workspace.
To set up ADD, you need to complete the following steps:
Configure the ADD Output Stage
Set the Output Stage parameters and create a view to link the integrated data to the ADD Output Stage.
Steps:
Go to the gray page for configuring the Output Stage. For this tutorial, the URL looks like the following (the URL is case-sensitive):
https://secure.gooddata.com/gdc/dataload/projects/ebyg33vqnls7kp13f1u0nkov2pxf8dbt/outputStageEnter the Output Stage parameters:
- Output Stage is the URI pointing to the schema in the Data Warehouse instance that represents the Output Stage. Set this parameter according to your ADS settings. For the purpose of this tutorial, set it to
/gdc/datawarehouse/instances/wfc047e12030c3fe48d983d2081a9200/schemas/default. - Client Id identifies data records related to a particular workspace. Leave this parameter empty.
- Output Stage Prefix identifies all Output Stage objects and distinguishes them from the objects in other logical areas (input stage, persistent stage) of Data Warehouse. Set this parameter to
out_.
Based on these parameters, ADD detects for your workspace what ADS instance to take the data from (ADS instance ID
wfc047e12030c3fe48d983d2081a9200) and what tables represent your Output Stage (the tables with theout_prefix).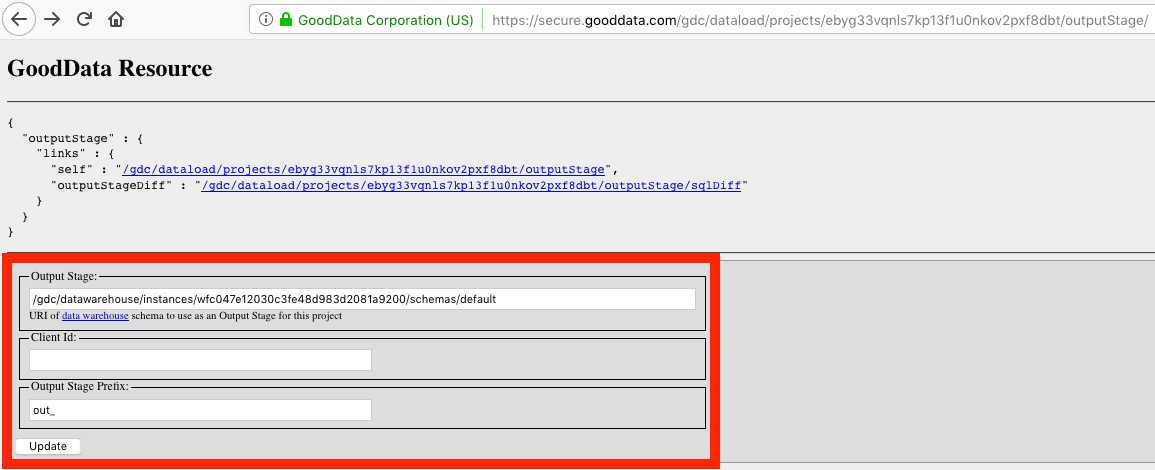
- Output Stage is the URI pointing to the schema in the Data Warehouse instance that represents the Output Stage. Set this parameter according to your ADS settings. For the purpose of this tutorial, set it to
Click Update. The Output Stage is configured. The Output Stage settings on the gray pages are updated. At the same time, the ADD data loading process appears in the Data Integration Console for your workspace. The process is named “Automated Data Distribution”. You will be working with it later in this tutorial. You are now going to inspect the workspace LDM and tables matching the Output Stage prefix and to review the SQL commands that you need to execute in your ADS instance.
On the Output Stage gray page, click the
outputStageDifflink, then click thepolllink. The result output similar to the following is displayed:-------------------------------------------------- -- out_orders -- -------------------------------------------------- CREATE TABLE "out_orders" ( "a__channel" VARCHAR(512), "a__status" VARCHAR(512), "cp__id" VARCHAR(512), "d__date" DATE, "f__price" NUMERIC(12,2) -- Uncomment only if you really know the consequences of your decision -- , "x__client_id" VARCHAR(128) ENCODING RLE -- , "x__timestamp" TIMESTAMP ENCODING RLE -- , "x__deleted" BOOLEAN DEFAULT false ENCODING RLE ); --if Vertica optimization is required, then: 1) replace ");" with ""; 2) replace "--verticaOpt " with "". --Align the usage of x__client_id and x__timestamp columns in the statements below with their real presence in the table. --verticaOpt ) --verticaOpt order by "x__client_id", "x__timestamp" --verticaOpt segmented by hash("a__channel","a__status","cp__id","d__date","f__price","x__client_id","x__deleted","x__timestamp") all nodes;The suggested SQL commands are intended for creating structures that match the entities in the
Ordersdataset.Connect to the ADS instance using JDBC (see Connecting to Data Warehouse from SQL Client Tools). Notice that the
outputStageDiffresource suggested creating a table calledout_orders. As you remember from the previous steps, ADS Integrator created a table calledstg_csv_Orders_merge. This is because usually, before you distribute data to client workspaces, you want to run SQL transformations on top of the staging tables. For the purpose of this tutorial, you are going to skip this step. Therefore, you do not have to create the table. Instead, you are going to create a view. When creating a table or a view, follow the naming conventions described in Naming Convention for Output Stage Objects.Create the view:
CREATE VIEW "out_orders" AS (SELECT channel AS a__channel, status AS a__status, id AS cp__id, date AS d__date, price AS f__price FROM stg_csv_Orders_merge)All structures needed for ADD to execute successfully are ready. You are now going to schedule the ADD process.
Schedule the ADD Process
Create a schedule for ADD to automatically execute the data distribution process at a specified time.
Steps:
- Go to the Data Integration Console, and make sure that you are at the Workspaces tab and the workspace ACME with the ID of
ebyg33vqnls7kp13f1u0nkov2pxf8dbtis selected. - Locate the
Automated Data Distributionprocess. This process was automatically created when you configured the Output Stage. - For this process, click Create new schedule.

- In the Runs dropdown, set the frequency of execution to manually. This means that the process will run only when manually triggered.
- In the Upload Data To section, click Selected, and select your dataset.
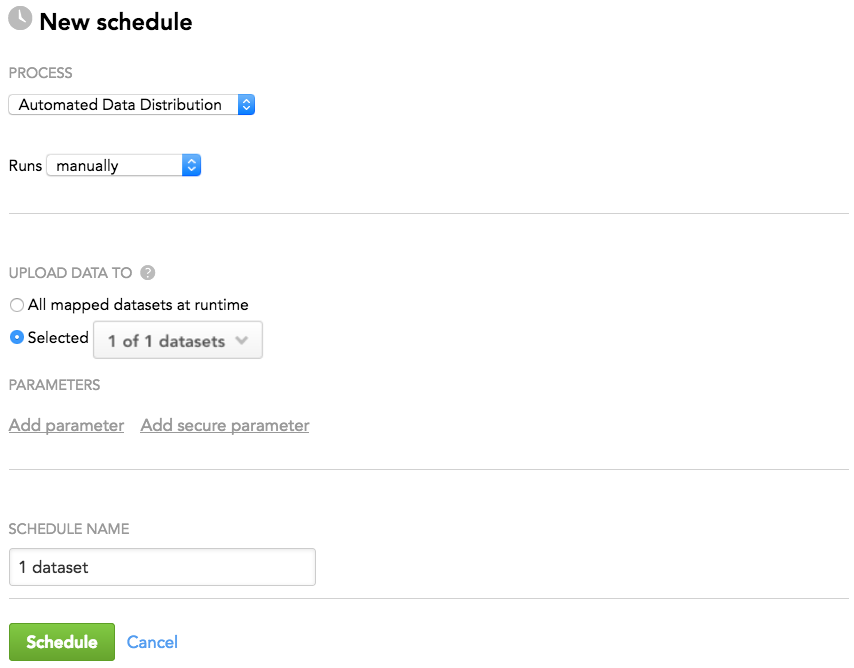
- Click Schedule. The schedule is saved and opens for your preview. You are now going to run the ADD schedule.
Run ADD
While on the opened ADD schedule, click Run. The schedule is queued for execution and is run as platform resources are available.
When the schedule finishes with the OK status, check the execution log to make sure that everything worked as expected: you should see that the data has been loaded to your workspace. Go to your workspace and check the data on the Manage tab.
Next steps
In the steps described above, you have set up ADD and iterated the execution until completed successfully.
After the first successful run, ADD fetched the data from ADS and distributed it to your workspace.
You are now going to set your data pipeline to run regularly so that new data gets accumulated in your workspace.
Set Your Data Pipeline to Run Regularly
Set your data pipeline to run regularly so that new data gets accumulated in your workspace for further analysis.
Go to the Data Integration Console, and modify the schedules of the deployed CSV Downloader, ADS Integrator, and ADD, so that they run regularly and each component starts only after the previous component completes. The components must run in this exact order:
- CSV Downloader
- ADS Integrator
- ADD
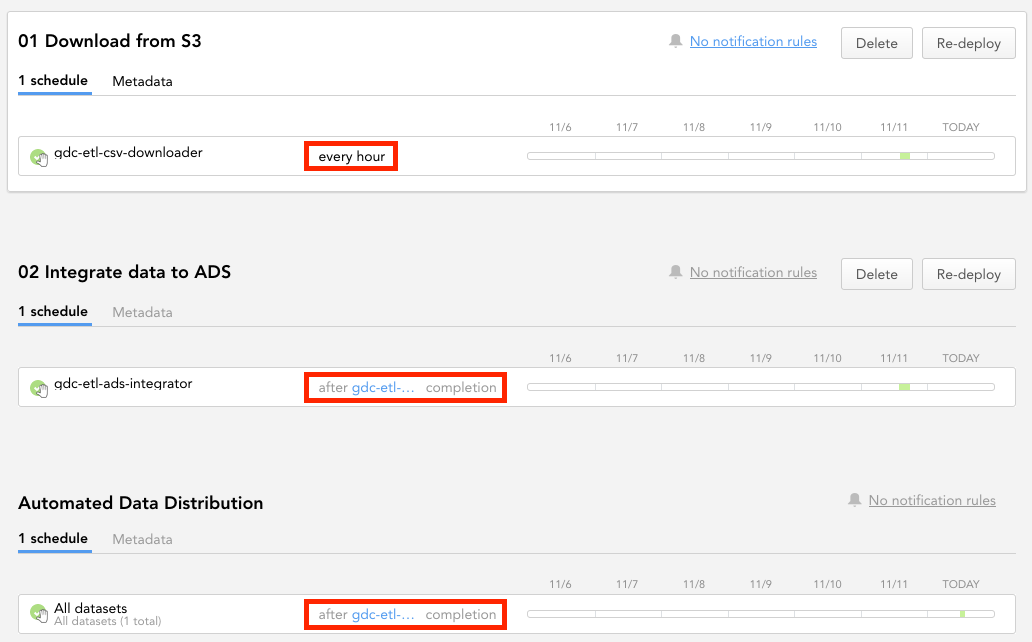
When you keep uploading new data to your S3 bucket, it will be downloaded automatically and loaded into your GoodData workspace every hour.
Summary
You have completed the tutorial. You should now be able to implement various components of the data pipeline, test them, and set up the pipeline to run regularly.
After you have a sufficient amount of data in your workspace, you can start discovering, analyzing, and visualizing your data. Use Analytical Designer and create your first insight.