Loading Data via REST API
This article describes how to load data from CSV files to your workspace in a single task instead of loading the CSV files one by one. Loading multiple CSV files at once helps you save time if your workspace uses incremental data loading, requires a long time to synchronize data, or contains many datasets (multiple data load tasks are integrated into a single task, and you do not have to start a data load task for each dataset).
Loading data via REST API consists of the following steps:
- Prepare the SLI manifest.
- Prepare CSV files with data to load.
- Transfer the CSV files to user-specific storage.
- Run a load task.
If you want to delete some old or obsolete data from a dataset while loading new data to the same or different dataset, see Delete Old Data while Loading New Data to a Dataset via API.
Prepare the SLI Manifest
Prepare Single Load Interface (SLI) manifests, one for each dataset. These manifests map the data columns to the logical data model in your workspace.
The SLI manifests are automatically generated by the GoodData platform. You are going to obtain them using the API.
The following procedure assumes that you access your workspaces at https://secure.gooddata.com/.
If you are a white-labeled customer, replace secure.gooddata.com with your white-labeled domain in the procedure steps.
In GoodData, terms workspace and project denote the same entity. For example, project ID is exactly the same as workspace ID. See Find Workspace ID.
Steps:
Use the API for obtaining SLI manifests to obtain the SLI manifests for each dataset you want to update:
API resource:
https://secure.gooddata.com/gdc/md/{workspace_id}/ldm/singleloadinterface/{dataset}/manifest/Method:
GETRequest headers:
Content-Type: application/json
Accept: application/json
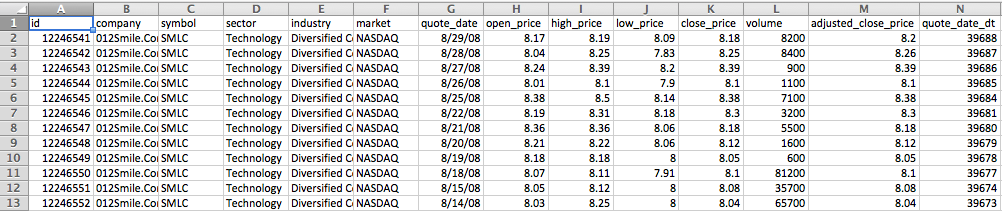
The API returns the SLI manifest for the specified dataset. The following sample is an example of the SLI manifest for the dataset called “dataset.quotes”:
{
  "dataSetSLIManifest": {
    "parts": [
      {
        "columnName": "id",
        "mode": "FULL",
        "populates": ["label.quotes.id"],
        "referenceKey": 1
      },
      {
        "columnName": "company",
        "mode": "FULL",
        "populates": ["label.quotes.symbol.company"]
      },
      {
        "columnName": "symbol",
        "mode": "FULL",
        "populates": ["label.quotes.symbol"],
        "referenceKey": 1
      },
      {
        "columnName": "sector",
        "mode": "FULL",
        "populates": ["label.quotes.sector"],
        "referenceKey": 1
      },
      {
        "columnName": "industry",
        "mode": "FULL",
        "populates": ["label.quotes.industry"],
        "referenceKey": 1
      },
      {
        "columnName": "market",
        "mode": "FULL",
        "populates": ["label.quotes.market"],
        "referenceKey": 1
      },
      {
        "columnName": "quote_date",
        "mode": "FULL",
        "populates": ["quote.date.mdyy"],
        "constraints": {"date": "yyyy-mm-dd"},
        "referenceKey": 1
      },
      {
        "columnName": "open_price",
        "mode": "FULL",
        "populates": ["fact.quotes.open_price"]
      },
      {
        "columnName": "high_price",
        "mode": "FULL",
        "populates": ["fact.quotes.high_price"]
      },
      {
        "columnName": "low_price",
        "mode": "FULL",
        "populates": ["fact.quotes.low_price"]
      },
      {
        "columnName": "close_price",
        "mode": "FULL",
        "populates": ["fact.quotes.close_price"]
      },
      {
        "columnName": "volume",
        "mode": "FULL",
        "populates": ["fact.quotes.volume"]
      },
      {
        "columnName": "adjusted_close_price",
        "mode": "FULL",
        "populates": ["fact.quotes.adjusted_close_price"]
      },
      {
        "columnName": "quote_date_dt",
        "mode": "FULL",
        "populates": ["dt.quotes.quote_date"]
      }
    ],
    "file": "data.csv",
    "dataSet": "dataset.quotes"
  }
}
Store the obtained SLI manifests for later use.
Do one of the following:
- If you have only one CSV file to upload, name the obtained SLI manifest file
upload_info.json, and proceed to Step 6. - If you have two or more CSV files to upload, proceed to Step 4.
- If you have only one CSV file to upload, name the obtained SLI manifest file
Create a JSON file, and name it
upload_info.json. Copy the following JSON structure into the file:{ "dataSetSLIManifestList" : [ ] }Insert the content of the stored SLI manifests into the
dataSetSLIManifestListarray. Yourupload_info.jsonfile should look similar to the following:{ "dataSetSLIManifestList" : [ { "dataSetSLIManifest": { "parts": [ { "columnName": "team_id", "mode": "FULL", "populates": [ "label.dim_team.id" ], "referenceKey": 1 }, { "columnName": "name", "mode": "FULL", "populates": [ "label.dim_team.name" ] } ], "file": "dim_team.csv", "dataSet": "dataset.dim_team" } }, { "dataSetSLIManifest": { "parts": [ { "columnName": "assignee_id", "mode": "FULL", "populates": [ "label.dim_assignee.id" ], "referenceKey": 1 }, { "columnName": "team_id", "mode": "FULL", "populates": [ "label.dim_assignee.team_id" ], "referenceKey": 1 }, { "columnName": "name", "mode": "FULL", "populates": [ "label.dim_assignee.name" ] } ], "file": "dim_assignee.csv", "dataSet": "dataset.dim_assignee" } } ] }Review the content of your
upload_info.jsonfile and modify it when needed:The attributes have multiple labels assigned in the logical data model.
"referenceKey": 1specifies that the primary identifier of an attribute column will be used.{ "columnName": "team_id", "mode": "FULL", "populates": [ "label.dim_assignee.team_id" ], "referenceKey": 1 }Select the label that represents the attribute to update its values.
To upload data incrementally, use
"mode": "INCREMENTAL".{ "columnName": "name", "mode": "INCREMENTAL", "populates": [ "label.dim_team.name" ] }For the columns that are related to the predefined date dimensions (provided by GoodData by default) or fiscal date dimensions, manually include a date
constraintkey with the appropriate date format. For example:"constraints": {"date": "yyyy-mm-dd"}Here is an example of a column related to the date dimension with the
constraintkey:{ "columnName": "quote_date", "mode": "FULL", "populates": ["quote.date.mdyy"], "constraints": {"date": "yyyy-mm-dd"}, "referenceKey": 1 }If you do not include a date
constraintkey, you will see the following error message:Missing date constraint for column...Do not use theconstraintkey for columns for any other purpose (for example, for columns related to generic attributes).
Save the changes.
Prepare CSV Files with Data to Load
Prepare CSV files with the data that you want to upload. Wherever possible, use a tool or a library to generate your CSV files. Avoid generating them manually.
CSV File Requirements
Verify that your CSV files meet the requirements listed in the following sections.
File Format and Name
- The files contain plain text in the UTF-8 format or in a UTF-8 compliant format (for example, ASCII).
- Each file has the header row, which appears as the first row of the file.
- File names are consistent.
- Keys are used consistently across all the files.
File Structure
All rows have the same number of fields (columns).
All rows within a column are formatted consistently.
Each field in a row contains a value (no blank cells).
The order of the columns and column names are preserved.
The columns have the same name and order as in the SLI manifest.
The file header row contains the name of each column, is formatted the same way and contains the same number of fields as the other rows.
Fields in a row are separated by commas (
,).There are no spaces between values. This is correct:
field1,field2,field3This is incorrect (note the extra spaces):
field1, field2, field3Each row ends with a line break character:
CRLForLF. You can use bothCRLFandLFwithin one file. The last field in a file may or may not have an ending line break.field1,field2,field3<LF> field4,field5,field6<CRLF> field7,field8,field9<LF> field10,field11,field12On a Mac, save your CSV files as “Windows Comma Separated (.csv)” files because Macs may use an unsupported end of line character.The files do not contain:
- Empty trailing rows
- Empty rows at the end of the file
- Delimiters after the last field in a row
- Delimiters (including tabs or newlines) at the end of the last row
- End-of-file (EOF) delimiters
Date Format
- Dates are formatted consistently across all the files.
- Date values are between the years 1900 and 2050.
- Dates are specified in one of the following formats:
yyyy/mm/dddd/mm/yyyy
Number Format
- Numbers are in the plain
#######.##format. - Numbers do not contain:
- Thousands separator commas (
,) - Currency symbols (for example,
$) - Percentage signs (
%) - Scientific notations (for example,
12E3)
- Thousands separator commas (
Quotation Marks
- The quotation marks are used consistently.
- The quotation marks are used in the following fields:
Fields with embedded commas
field1,"field2 with a comma, and a space",field3Fields with embedded line breaks
field1,field2,field3
"field4 with
line breaks",field5,field6
Fields with embedded double-quote characters (a pair of double-quote characters):
field1,"field2 with ""double quotes""",field3Fields with text strings
field1,"field2 is a string.",field3
Processing Specific Characters
Double commas are converted to blank fields. This row:
1,2,,will be parsed as the following:
"1","2","",""Leading and trailing spaces are not trimmed. This row:
field1, field2_with_leading_trailing_space ,field3will be parsed as the following:
field1," field2_with_leading_trailing_space ",field3The null character and the null (SQL) marker are not supported. This row:
NULL,field1,field2will be parsed as the following:
"NULL","field1","field2"
Transfer the CSV Files to User-Specific Storage
Steps:
Create a directory in your user-specific storage. To know the server URL to connect to, see User Specific Data Storage.
curl -i -X MKCOL -v https://username%40email.com:PASSWORD@secure.gooddata.com/gdc/uploads/new-directory/Zip the SLI manifest (the upload_info.json file) and the CSV files with data to load into a single archive file. Name the archive file “upload.zip”.
Avoid putting dynamic fields or directory names inside of the zip file.
On a Mac, do not use the “Compress File” option to create a zip file for upload because it adds some hidden files to the archive. Use command line utilities instead.
Put the archive file to the newly created directory.
curl -i -X PUT --data-binary @upload.zip -v https://user.name%40gooddata.com:PASSWORD@secure.gooddata.com/gdc/uploads/new-directory/upload.zip
If you do not want to or cannot use a zip file archiver for any reason, you can put the SLI manifest (the upload_info.json file) and the CSV files to your storage directory without zipping them. For these files to be processed correctly, they must be located in the same location.
Run a Load Task
The Single Load Interface (SLI) handles the loading of each dataset with the appropriate CSV file, as specified in the manifest.
The loading process consists of two phases:
- The first phase is common for all datasets. An error during this phase causes crash for all datasets.
- The second phase processes each dataset independently. Multiple datasets can be processed in parallel. An error encountered with a specific dataset does not affect the loading of the other datasets.
The following procedure assumes that you access your workspaces at https://secure.gooddata.com/.
If you are a white-labeled customer, replace secure.gooddata.com with your white-labeled domain in the procedure steps.
Steps:
Use the API for starting data upload to load the data from the user-specific storage to your workspace:
API resource:
https://secure.gooddata.com/gdc/md/{workspace_id}/etl/pull2Method:
POSTRequest body:
{"pullIntegration": "new-directory"}Request headers:
Content-Type: application/json
Accept: application/json
The task runs, and the link for polling for data loading status is returned.
Poll for the status until the OK task status is returned.
Log in to your workspace, and verify that the data has been uploaded.