Externalizing Internal Lookup Tables
After you have created an internal lookup table as a part of a graph, you may want to convert it to an external (shared) lookup table. So that you would be able to use the same lookup table for other graphs.
If you want to externalize internal lookup table into external (shared) file, do the following: Right-click the desired internal lookup table item in the Outline pane within Lookups group, then click Externalize lookup table from the context menu. If your lookup table contains internal metadata, you will see the following wizard.
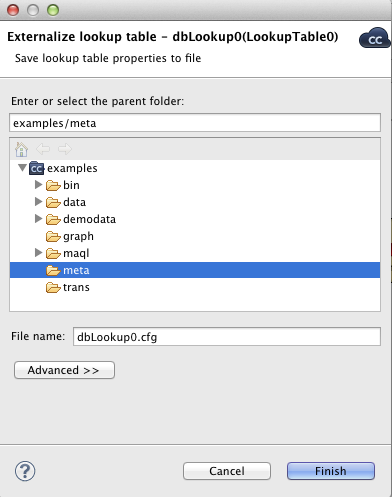
In this wizard, you will be offered the
meta subfolder of your project as well as a
filename of the new external (shared) metadata file to which the
internal metadata assigned to the selected lookup table should be
externalized. If you want (a file with the same name may already
exist), you can change the suggested name of the external (shared)
metadata file. After clicking Next, a similar
wizard for externalizing database connection will be open. Do the
same as for metadata. Finally, the wizard for lookup tables will
open. In it, you will be presented with the
lookup folder of your project as the location
for this new external (shared) lookup table file and then you can
click . If you want (a file with the same
name may already exist), you can change the suggested name of the
lookup table file.
After that, the internal metadata (and internal connection)
and lookup table items disappear from the
Outline pane Metadata (and
Connections) and Lookups
group, respectively, but, at the same location, new entries appear, already
linked the newly created external (shared) metadata (and connection
configuration file) and lookup table files within the corresponding
groups. The same files appear in the meta,
conn, and lookup subfolders
of the project, respectively, and can be seen in the
Navigator pane.
If your lookup table contains only external (shared) metadata
(and external database connection), only the last wizard (for
externalizing lookup tables) will open. In it, you will be presented
with the lookup folder of your project as the
location for this new external (shared) lookup table file and then
you will click . If you want (the file with
the same name may already exist), you can rename the offered name of
the lookup table file.
After the internal lookup table has been externalized, the
internal item disappears from the Outline pane
Lookups group, but, at the same location, there
appears, already linked, the new lookup table file item. The same file
appears in the lookup subfolder of the project
and can be seen in the Navigator
pane.
You can even externalize multiple internal lookup table items at once. To do this, select them in the Outline pane and, after right-click, select Externalize lookup table from the context menu. The process described above will be repeated again and again until all the selected lookup tables (along with the metadata and/or connection assigned to them, if needed) are externalized.
You can choose adjacent lookup table items when you press Shift and then press the Down Cursor or the Up Cursor key. If you want to choose non-adjacent items, use Ctrl+ at each of the desired connection items instead.