Element Masking
For workspace administrators only
Element masking allows you to define what attribute elements can appear in reports as is while the rest will be masked (attribute labels replaced with a placeholder such as hidden or undisclosed) based on a masking metric.
Element masking is available only in the Pixel-perfect interface. In Analytical Designer, element masking is not supported.
What Element Masking Is
Imagine that you have a report with the Amount metric sliced by the Account attribute:
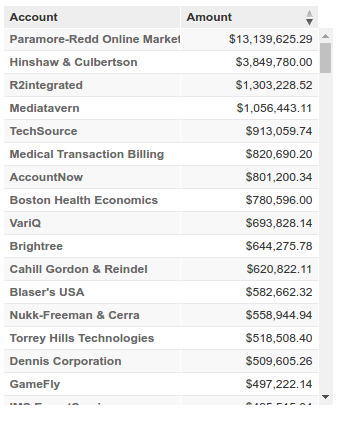
Account is the sensitive attribute that you want to mask. You want to show only top five accounts according to the first metric in the report:
SELECT 1 BY Account ALL OTHER HAVING (SELECT RANK(REPORT METRIC(1)) DESC BY Account ALL OTHER) <= 5
All the other accounts should be masked.
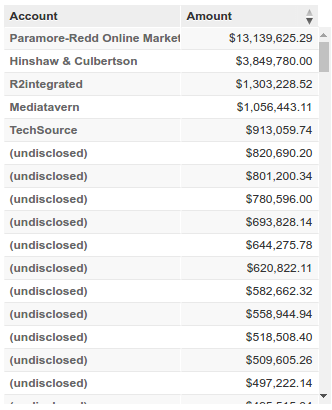
Here is what the report will look like with the masking applied:
How to Set Up Element Masking
This is how you set up element masking in your workspace:
Set up element masking for the attribute that you want to mask. To do so, you have to create an
elementMaskingmetadata object that specifies the attribute to mask, the masking placeholder, and the masking metric.An attribute can have only oneelementMaskingobject assigned. A report can have multiple attributes with element masking applied.Restrict the permission to modify the masking metric to workspace administrators only. Element masking is based on masking metrics. By default, metrics can be modified or deleted by workspace administrators and editors. To prevent the masking metric from being changed or deleted, allow only workspace administrators to edit the masking metric.
Restrict the permission to modify the reports and dashboards referencing the masking metric to workspace administrators only. To prevent the masking metric from being accessed by any other users except for workspace administrators, allow only workspace administrators to edit the reports and dashboards referencing the masking metric. Non-admin users will still be able to review the locked reports and dashboards.
Make the masked attribute protected. To prevent users from using the masked attribute in their custom ad hoc reports, make the masked attribute a protected attribute. While the users will be able to see the attribute with masked values in the reports created by you and to use dashboard filters, they will not be able to edit such reports or drill into them.
Set up element masking for the attribute that you want to mask
The following procedure assumes that you access your workspaces at https://secure.gooddata.com/.
If you are a white-labeled customer, replace secure.gooddata.com with your white-labeled domain in the procedure steps.
To set up element masking, define an elementMasking metadata object for the attribute that you want to mask. This object specifies the attribute to mask, the masking placeholder, and the masking metric.
An attribute can have only one element masking object assigned. A report can have multiple attributes with element masking applied.
In GoodData, terms workspace and project denote the same entity. For example, project ID is exactly the same as workspace ID. See Find the Workspace ID.
To define the metadata object, use the following API:
API resource:
https://secure.gooddata.com/gdc/md/{workspace_id}/objMethod:
POSTRequest body:
{ "elementMasking": { "content": { "attribute": "/gdc/md/{workspace_id}/obj/{attribute_id}", "maskingMetric": "/gdc/md/{workspace_id}/obj/{metric_id}", "maskValue": "{mask_name}" }, "meta": { "title": "{masking_object_title}" } } }attributeis the sensitive attribute whose labels should be masked.maskingMetricis the metric whose values are used to distinguish which elements should be preserved or replaced withmaskValue. The0orNULLvalues of the metric mask the attribute value.maskValueis the placeholder label to be used to replace the attribute elements that should be masked (for example,hiddenorundisclosed).titleis the name of theelementMaskingobject.
For example, the request body may look like the following:
{
  "elementMasking": {
    "content" : {
      "attribute": "/gdc/md/e863ii0azrnng2zt4fuu81ifgqtyeoj21/obj/969",
      "maskingMetric": "/gdc/md/e863ii0azrnng2zt4fuu81ifgqtyeoj21/obj/75538",
      "maskValue": "Undisclosed"
    },
    "meta" : {
      "title": "Masking of the Company name"
    }
  }
}
To get a list of the elementMasking objects currently defined in your workspace, use the GET method with the following API resource:
https://secure.gooddata.com/gdc/md/{workspace_id}/objects/query?category=elementMasking&limit=50
To delete an elementMasking object, use the DELETE method with the following API resource:
https://secure.gooddata.com/gdc/md/{workspace_id}/obj/{elementMasking_object_id}
Restrict the permission to modify the masking metric to workspace administrators only
Element masking is based on masking metrics. By default, metrics can be modified or deleted by workspace administrators and editors. To prevent the masking metric from being changed or deleted, allow only workspace administrators to edit the masking metric.
Steps:
- Click Manage on the toolbar.
- On the Data tab, click Metrics.
- Click the metric that you want to lock. The metric page opens.
- Click Sharing & Permissions. The metric permission dialog opens.
- Select Only Admins can modify this metric, and click Save Permissions. The metric is now locked, and only workspace administrators can edit it. The padlock symbol appears next to the Sharing & Permissions button.
Restrict the permission to modify the reports and dashboards referencing the masking metric to workspace administrators only
To prevent the masking metric from being accessed by any other users except for workspace administrators, allow only workspace administrators to edit the reports and dashboards referencing the masking metric. Non-admin users will still be able to review the locked reports and dashboards.
Locking a dashboard locks all its tabs and also locks the reports and the metrics in the reports used on this dashboard. For more information, see Permission to Edit Workspace Metrics, Reports, and Dashboards.
Restrict the permission to modify a report
Steps:
- Click Reports on the toolbar.
- Click the report that you want to lock. The report page opens.
- Click Options, then click Settings. The report settings dialog opens.
- Select Only Admins can modify this report, and click Save. The report is now locked, and only workspace administrators can edit it. The padlock symbol appears next to the Saved button.
Restrict the permission to modify a dashboard
Steps:
- Click Dashboards on the toolbar.
- With the dashboard displayed, click the Gear icon, and then click Sharing & Permissions. The dashboard permission dialog opens.
- In the section “These users can edit the dashboard”, select Admins only, and click Save changes. The dashboard is now locked, and only workspace administrators can edit it. The padlock symbol appears next to the function buttons.
Make the masked attribute protected
The following procedure assumes that you access your workspaces at https://secure.gooddata.com/.
If you are a white-labeled customer, replace secure.gooddata.com with your white-labeled domain in the procedure steps.
Make the masked attribute a protected attribute to prevent users from using the masked attribute in their custom ad hoc reports. While the users will be able to see the attribute with masked values in the reports created by you and to use dashboard filters, they will not be able to edit such reports or drill into them.
To make the mask attribute protected, use the following API:
API resource:
https://secure.gooddata.com/gdc/md/{workspace_id}/objects/setFlag/protectedMethod:
POSTRequest body:
{
  "setProtected": {
    "items": [
      "/gdc/md/{workspace_id}/obj/{attribute_1_id}",
      "/gdc/md/{workspace_id}/obj/{attribute_2_id}",
      ...
    ]
  }
}
To remove the protected property from the attribute, use the POST method with the following API resource:
https://secure.gooddata.com/gdc/md/{workspace_id}/objects/unsetFlag/protected
with the following request body:
{
  "unsetProtected": {
    "items": [
      "/gdc/md/{workspace_id}/obj/{attribute_1_id}",
      "/gdc/md/{workspace_id}/obj/{attribute_2_id}",
      ...
    ]
  }
}
Limitations and Considerations
When setting up element masking, consider the following:
The logical data model in your workspace and the masking metric must be created in a way that does not allow users to circumvent this masking restriction and reveal actual label values.
Element masking is not compatible with variable filters (see Filter for Variables) and the useAvailable feature (see Filter out Values of Attribute Filters). Element masking applied together with either or both these features within the same dashboard may generate unexpected behavior of dashboard reports and filters.
When element masking is applied, export to raw CSV is disabled.
Report Computation and Masking Metrics
elementMasking objects are collected for all attributes in a report. If an elementMasking object exists, the masking metric is appended to the report computation, and the 0 or NULL values of the masking metric mask the attribute value (the attribute labels are replaced by the mask value string). The masking metric itself is not present in the result so that it is not visible to the users. The masking metric is used only to determine which attribute element labels should be masked.