Set Up a Notification Rule for a Data Loading Process Using API
Today we’ll take a look at a new feature that helps you being up-to-date with your data and processes without having to check it manually. If you want to know what’s going on in your Analytics App but don’t want to login to GoodData every time you want to check your KPIs, then the Notifications feature is a must have.
How do GoodData Notification Framework works? There are multiple ways. You set the condition for a metric (i.e. number of Chatter posts per Opportunity < 16 ). Every time the condition is fulfilled, the application sends the notification to the specified channel. The specified channel can be for example the SalesForce Chatter or Twilio, for example. Another option is to set up the data loading events as a trigger to the notifications and use the same channels to receive it.
In GoodData, terms workspace and project denote the same entity. For example, project ID is exactly the same as workspace ID. See Find the Workspace ID.
Introducing the Notification API
So, you want to start using the Notifications. That means you will need to set it up correctly. The Notifications API consists of two REST resources - Channel Configuration and Subscription Configuration. The Channel defines where the notifications will be sent to and the Subscription Configuration contains details about what and how often will the notifications be sent.
The Channel Configuration is located on following URL. remember that if you type in those URLs to your browser and you are authenticated to GoodData Legacy, you can use our Grey Pages to make a direct request.
https://secure.gooddata.com/gdc/account/profile/{profile}/channelConfigurations
You have to use your profile ID in the request URL. This doesn’t work with profile Email.
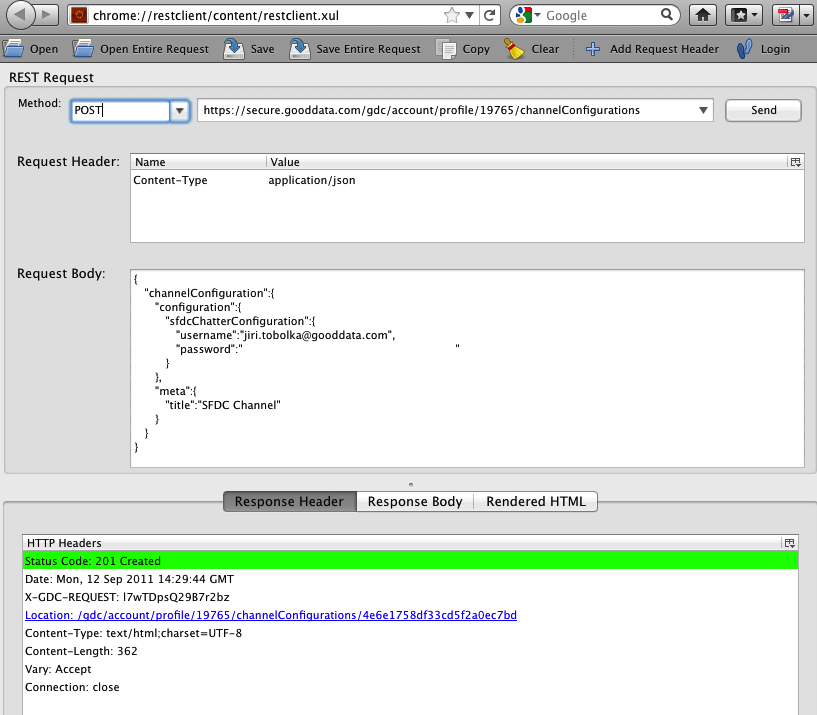
GoodData currently supports three Notifications Channels - SalesForce Chatter, Twilio and Email. To configure the notification that will appear on your SalesForce Chatter, you need to POST the payload that is similar to what is shown below.
{
   "channelConfiguration":{
      "configuration":{
         "sfdcChatterConfiguration":{
            "username":"your@email",
            "password":"passwordSecurityToken"
         }
      },
      "meta":{
         "title":"SFDC Channel"
      }
   }
}
As you can see you have to specify your SFDC username and password. The password is a combination of your SFDC password and generated security token.
Let’s see the picture below and learn how it works with the REST Client for Firefox. You have to define request type, request url, set the header content type to application/json, and paste the request body with json file as we defined it above. Then you can send the request. If everything is correct, you will receive 201 Created HTTP status.
Twilio Notifications
Otherwise, if you want to set up Twilio as a channel, your POST should look something like this:
{
   "channelConfiguration":{
      "configuration":{
         "twilioSmsConfiguration":{
            "username":"username",
            "password":"AUTH TOKEN",
            "from":"+14086457515",
            "to":"+420724000000"
         }
      },
      "meta":{
         "title":"Twilio Title"
      }
   }
}
To use Twilio for the notifications, you need to define your Twilio username, password, source phone number and finally phone number the notification will be sent to.
Email Notifications
You can also set up email notification channel. The Channel configuration will looks as follows:
{
   "channelConfiguration":{
      "configuration":{
         "emailConfiguration":{
            "to":"your@email.com"
         }
      },
      "meta":{
         "title":"Channel title"
      }
   }
}
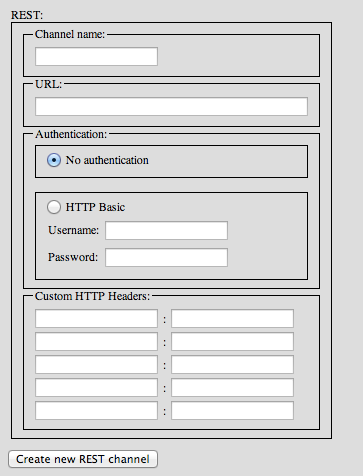
REST Notifications
Latest functionality in our Notification framework is ability to send custom REST request to your specific resource. You can use it with basic authentication or without any authentication. The payload will be as follows:
{
  "channelConfiguration" : {
    "configuration" : {
      "restConfiguration" : {
        "url" : "http://requestb.in/1m2ufaj1"
      }
    },
    "meta" : {
      "title" : "TEST"
    }
  }
}
If you use basic authentication the payload will be similar to:
{
    "channelConfiguration": {
        "configuration": {
            "restConfiguration": {
                "url": "http://requestb.in/1m2ufaj1",
                "authentication": {
                    "basicAuthentication": {
                        "username": "test",
                        "password": "123456"
                    }
                }
            }
        },
        "meta": {
            "title": "REST"
        }
    }
}
Custom HTTP Headers
Through the gray pages, you can configure name/value pairs for custom HTTP headers to pass from the GoodData API with each custom notification delivered to the third-party system. Some third-party systems require custom headers in order to function correctly, and this interface enables you to include the appropriate headers with each notification.
Setting up the Subscription for Metric Alert
So, we’ve set up the channel and now it’s time to move on to the second step of configuration. We’ll need to specify the notification condition, message and some other details. The Subscription Configuration resource is located on:
https://{hostname}/gdc/projects/{project}/users/{user}/subscriptions
and we will set it up once again by POSTing following payload (sure not exactly this one):
{
   "subscription":{
      "triggers":[
         {
            "timerEvent":{
               "cronExpression":"0 0/5 * * * *"
            }
         }
      ],
      "condition":{
         "condition":{
            "expression":"f:executeMetric('/gdc/md/ChatterDemo/obj/130001729') < 16"
         }
      },
      "message":{
         "template":{
            "expression":"Average Chatter posts per Opportunity has fallen to ${f:executeMetric('/gdc/md/ChatterDemo/obj/130001729')} ..."
         }
      },
      "channels":[
         "/gdc/account/profile/1/channelConfigurations/4e313f3d300406ad568d3bec"
      ],
      "meta":{
         "title":"Avg Posts per Oppty < 16"
      }
   }
}
Now let’s describe the payload above. First part of config file describes the triggers. It’s possible to set up multiple triggers, but in this moment only the timerEvent is supported. The timerEvent needs to have a CRON expression defined. The granularity of notification is driven by platform configuration. In other words, even if a user specifies that he or she wants to receive a notification every minute, the user will receive notifications every 10 minutes at the 0^th^, 10^th^, 20^th^… minute of an hour. It’s also possible to specify a timezone by adding “timezone”:”yourtimezone” to the timerEvent element. Timezone format is described here.
As we mentioned earlier, the notification is sent only if the condition is fulfilled. The condition is based on a JEXL expression that has to result in a true/false value. In our example /gdc/md/ChatterDemo/obj/130001729 < 16 means that condition is true if the metric (which is identified by unique ID) is smaller than 16. If you don’t have any specific condition, just fill in the ‘true’ into the parameter. You can also use variables like ‘Project ID’ or similar.
The template describes the notification message, that contains the JEXL template with the metric value. The channels element describes which channel the notification will be sent to, based on the configuration. Finally, the meta element contains the title of the notification.
You can also apply GET, PUT or DELETE to the configuration resource to retrieve, update or delete the configuration. Also, all requests has to contain Content-type: application/json request header.
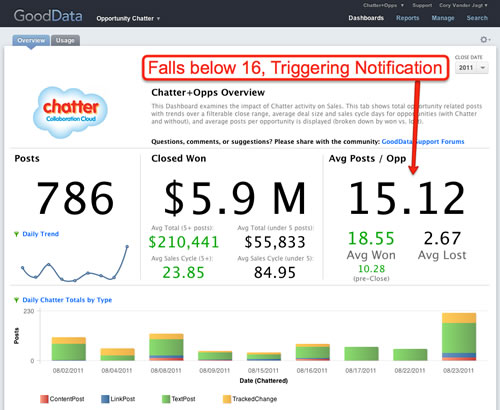
The Result
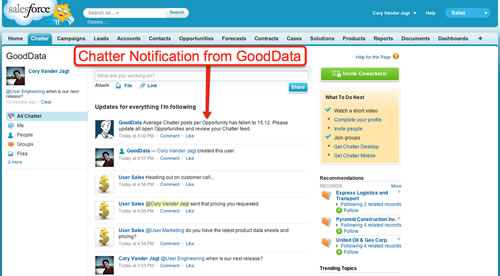
We’ve set everything up, so now it’s time to see the result. Every time the Average Posts / Opportunity falls below 16 the notification will be sent to our SFDC Chatter. Check out the screenshot below!
The notification is sent:
Subscription to REST Example
Another example. A subscription for the new channel that will be triggered by some event or by time. See the example of the notification that is fired when any data loading process finished with the OK status:
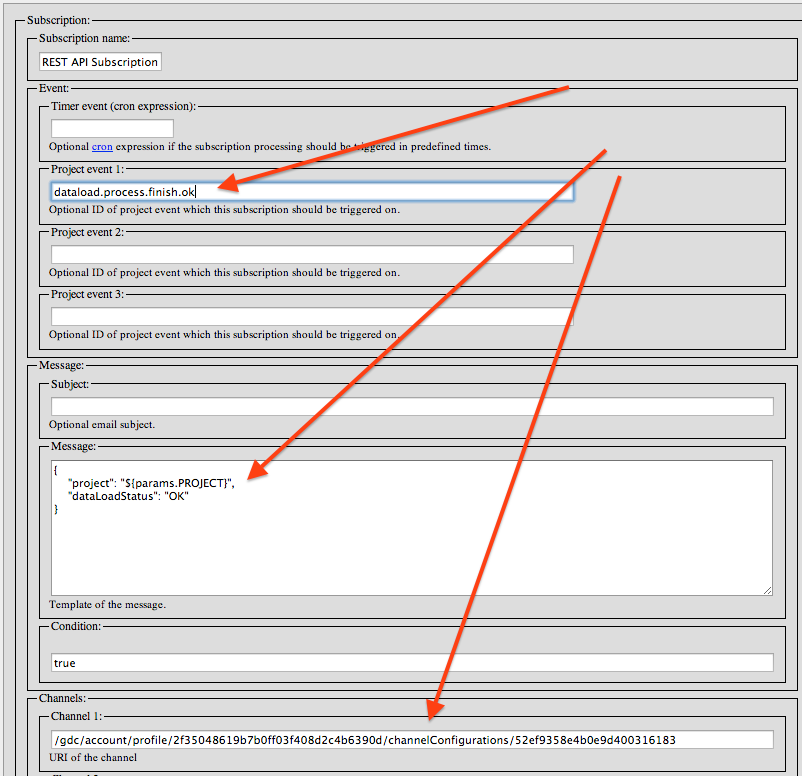
The payload is the same as in the previous example. You just need to fill in the correct values.