Setting up OAuth 2.0
CloudConnect is a legacy tool and will be discontinued. We recommend that to prepare your data you use the GoodData data pipeline as described in Data Preparation and Distribution. For data modeling, see Data Modeling in GoodData to learn how to work with Logical Data Modeler.
When connecting to REST-based systems, CloudConnect Designer now supports authentication using OAuth 2.0. Simply drag and drop REST Connector to your graph and set up the authentication method. OAuth 2.0 configuration should be familiar if you have previously authenticated with OAuth 1.0a. For more information on OAuth 1.0a, see Using OAuth 1.0a with REST Connector.
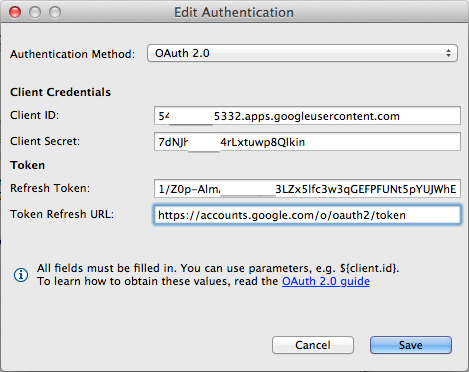
Required Configuration Information
- Client ID
- Client Secret
- Refresh Token
- Refresh Token URI
Example
Suppose you wish to connect to the Google API, which supports OAuth 2.0 natively. The steps below outline how to acquire the configuration necessary for integrating CloudConnect Designer using OAuth 2.0. The information listed below needs to be acquired from any service with which you are connecting.
Steps:
- Create a developer App and register it.
- From the registration process, obtain the Client ID and Client Secret values.
- For Google API integration, you need to make an API call to retrieve the initial Code value. For more information on retrieving this value from the Google API, see the following Google’s article: Refreshing an access token (offline access).
- Use the Code value to retrieve the Refresh Token.
- As part of the registration process, you should receive the Refresh Token URI.
For more detailed information on Google API integration, see the following Googl’s article: OAuth 2 Web Server.
After you have acquired the above configuration information, simply paste all values to the Authentication dialog while setting up the REST Connector. See the screenshot below: