CloudConnect - Working with Metadata
CloudConnect is a legacy tool and will be discontinued. We recommend that to prepare your data you use the GoodData data pipeline as described in Data Preparation and Distribution. For data modeling, see Data Modeling in GoodData to learn how to work with Logical Data Modeler.
Using metadata is one of the most important skills when working with CloudConnect, as metadata describe how record flow through the edges between components. In this article, we will dig into work with metadata and show you some tricks how to use them to make your work with CloudConnect even easier.
Basics
Here are some basic facts about metadata (you probably already know most of them from the initial examples):
- Every edge (a line connecting two components) has to have assigned metadata.
- An edge without metadata is indicated by a dashed line.
- Multiple edges can use the same metadata if that makes sense.
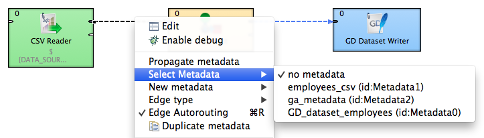
- To assign existing metadata to an edge, right click the edge and select Select Metadata.
- To check what metadata are used, point to an edge and wait for a moment. A popup will display metadata name and ID.
- All the metadata are accessible in the Outline view under Metadata. When you select it there, all edges using this will turn blue.
- If you click an edge, all edges that share the same metadata will turn blue.
- You can edit metadata by either clicking the edge or its name in the list.
Creating Metadata
There are several ways how to create a new metadata record and each of them is good for another data source or target.
Extracting from flat file
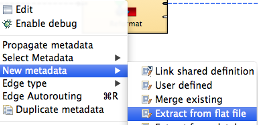
Execute this wizard for a specific file directly from CSV Reader. Right click it and select Extract metadata. Note that metadata created this way will not be automatically used for the edge coming from the reader, though.
If you have your data in a flat source file (delimited or with fixed field length), the fastest way to create correct metadata for it is to extract it directly from the file. To do so, right click the edge and select New Metadata - Extract from flat file. A wizard will show up where you can select the file. It will then try to guess whether the file is delimited or has fixed column length. If this guess is not what you expected, you can change it in the combo box below the filename as well as select preferred encoding.
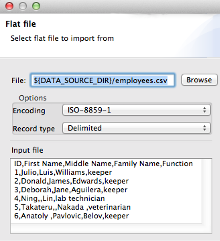
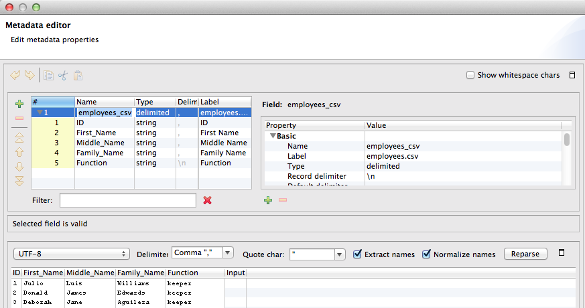
Click Next and (in case of a delimited file) select the delimiter and check how the columns will look like. If the file has quoted values, you can also select the quotation character. If the file has a heder row, check Extract names and click Reparse to name metadata fields according to this header. You can rename any field or set different data type in top left part of the window. Click Finish and your new metadata is created instantly.
Extracting from GoodData dataset
This is the best approach for metadata on edges going directly to GD Dataset Writter component. This component is quite strict about its input metadata andeach attribute, fact or reference in the dataset needs to be mapped to some field in metadata. It is a good practice to generate metadata for it directly from GoodData dataset. What is more, metadata fields generated this way will be named in a way that automapping of GD Dataset Writter will recognize them.
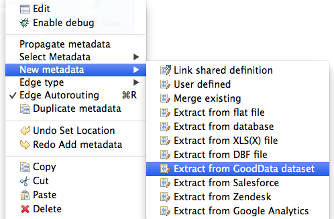
Right click the edge and select New Metadata - Extract from GoodData dataset. It will ask for a GoodData project (prefilled with current working project) and dataset to extract from. Then such new metadata will be generated that cover all the fields in the specified dataset with their data types correctly set (Date for dates, decimal for facts).
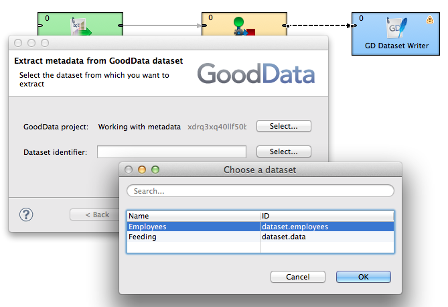
Open GD Dataset Writer now, select project (if different than current) and dataset and open Field mapping. All the fields should be already mapped to the correct metadata fields and you can easily do the mapping to source metadata in reformat component.
Combination of these two techniques allows you to create simple loading graphs very quickly using CSV Reader, Reformat, and GD Dataset Writer. See how to map single data source within a minute (the link requires Adobe Flash Player).
Extracting from other sources
It is also possible to extract metadata from other sources such as databases (New Metadata - Extract from database), Excel sheets (New Metadata - Extract from XLS(X) file), SalesForce or Google Analytics query etc. Feel free to experiment with these options if you need these data sources.
Creating manually
Of course you can as well create new metadata from scratch field by field (New Metadata - User defined). Select either delimited or fixed length (or mixed) and add all the fields you need and their data types. Name the metadata in the very first row (near the type). You can set parameters (in the right part of the window) either for whole metadata (first select the very first row on left) or for each field (select the field).
Internal and External Metadata
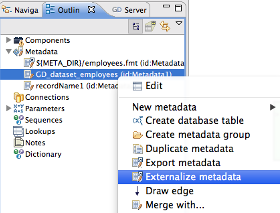
Each metadata definition can be stored internally in the graph or in an external file. All metadata you create with methods above are stored as internal. Sometimes it might be useful to externalize them, especially if you use the same metadata in several graphs within the same project. However, be careful when doing this as you can break your other graphs if you modify shared metadata.
To save metadata to an external file, go to the Outline view, right click particular metadata and select Export metadata (if you want to just dump a copy of it somewhere) or Externalize metadata (if you want to move an internal metadata record to an external file and link it to the graph). Metadata files are usually stored in the meta directory within the project and have .mft extension. Note that if you store your metadata outside the project directory, they will not be published to the server and the server side execution will fail.
Propagate Metadata
Some components that do not change the structure of data (such as sorters, filters, copy, gather, etc.) expect the same metadata for both input and output ports. They automatically add the same metadata on the output edge when it’s connected. However, if you later change the input metadata, the output will remain unchanged. You can fix this manually edge by edge but there is a neat way how to achieve this quickly. Select the input edge, right click it, and select Propagate metadata. All the edges up to first component that can have different output metadata will change to the same.
Duplicate and Merge
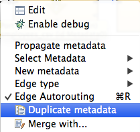
Sometimes you need your metadata to be only slightly different from one that already exists (with a few fields added or removed, for example). The easiest way to achieve this is to duplicate the existing metadata and manually edit it. In case the metadata is already used on some edge, right click it and select Duplicate metadata. Then pick a new name and it will appear in your list. It is good to know that in right click menu on the edges, the newly added metadada will allways appear at the very bottom of the list (until you save the graph, then it will be reordered alphabetically).
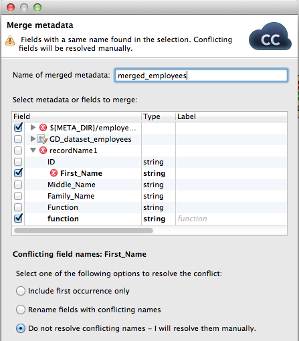
Another handy feature (especially when working with joiners) is the metadata merge. In right click menu pick Merge metadata and select which metadata to merge (you can even select only some of their fields), resolve naming conflicts if there’re any, and finally name your new metadata.
Useful Properties
No matter whether you create metadata manually or edit one generated previously, there are many properties you can set. Let’s have a look at some of them:
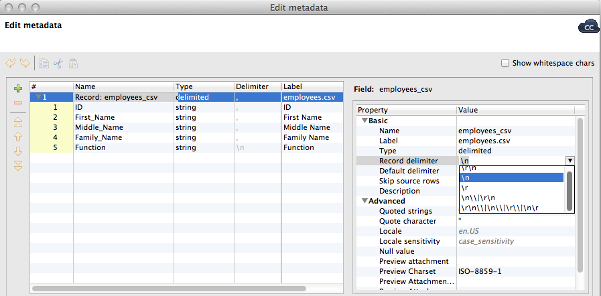
Record delimiter
When working with flat files, record delimiter specifies the character that splits the input into single records. As your files might contain various record delimiters (both windows and unix end of line characters), it is usually safe to select some more general record delimiter where more possibilities will be tried. Incorrect record delimiter in source file can cause your graph to fail.
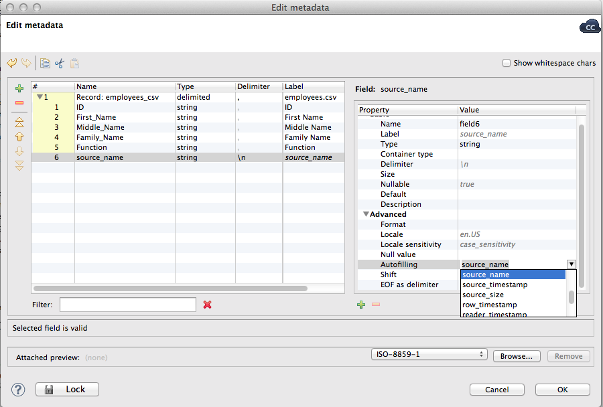
Autogenerated fields
Some fields do not need to have their origin in the source file. They can contain some interesting dynamic data such as name of the file read (useful when using wildcards i.e. * in filenames). To achieve this, add a new field, select it and in Autofilling property set source_file. Each record will be enriched with the source file it came from. Similarly, you can use other automated values - source size, timestamp etc. We recommend using this specialised fields at the end of metadata record.
Keep it Clean
You should keep your metadata organized in order to be able to tell which is used for what. We in GoodData strongly recommend using some naming convention. For example, prefix I_ or IN_ for metadata used by readers and O_ or OUT_ for metadata for writers. There is currently no way to clear unused metadata automatically, but we have this feature on our roadmap. Until then, it is up to you to handle the cleaning yourself.