CloudConnect - Working with Archives
CloudConnect is a legacy tool and will be discontinued. We recommend that to prepare your data you use the GoodData data pipeline as described in Data Preparation and Distribution. For data modeling, see Data Modeling in GoodData to learn how to work with Logical Data Modeler.
When you need to transfer or archive larger amount of data it is common to use some kind of compression, which makes compressed archives one of the most popular data sources for CloudConnect transformations. CloudConnect supports several types of compression methods - namely ZIP, GZIP, and TAR.
In this article, we will show you how to read data from locally and even remotely stored ZIP archives. For other types of archives the processes are almost identical. We will also take a look at how to handle password protected archives.
Data we Will Be Using
Throughout the article we will be referring to two simple CSV files with following content:
Opportunity.csv:
| Id | Probability | StageName | CloseDate | CreatedDate | AccountId |
|---|---|---|---|---|---|
| 1 | 15.0 | Open | 2013-04-01 | 2012-12-02 | 1 |
| 2 | 100.0 | Closed | 2012-10-09 | 2012-07-11 | 3 |
| 3 | 30.0 | Rejected | 2012-11-12 | 2012-05-10 | 1 |
| 4 | 5.0 | Open | 2013-05-11 | 2013-01-01 | 2 |
Account.csv:
| Id | FirstName | LastName | |
|---|---|---|---|
| 1 | John | Doe | john.doe@comapny.com |
| 2 | Jane | Deer | jane.deer@comapny.com |
| 3 | Jim | Dean | jim.dean@company.com |
You can download an example project that contains all referenced graphs and data here.
Reading from a Locally Stored ZIP Archive
Let’s start with the simplest case. We have one ZIP archive stored locally in data/source directory of our CloudConnect project. The ZIP archive is called data_business.zip and contains our two CSV files - opportunity.csv and account.csv. What we want to do is to read the files line by line. We can do that using the CSV Reader component.
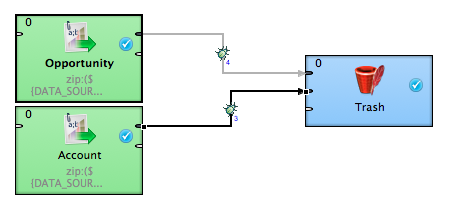
We will create a graph called unprotected_locally.grf and use two CSV Readers - one per each zipped CSV file - and one Trash component which can be found among Writers on the component Palette. Instead of the Trash component, you could use GD Writers to upload the data to a GoodData project or CSV writers to store the extracted CSV files or another component to perform some kind of transformation on the extracted data, but we don’t want to complicate our reading exercise.
The readers themselves have the ability to read compressed data built in. The trick is in setting the File URL property correctly. In order to set it double click on one of the readers. Dialogue like the one below will open up.
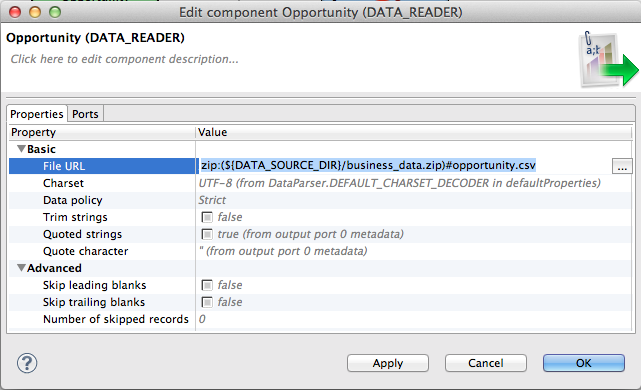
The zip:() part denotes that the file referenced inside the parenthesis is a ZIP archive. The part after the # letter specifies the path to a particular file inside the ZIP archive. In this case, we are reading from opportunity.csv file stored in business_data.zip archive. The ${DATA_SOURCE_DIR} stands for ./data/source/ and it is a graph parameter. For more information about parameters, CloudConnect - Using Parameters.
Now you need to set up the second CSV Reader in the same way for the account.csv file. The resulting URL should look like: zip:(${DATA_SOURCE_DIR}/business_data.zip)#account.csv.
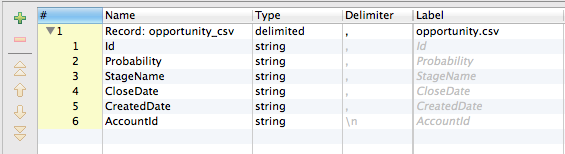
The metadata on edges connecting the readers with the trash should reflect the structure of the CSV files the readers are reading from. For opportunity.csv the metadata would look like:
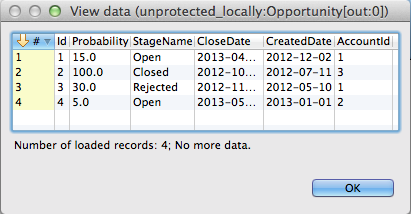
After setting up the metadata right-click the edges and select enable debug option so you will be able to see the data that will flow through the edges. Go ahead and run the graph. After the run finishes right-click on an edge again and select View data to see what was read from the file.
That is all.
Just a few more things that are good to know. You can use ? and * wildcards in the File URL which allows you to for example read from multiple ZIP archives at once or specify a file name that has a variable part. Examples of File URL with wildcards:
//data for accounts might be split into multiple CSV files
//account1-3.csv, account4-6.csv, account7-9.csv
zip:(${DATA_SOURCE_DIR}/business_data.zip)#account*.csv
//zip file might contain a varibable part - e.g. a timestamp
//business_data_1364236917.zip
zip:(${DATA_SOURCE_DIR}/business_data*.zip)#account.csv
//combination of the above
zip:(${DATA_SOURCE_DIR}/business_data*.zip)#account*.csv
You can also read from a different type of archive. All you have to do is to change the zip part of the File URL.
//reading accounts form a TAR archive
tar:(${DATA_SOURCE_DIR}/business_data*.tar)#account.csv
Finally, you may want to read a different type of a file from the archive - for example, XML. In this case, you have to use a different reader - the XML Reader or XML XPath Reader - but for all the readers that have the File URL property is the path configuration the same.
Description of all possible variants of File URL can be found here.
Reading from a Locally Stored Password Protected ZIP Archive
The second example is very similar to the first one. Again we have a ZIP archive containing two CSV files only this time the ZIP archive is password protected. The ZIP archive is called data_business_passwd.zip and contains the same two files as in the previous example. The password protecting this archive is not a very clever one. It is simply a password. CSV Readers aren’t able to handle password protected archives so we will have to use another component to extract the data. It is called ZIP Archive Decrypter and can be found in the components Palette amongst Readers. Appart from the ZIP Archive Decrypter we will also need the CSV Reader and the Trash.
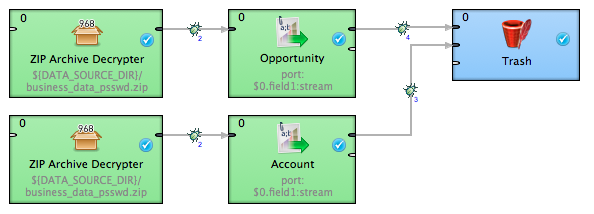
For each CSV file, you will want to use one ZIP Archive Decrypter and one CSV Reader. First let’s take a look at the ZIP Archive Decrypter setup.
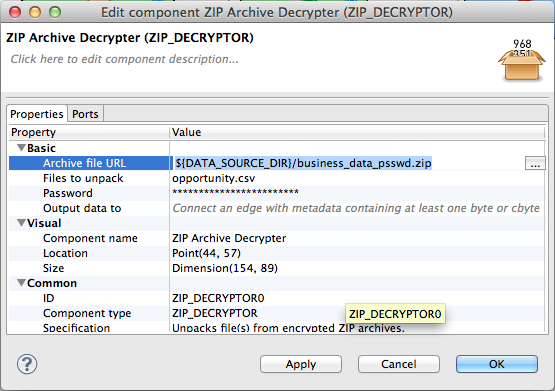
Fill in the Archive file URL with the path to the ZIP archive. Files to unpack expects the path to the desired file(s) inside the archive. Both of these properties accept wildcards. Finally, fill in the Password. Do the same thing with the second ZIP Archive Decrypter for the second file.
Now we will need to define metadata connecting the ZIP Archive Decrypters with the CSV Readers. They are the same for both files.
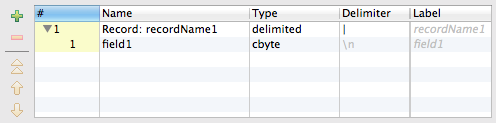
ZIP Archive Decrypters output data not as a string but as a byte sequence. This byte sequence can be afterwards processed by another kind of a reader - in our case the CSV Reader - and parsed into textual data.
To make the CSV Reader read data from the connected edge we need to set up the File URL accordingly.
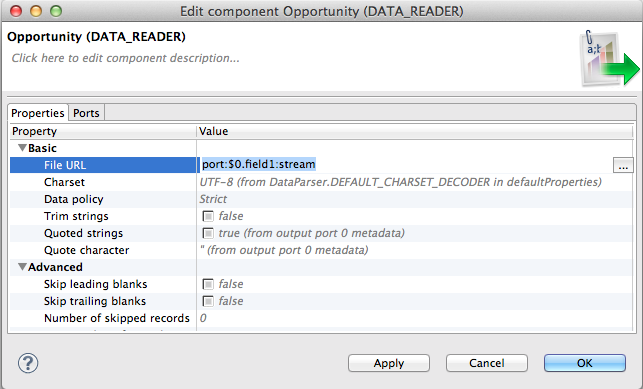
The port part denotes that the input is the connected edge. The $0.field1 indicates that we are interested in the data from that particular field from the metadata on the incoming edge and the stream says how these data should be interpreted. For more info on reading from a port refer to Input port reading.
Metadata on edges connecting the CSV Readers with the Trash are the same as in the previous example.
Now you can run the graph and use the View data debug option see what was processed.
Reading from a Remotely Stored ZIP Archive
Often you may want to read from an archive that is stored on remote server. CloudConnect supports many protocols - for example, ftp, http or https. The only thing you need to change in order to read a file from a remote location is the path to the archive. The full list of the protocols is to be found here. We will show just a few more complex examples of possible File URL modifications.
//reading from GoodData project-specific storage
zip:(https://${URL_ENCODED_USERNAME}:${URL_ENCODED_PASSWORD}@secure-di.gooddata.com/project-uploads/${GDC_PROJECT_ID}/data_business.zip)#account.csv
//reading from Amazon s3 storage
zip:(https://${S3_ACCESS_KEY_ID}:${URL_ENCODED_S3_SECRET_ACCESS_KEY}@${S3_BUCKETNAME}.s3.amazonaws.com/data_business.zip)#account.csv
Note that the only thing that changes is the path in between the parenthesis. If you need to read remote password protected archive you would have to modify the Archive file URL property of the ZIP Archive Decrypter accordingly.
//reading from GoodData project-specific storage
https://${URL_ENCODED_USERNAME}:${URL_ENCODED_PASSWORD}@secure-di.gooddata.com/project-uploads/${GDC_PROJECT_ID}/data_business_passwd.zip
//reading from Amazon s3 storage
https://${S3_ACCESS_KEY_ID}:${URL_ENCODED_S3_SECRET_ACCESS_KEY}@${S3_BUCKETNAME}.s3.amazonaws.com/data_business_passwd.zip
Even though it is possible to use the readers to read from remotely located files it is not recommended - especially not for a large amount of data or files. A more robust way is to use File Download component to download the files to a local storage and afterwards process the files as shown in the first two examples.