CloudConnect - Using Parameters
CloudConnect is a legacy tool and will be discontinued. We recommend that to prepare your data you use the GoodData data pipeline as described in Data Preparation and Distribution. For data modeling, see Data Modeling in GoodData to learn how to work with Logical Data Modeler.
There are cases when you need your transformation to behave differently based on circumstances. You might want to download data from another location, to have credentials stored more securely or just to change the default behavior to some specific. One possible way to achieve this is to use parameters. There are several ways how to you use parameters in your transformations and I would like to show you how to do this and which way to use when.
Parameter Types
Here are the methods to add parameters to your transformation (each of them is further described below):
- Parameters in workspace.prm
- Parameters read from external file
- Internal parameters within a graph
- Parameters passed during execution/schedule
Parameters in workspace.prm
When creating new CloudConnect project, file called workspace.prm is created as a part of the default structure. This is a default parameter file which contains severaly basic parameters that are required for the transformation to work. There are parameters defining default paths to folders and if you select a GoodData working project, its ID becomes one of the parameters as well. Besides that you can also use workspace.prm to add your own parameters. To do it, just open the file and add a line in format PARAMETER_NAME=parameter_value there. You can also combine parameters in workspace.prm:
HOUSE=my_house
KITCHEN=${HOUSE}/my_kitchen
SINK=${KITCHEN}/my_sink

#I have already found my ring, it was stuck in the kitchen sink.
#LOST=${SINK}/my_ring
In this case SINK will be evaluated as my_house/my_kitchen/my_sink. Disabling some parameter or adding some comment is possible by adding hash (#) at the beginning of the line.
From now you can use these parameters in all your graphs within the project. Using it is as simple as writing ${PARAMETER_NAME} anywhere in the graph. It can be in a file path or in any parameter of any component.
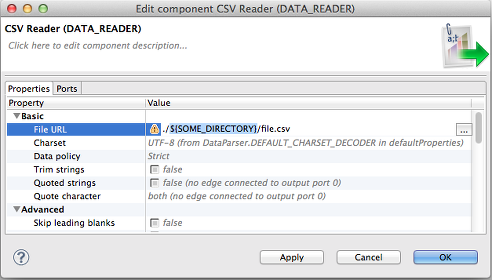
You can also use it anywhere in CTL code. This placeholder will be replaced by the actual value read from workspace.prm. Please note that the evaluation of parameters is done only during initialization phase of execution, that means before the graph actually starts. This means its value cannot be changed during the graph run and remains static.
Parameters Read from External File
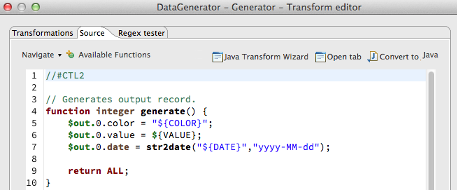
When using within CTL code, it is best to consider the parameter value to be a string and enclose it in double quotes (and do some conversion to another data type if it is needed).
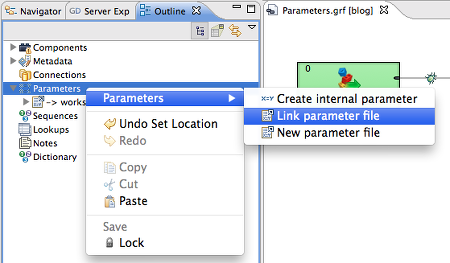
You do not have to use only workspace.prm for your parameters. In fact, you can create your own parameter file (or more of them) and attach it to the graph in the same manner workspace.prm is linked. To do this, display the Outline panel in CloudConnect and unfold Parameters section. Right click the section and select “Link parameter file” to add previously created file or select “New parameter file” to create new one using simple graphic interface (first add parametes names and values, then select where to store the file within the project). While you can link a file from other local directory outside your project, it will only work on local computer (and when running on server you would get an error saying that the linked file does not exist). Only parameter files stored within a project directory are deployed to server.
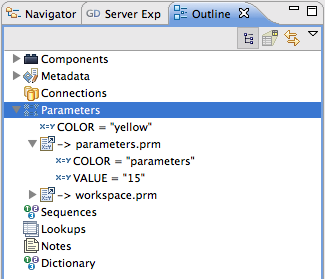
In Outline’s Parameters section you can see all the parameter files linked to the currently opened graph and if you unfold the filename, you can see all the parameters and their values as well. This is really useful when you want to quickly check which parameters this graph uses. after double clicking the parameter file you will be presented with a graphic parameter editor where you can add, change, and remove parameters. This will modify the underlying file as well.
Internal Parameters Within a Graph
Above we described how to share parameters over several graphs of your project using external file, we can also just keep things simple and use only internal parameter that will exist within a single graph. To do this, select “Add internal parameter” in Outline’s right click menu. Such parameters will remain part of the graph XML file.
Execution Parameters
Until now, all the parameters we used were internal part of the project - stored either within the graph or some linked file. To change them you had to to edit the file and for graphs running on a server, this would also mean redeploying the process. However, there are also parameters passed to the graph at the moment of execution or scheduled execution. This means for example that if there are several projects with the same model, you can deploy the same transformation process to them and use different parameters to configure it.
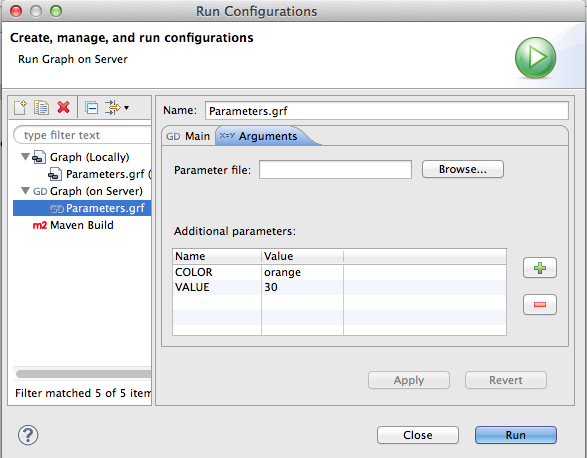
Here is how to set parameters when executing process on server in CloudConnect. If you are running the process for the first time a “Run Configurations” window appears. On “Arguments” tab, you have two oprions how to set execution parameters. You can either directly write them to the table or select a parameter file. Format of the file is the same as mentioned above and .prm extension is expected. When you run the same process again, it will use the same parameters. If you want to change them, open “Run Configurations” window from menu (Run - Run Configurations) and select the configuration you want to modify.
Schedule Parameters
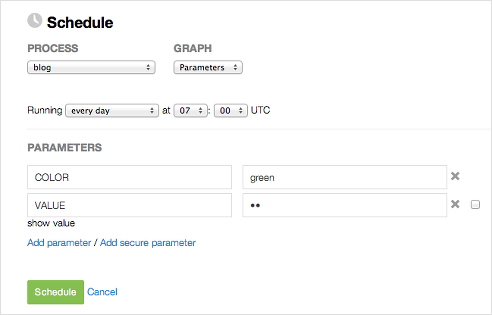
Similarly to one-time execution parameters, there is also possibility to set parameters when scheduling execution of a process. Moreover, it is possible to mark some parameters as “hidden”. This means they will be treated as secure when executing on the server (i.e. not visible in logs etc.) Allways use hidden parameters when passing sensitive data such as passwords. You can set parameters and hidden parameters for schedule on the schedules gray page (/gdc/projects/PID/schedules). Another way is setting them using our API (see the documentation for managing a schedule). And our new UI for scheduling will soon allow you to set schedule parameters in even more convenient way.
Parameter Usage Tips
Here are some tips and good practices on how to use parameters and some specific uses.
- Use parameters to switch between your testing and production environment
- Use parameters for credentials and other data that can easily change
- Use parameters when deploying more same projects for more customers
- Create optional parameter with default value (see parameter priority section below)
Always use hidden parameters for sensitive data such as passwords.
Parameter Priority
As described above, there are more ways to set parameters. If you use more of them to set a parameter with the same name and different value, the actual value passed to the graph will depend on priority as described below. If for example we have a parameter defined in external file, it can be overridden by an internal parameter or by value passed from schedule. It is a good practice to store default values in workspace.prm and override them during schedule if needed.
| Priority (descending) | Parameter type |
|---|---|
| 1. | Execution level (schedule) parameter |
| 2. | Internal graph parameter |
| 3. | External parameter from file |
Parameters and RunGraph Component
As will be described in one of the following articles, the RunGraph component allows you to execute another graph or more graphs from within the actual graph. You can control which parameters to pass to this graph with “Graph parameters to pass” parameter. Please note that the execution will only pass parameters you name here and no others from the environment (if the graph that is executed has linked parameter files such as workspace.prm they will be read of course).
Note that there are some internal parameters that are used for communication with GoodData platform that some components (i.e. GD Dataset Writter, EventStore components, …). If you want to run these in nested graphs, you need to pass these parameters explicitly.
GD Internal parameters
These parameters are automatically passed when a graph is executed on server. As they are per-execution parameters, they have the highest priority and will overwrite any other value you would set locally.
| Parameter | Meaning |
|---|---|
| GDC_PROJECT_ID | ID of the current project |
| GDC_SST | Super secure token for authentication |
| GDC_PROTOCOL | Protocol used to communicate with platform |
| GDC_HOSTNAME | Hostname of the currently used server |
| GDC_PORT | Port of the currently used server |
| GDC_USERNAME | Name of the current user who executed the process |
Parameters in log file
You can see parameters (only execution/schedule, not internal or read from linked files) passed to the graph in the log file. They appear at the very beginning in this form (hidden parameters are replaced with asterisks).
Server log:
2013-03-07 14:59:31.450+0100 [main] [DEBUG]: request_id=qyV2158WNvNPv7qh:OJqMgk8CqJ567hAw ContextURL is set to file:/uploads/executions/odl87aiy5b259t709lo3i632rqft4wlg/blog-Parameters/2013-03-07_14-59-30/blog/
2013-03-07
 14:59:31.458+0100 [main] [DEBUG]:
request_id=qyV2158WNvNPv7qh:OJqMgk8CqJ567hAw Graph Parameters.grf
additional properties {COLOR=orange,
GDC_REQUEST_ID=qyV2158WNvNPv7qh:OJqMgk8CqJ567hAw, GDC_SST=*****,
GDC_PORT=443, VALUE=30, GDC_PROJECT_ID=odl87aiy5b259t709lo3i632rqft4wlg,
 GDC_HOSTNAME=secure.gooddata.com, GDC_WEBDAV_ROOT=/uploads, GDC_PROTOCOL=https}
2013-03-07 14:59:31.459+0100 [main] [DEBUG]: request_id=qyV2158WNvNPv7qh:OJqMgk8CqJ567hAw Loading graph from file:/uploads/executions/odl87aiy5b259t709lo3i632rqft4wlg/blog-Parameters/2013-03-07_14-59-30/blog/graph/Parameters.grf
...
Example Project
Feel free to download the example project with practical examples on use cases mentioned. Parameters are evaluated only during the initialization phase and cannot be changed. There is, however, a way how to change the value during runtime and even use it in cycle (using run graph and external parameter file.