CloudConnect - Parsing XML Files
CloudConnect is a legacy tool and will be discontinued. We recommend that to prepare your data you use the GoodData data pipeline as described in Data Preparation and Distribution. For data modeling, see Data Modeling in GoodData to learn how to work with Logical Data Modeler.
With CSV occupying the first place, XML is probably the second most popular format for data sharing. While it is generally less readable compared to the CSV, it allows storing more complicated data structures including metadata and entity relations. We usually encounter data in XML format when working with third party APIs as the primary data source.
CloudConnect provides two reader components to parse XML files. The simple XMLExtract, which uses generated or provided XSD schema to configure the parser, and XMLReader (formerly known as XMLXPathReader) which uses XPath definition.
Component Comparison
XMLExtract
Pros
- Easily configurable
- GUI for XML mapping creation
Cons
- Less configurable
XMLReader
Pros
- Useful for complex data parsing
- Highly configurable
Cons
- XPath knowledge needed
The XMLExtract is simple XML parsing component, which can be configured very quickly and does not require extensive previous experience with XML parsing. It provides guidance to set XML parsing process very quickly and works very well with simple XML files. The XMLReader is on the other hand more versatile for parsing large and complex XML structures. It uses powerful XPath expression, which provide various ways to get data from XML structure.
Examples
In this section I will cover a couple of examples on XML parsing using both components mentioned above. The source XML file has the following structure:
<entities<
    <entity id="...">
        <name>...</name>
        <category>.</category>
        <adresses>
            <adress order="...">
                <street>...</street>
                <city>...</city>
                <country>...</country>
            </adress>
            <adress order="...">
                ...
            </adress>
        </adresses>
    </entity>
</entities>
Let’s assume we want to get two datasets from the XML file. First set will contain entity_id, entity_name, and entity_category. Second set will contain entity_id, adress_order, adress_city, and adress_country. To make the graph as simple as possible, I will use only one component and two output ports.
XMLExtract
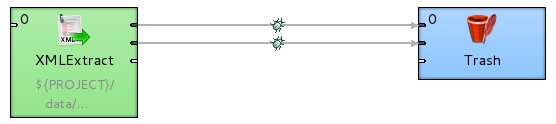
I will start with inserting XMLExtract component into the graph, linking the component to the test file and creating two metadata records - (O_entity) for the first set of data (O_adress) for the second one. I will use the string datatype for all the metadata fields. For testing purposes I will connect XMLExtract directly to Trash component and put metadata on edges.
Now, the most complex part of parsing XML file is setting up mapping. The XMLExtract component provides Mapping wizard, where you can quite easily define the output metadata mapping. Lets open mapping wizard inside XMLExtract component. After hitting the Generate tree structure button and choosing folder for XSD mapping file, the mapping dialog should look like this:
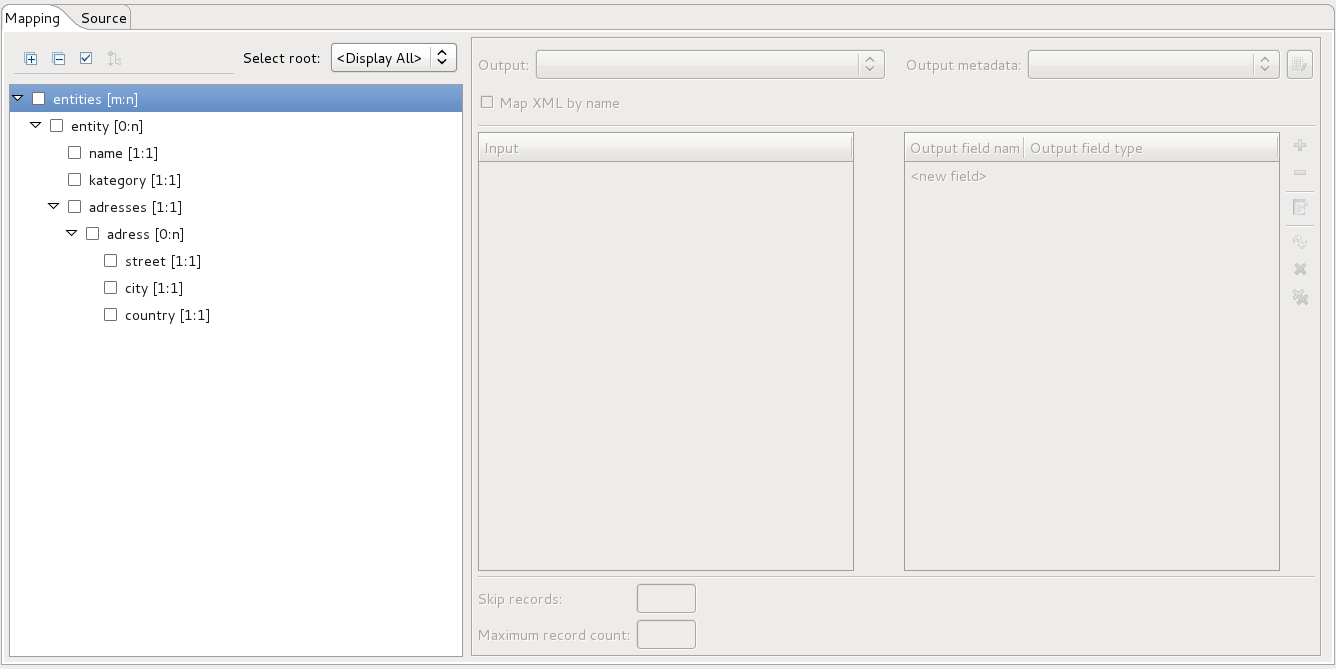
Let’s take closer look at the screenshot above. The tree displays structure of XML file. You can see top tag entities, which contain 0 to N entity tags. Information about cardinality is next to the entity tag in tree structure. Mapping of XML fields to the output metadata is always done only for one level of the XML file represented by the tree structure. The level on which you create mapping will control how the output CSV file will look like. For example, if I create mapping on entity level, there will be two lines in output CSV file, but if I create mapping on address level, there will be three lines in output CSV file even if the mapping is same. This happens because there are three adress elements in the input file and mapping is applied for each of the elements. For our first use case, the right mapping is the mapping on entity tag level. The picture below shows the correct mapping to O_entity metadata. This will produce two lines of output, each with distinct entity values.

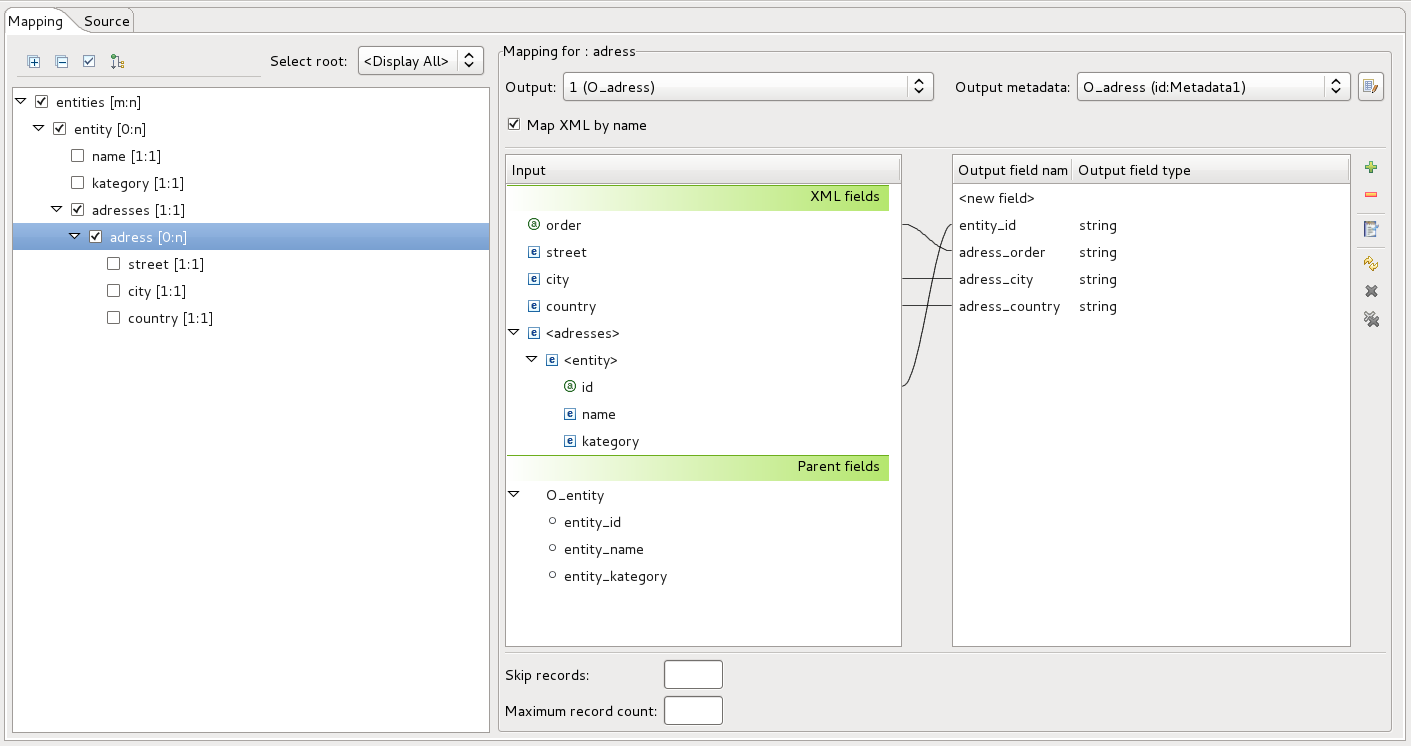
Let’s now continue with the second use case. Now we want to get all the company addresses present in the XML file. To achieve this, we will create mapping on address tag level. You can see that we will also be using information from entity tag level, but mapping is on adress level and this will ensure that we have all records in the output file. The final mapping will look like this:
As you can see, configuring the XMLExtract component is quite an easy task. You should always keep in mind that the number of output records depends on what level you create the mapping. This is very important in bigger more complex XML files, as it could lead to unexpected behavior of XMLExtract component. More information about the component can be found here.
XMLReader
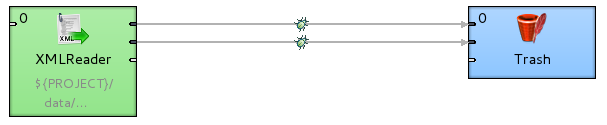
The usecases for XMLReader will be exactly the same as for XMLExtract. We will also need to add the XMLReader component to graph, connect it to output component and create new metadata. In the XMLReader the mapping of XML fields to output metadata is done by definition based on XPath technology (XPath). The most interesting part of XPath is the XPath expression, which defines which part of XML we want to parse. When you open Mapping dialog inside the XMLReader component, you will see an example of mapping XML. The mapping structure consist of two elements: the Context tag and the Mapping tag. Both of the tags have attribute XPath, which is accepting XPath expression. The Context tag defines on what level of XML we are doing Mapping operations and also defines to what output port will the data go. Let’s have a look at some Context examples:
- <Context xpath=”/entities”/> - root element level (this will produce 1 output row)
- <Context xpath=”/entities/entity”/> - entity element level (this will produce 2 output rows)
- <Context xpath=”/entities/entity/adresses/adress”/> - address element level (this will produce 3 output rows)
The Context tags can be nested within each other. An example of such nesting is:
<context A port="0">
    <context B port="1"></context B>
    <context C port="2"></context C>
</context A>
<context D port="3"></context D>
In this example you can see that Context tag B is nested in tag A (same as Context tag C). This means that the final XPath expression will be constructed from Context A XPath expression and Context B XPath expression. Context D tag is not nested in any other tag, so it will begin from root element.
The Mapping tag defines how are the values in XML mapped to output metadata. The Mapping tag is always inside one or more Context tags and it is working on level defined by nearest Context tag. The Context level is very important when creating final mapping. The most important fact is the mapping will not affect number of records on output port. The number of rows is defined by Context tag and its XPath expression. It is possible to get information from XML elements on different level, then is defined in Context element, but there will always be only oen element for each row defined by Context. If there will be more then one element, the run will finish with parsing error and graph will fail. Let’s have a look at the following mapping example:
<Context xpath="/entities/entity" outPort="0">
    <Mapping xpath="@id" cloverField="entity_id"/>
</Context>
The following mapping is correct, it will return two rows, each with different entity_id.
<Context xpath="/entities" outPort="0">
    <Mapping xpath="entity/@id" cloverField="entity_id"/>
</Context>
The following mapping is incorrect and it will return error (result of XPath filling field ‘entity_id’ with two values). This is because on context level there is only one entities element (one output row) and parser could not guess, which of the entity ids send to the output.
Now back to our use-cases. We have all knowledge needed for creating one simple mapping, which will parse data from our example file. Such final example would look like this:
<Context xpath="/entities/entity" outPort="0">
    <Mapping xpath="@id" cloverField="entity_id"/>
    <Mapping xpath="name" cloverField="entity_name"/>
    <Mapping xpath="kategory" cloverField="entity_kategory"/>
    <Context xpath="adresses/adress" outPort="1">
        <Mapping xpath="../../@id" cloverField="entity_id"/>
        <Mapping xpath="@order" cloverField="adress_order"/>
        <Mapping xpath="city" cloverField="adress_city"/>
        <Mapping xpath="country" cloverField="adress_country"/>
    </Context>
</Context>
One thing that can be confusing in mapping definition is the usage of (..) construct. It is simple definition of going one level up from current Context. In the example I am using it to get id from Entity level, even if my context is on Adress level.