Analyzing Twitter Search
CloudConnect is a legacy tool and will be discontinued. We recommend that to prepare your data you use the GoodData data pipeline as described in Data Preparation and Distribution. For data modeling, see Data Modeling in GoodData to learn how to work with Logical Data Modeler.
In this tutorial, you explore how to extract data from the Twitter Search API for use in your GoodData project. If already finished our Getting Started Tutorial, you can skip the entry and continue with more advanced topics.
The provided CloudConnect project is preconfigured to use a provided Twitter developer application to authenticate to the Twitter Search API and to extract tweets containing the string: gooddata
This tutorial provides a brief run-through of this example project and then extends it so that you can extract your own Twitter data using your own developer application.
This article is intended to be an extension of the Getting Started Guide for Developers, which explores the Twitter example project in much greater detail.
If you are new to using CloudConnect Designer or have not yet reviewed the Getting Started Guide, please start there first. For more information, see GoodData CloudConnect Tutorial.
Prerequisites
- Twitter Developer App: The provided CloudConnect project is preconfigured to use a GoodData developer application. This tutorial is designed to enable you to gather your own Twitter data, for which you should use your own developer application for authentication. Further instructions are listed in the following section.
- CloudConnect: CloudConnect Designer must be downloaded and installed on your local computer. You also need a project authentication token to create your GoodData project. For more information, see Getting Started with CloudConnect.
- GoodData Account: You must have an account to use the GoodData Portal.
Twitter example project
The example project includes a logical data model and a data loading process, which performs the following actions:
- Read data using HTTP Connector
- Reformat data to fit GoodData model
- Upload data using GD Dataset Writer
Later in this tutorial, these values will be inserted into your CloudConnect project as part of the ETL process.
For more information on GoodData authentication, see Using OAuth 1.0a with REST Connector.
Download the Twitter example package.
Import the example package as a CloudConnect Project from archive file.
The content is the following:
- model: twitter.ldm
- graph: twitter.grf
Create or assign GoodData working project
For each CloudConnect project, you must create or assign a GoodData project to receive the results from CloudConnect.
To assign the working project for your current CloudConnect project:
Click the Server Explorer tab and then click the GD logo:
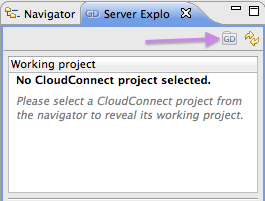
In the dialog, enter all applicable information.
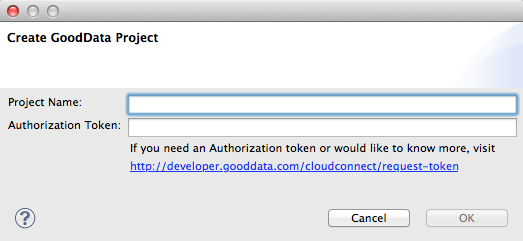
- Click OK.
Data Model
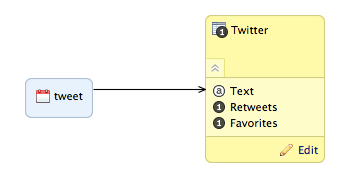
Let’s examine the Twitter example data model, which is very simple. It contains one dataset with three columns as well as a date dimension. The dataset fields are the following:
- Tweet (text)
- Retweets (number)
- Favorites (number)
To create the new data model inside the current working GoodData project:
- Open the twitter.ldm file in the CloudConnect project.
- In the displayed window, click Publish Model to Server.
- A success message indicates that the project was successfully updated with the logical data model.
Data Loading Process
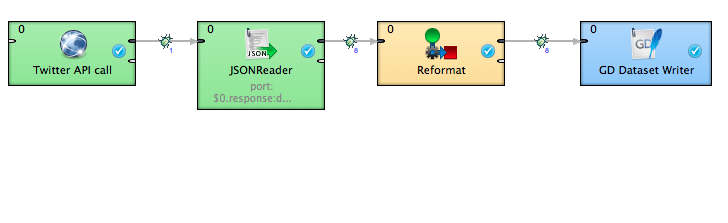
Now, let’s examine the project’s ETL graph. This tutorial utilizes the HTTP Connector component to extract data from the Twitter Search API, transform it, and upload it to the GoodData. The complete process is illustrated below.
Getting Started with Twitter
Before you begin, you must have a Twitter account. Additionally, you must create your own developer application. For more information, see Application Management.
After you have created your developer application, you need to retrieve the following pieces of information, which are used for authentication from GoodData to the Twitter Search API.
- Consumer Key
- Consumer Secret
- Access Token
- Access Token Secret
HTTP Connector component
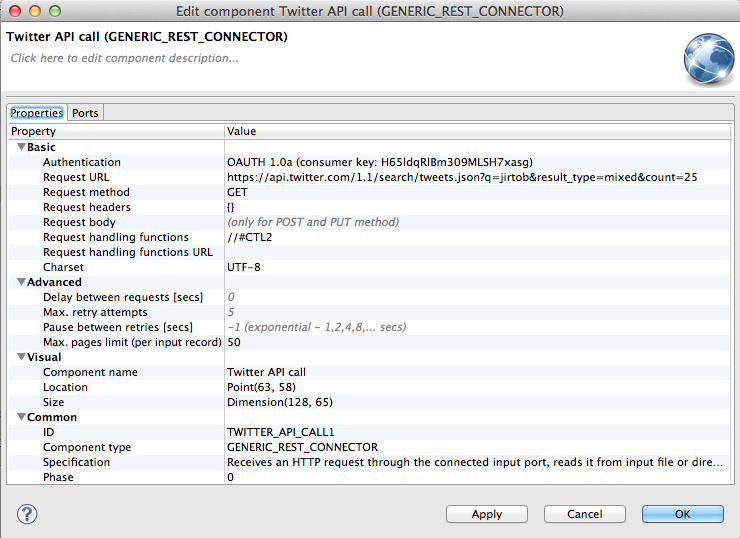
The HTTP Connector component is used to connect via HTTP to the Twitter Search API and to submit a request for a set of tweets. This request is submitted as an URL with predefined query parameters.
In the previous diagram, the connector is labeled as “Twitter API call.”
By default, the Connector is configured to extract tweets containing the string, gooddata. For now, leave it alone, so that you can see the whole execution process before you begin modifying it.
JSON Reader component
The second step of our ETL graph is to extract the Twitter data from the JSON response returned as part of the HTTP Connector component.
The JSON Reader component is used with the following JSON XPath expressions:
<?xml version="1.0" encoding="UTF-8" standalone="no"?>

<Context xpath="/root/object/statuses" outPort="0">
  <Mapping cloverField="text" xpath="text"/>
  <Mapping cloverField="retweetCount" xpath="retweet_x005fcount"/>
  <Mapping cloverField="favoriteCount" xpath="favorite_x005fcount"/>
  <Mapping cloverField="date" xpath="created_x005fat"/>
</Context>
The code is part of the the JSON Reader configuration. It extracts the data from response using the provided xpath and sends it to the corresponding metadata field (cloverField).
Reformat component
The extracted data is delivered as strings. It must be reformatted to match the data types in the GoodData project, which are specified as part of the logical data model.
This tutorial uses the Reformat Component with following transformation definition:
function integer transform() {
    $out.0.text = $in.0.text;
    $out.0.favorites = str2integer($in.0.favoriteCount);
    $out.0.retweets = str2integer($in.0.retweetCount);
    $out.0.tweet = str2date($in.0.date,"EEE MMM d HH:mm:ss Z yyyy");

    return ALL;
}
Basically, the above transformation changes the string value for the date to a actual date type. Additionally, it converts strings to decimals where it is necessary. In this case, the items that reflect counts must be converted to numerical data, so that they can be stored as facts through the logical data model. These facts, in turn, can be used as metrics inside your GoodData project.
GD Dataset Writer component
The final step is to upload the data to our previously created project. The GD Dataset Writer component delivers the data to the working project.
Double-click the GD Dataset Writer component.
Click the Field Mapping field, and then click the Browse button.
Review the field mappings to verify that the inputs to the GD Dataset Writer are mapped to the appropriate fields in the data model:
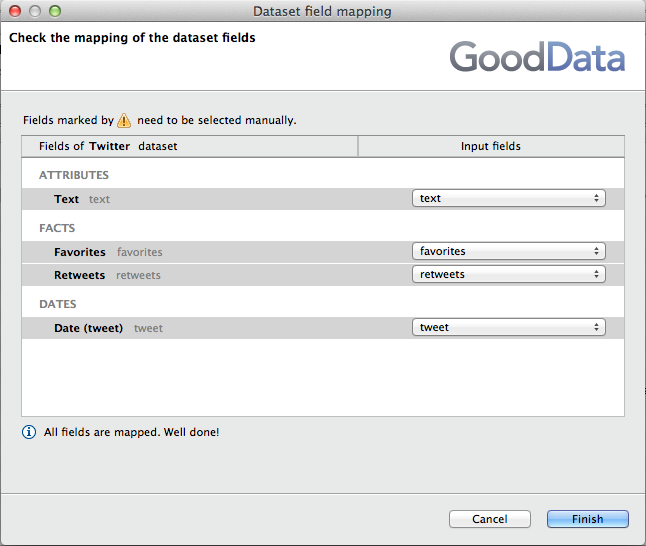
- Click Finish.
Executing the ETL
You’re ready to run the ETL graph. To run the graph through CloudConnect, secondary-click in the white space next to the graph and select Run As… > 1 Graph (Locally). The graph executes and, if successful, loads a set of tweets referencing gooddata into the working project.
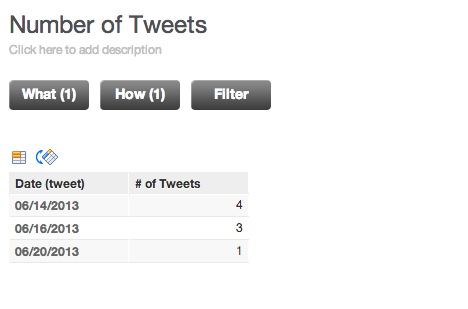
Verifying the Upload
In the project, you can create a simple COUNT metric on the Tweet attribute to generate a simple report like the following:
Configuring the project for your enterprise
After you have verified that the data has been uploaded to your project through the above report, you can now configure the CloudConnect project to gather tweets that are of importance to you and your organization.
Configuring Twitter authentication in the ETL process
To begin, you should now use your Twitter developer application to authenticate between GoodData and the Twitter Search API.
Please retrieve the following information from your Twitter developer application:
- Consumer Key
- Consumer Secret
- Access Token
- Access Token Secret
Please review and complete the following instructions to use your own developer application authentication credentials via OAuth 1.0a authentication with the HTTP Connector. For more information, see OAuth 1.0a.
After you have finished the above steps:
Double-click the Twitter API call component in the CloudConnect project.
Click the Authenticate field. Then, click the Browse button.
Complete the fields in the Authentication Form and save your changes:
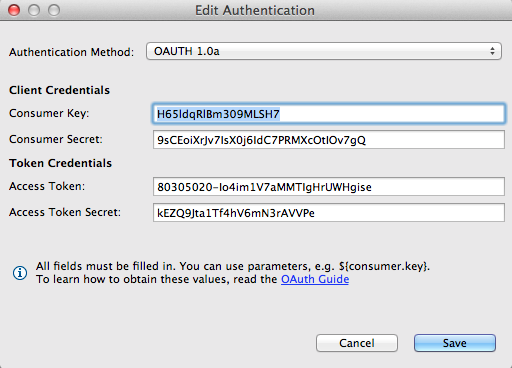
The HTTP Connector is now configured to use your Twitter developer application.
Configuring the request
By default, this project is configured to request tweets containing the text string gooddata. While that may be interesting information, it may not be terribly valuable to you and your organization.
You can use the following steps to query the API for any string value (e.g. mycompany).
Steps:
- In CloudConnect, open the twitter.grf file.
- Double-click the Twitter API call component.
- Select the Request URL. Click the Browse button.
- In the displayed URL, select the following value:
q=gooddata - Replace it with the following, substituting “mycompany” with the value of your choice:
q=mycompany - Click OK.
- Click Apply.
Configuring additional fields
The Twitter Search API contains additional fields that you can request and use in your GoodData project. In general, you must do the following:
- Define the fields that you want to use in the logical data model. When you publish the new logical data model to the server, the current dataset may be overwritten, depending on the changes.
- HTTP Connector - configure the request properly.
- JSONReader - map the fields you want using XPaths.
- Reformatter - reformat the strings to the appropriate data type for the new fields in the logical data model.
- GD Dataset Writer - map the new fields to the logical data model.
- Run the graph locally again.
The details of this approach exceed the scope of this tutorial.
For more information, see Twitter Search API.
Execute the graph
When the ETL graph is next run, tweets that reference the value you inserted are extracted from the Twitter API.
By default, the ETL graph is configured to do full data loads, which replaces all of the current data with the incoming data. For this tutorial, that should be fine.
When the data load finishes, you should validate that it loaded properly be rechecking your simple COUNT report in the GoodData project.