Analyzing Customer Data from Salesforce
CloudConnect is a legacy tool and will be discontinued. We recommend that to prepare your data you use the GoodData data pipeline as described in Data Preparation and Distribution. For data modeling, see Data Modeling in GoodData to learn how to work with Logical Data Modeler.
In this tutorial, you modify a pre-built CloudConnect Designer project to integrate your Salesforce data into a GoodData project.
Through CloudConnect Designer, you can easily and visually build a logical data model and create a visual ETL process that populates it with data from a wide range of source systems.
The purpose of this article is to provide a step-by-step examination of how to complete the steps of this data integration, using the Salesforce Account, Opportunity, and Opportunity Line Item objects.
Pre-Requisites
CloudConnect Designer. For more information, see the Downloads page at https://secure.gooddata.com/downloads.html.
If you are a white-labeled customer, log in to the Downloads page from your white-labeled domain:https://my.domain.com/downloads.html.GoodData account. For more information, see Try GoodData for Free.
Salesforce login credentials (username, password, Salesforce token)
GoodData login credentials (username, password)
Getting Started with the Project
To begin, download the package, which is stored as a ZIP file.
Open CloudConnect Designer. From the menu, select File > Import. Import the project from the archive (ZIP) file as a CloudConnect project.
The package contains the following:
- model: Salesforce.ldm
- graph: SalesforceExample.grf
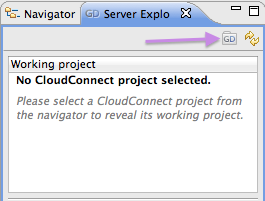
For each CloudConnect project, you must assign a GoodData working project. To assign, click the Server Explorer tab, and then click the GD logo:
The Create GoodData Project window is displayed. Enter a Project Name and provide your authorization token. Then, click OK.
For more information about the authentication token, see Find the Workspace Authorization Token.
Project Overview
This project utilizes a connection to gather data from three different areas of your Salesforce data. This data is mapped to the fields in the dataset of this project. In the case of Opportunity and Opportunity Line item source data, it must be merge together before it is loaded into the generic Opportunity dataset in your GoodData project.
As part of this project’s configuration, you must create a connection to your Salesforce account, using the credentials you have already gathered for it. Additionally, you learn how to enable debugging in your ETL graphs and to perform data mappings between components.
Review Your Data Model
This project includes a pre-designed logical data model to capture the information from the Account, Opportunity, and Opportunity Line Item objects in Salesforce.
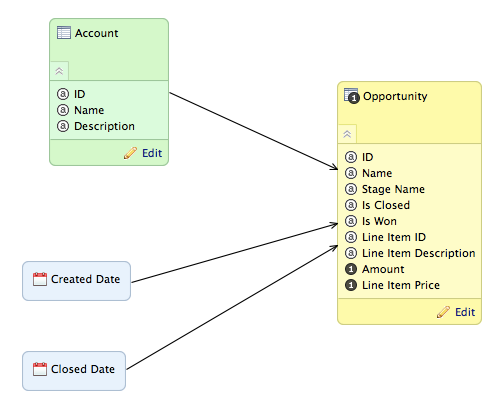
In the above image, you can see how the Opportunity dataset contains opportunity information as well as the detail Line Item fields. In this data model, Opportunity contains the transactional data for items in the sales pipeline, while referencing the other data sources for supporting information.
This dataset references three other datasets:
- Account - contains account information
- Created Date
- Closed Date
To publish the model, click Publish model to server in the Details sidebar. In a few seconds, the model is published to the GoodData project. You can review a graphical representation of the model in your GoodData project. In the menu, select Manage > Model.
ETL Graph
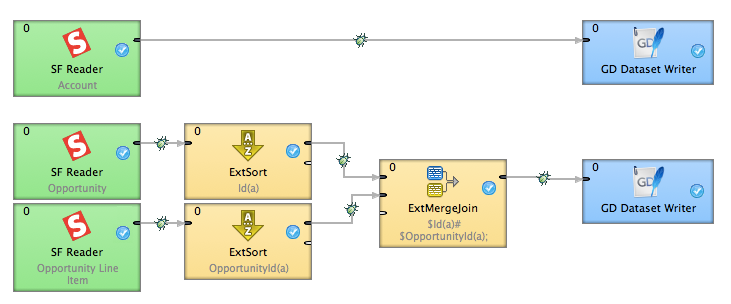
This project also contains a pre-built ETL graph. In the Project Explorer, open the /graph/SalesforceExample.grf. The graph file is opened in a new CloudConnect tab:
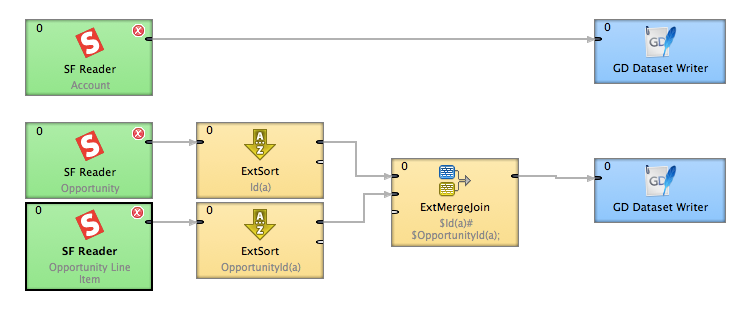
This ETL graph utilizes the Salesforce Reader component to pull data from the three Salesforce sources.
- The Account data source is written to the Account dataset.
- The Opportunity and Opportunity Line Item feeds are sorted using the ExtSort component, combined together using the ExtMergeJoin component, and written to the Opportunity dataset.
Enable Debugging
Between the components in your ETL graph, it is a good development practice to enable debugging.
In CloudConnect Designer, when debugging is enabled, you can review the specific data that is passed between the components. This useful method allows you to track the specific changes that are occurring within each component, which can greatly simplify debugging of issues within your ETL.
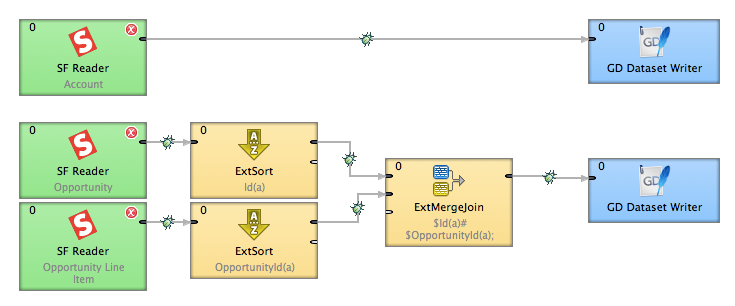
Debugging is enabled in the edges of your ETL graph. An edge is a one-way arrow that connects components in sequence in an ETL graph. This project contains four edges:
To enable debugging, secondary-click the edge between two components and then select Enable debug. A small Bug icon appears on the edge. Repeat this step for each edge of the project, which should look like the following:
Configure Connection
Before you begin, please verify that you have acquired your Salesforce login information, including a Salesforce security token, for the account from which you can extract data.
Before you begin using the ETL, you must create a new Salesforce connection. In the Project Outline box, you can review the current connections. To create a connection, secondary-click the Connections folder and select New Salesforce Connection.
The Salesforce connection window opens:
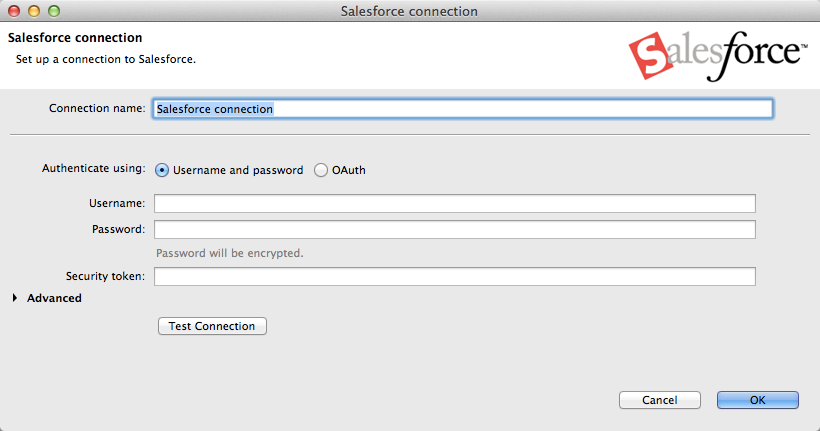
Paste your Salesforce security token into the access token field. Click Test Connection. If the connection is valid, click OK.
Configure Salesforce Reader components
Now, you need to reference the newly created connection in the Salesforce Reader components that will use it.
Steps:
Let’s begin by configuring the ETL that uses the Salesforce Reader to pull data from the Account object.
Double-click the Salesforce Reader for the Account ETL to bring up the configuration window:
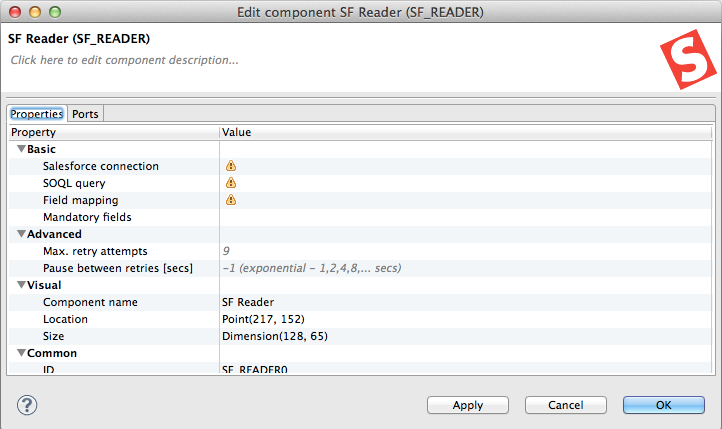
Select the Salesforce connection parameter. From the drop-down, select the connection that was just created.
Click the SOQL query parameter. CloudConnect attempts to connect to the Salesforce object using the connection you just created. Whether it is successful or not, you can configure the SOQL query to use to retrieve the data from the Salesforce object.
For the Account object, you should enter the following query in the displayed window:
SELECT Id, Name, Description FROM AccountFor more information on SOQL, see Salesforce Developer Documentation. You may also use the Force.com Explorer investigate the objects and fields that exist in your account. For more information, see Force Explorer.
Click OK.
To save the graph file, select File > Save.
The above steps should be applied for the Opportunity and Opportunity Line Item readers. Different queries need to be applied.
Configure GD Dataset Writers
You have now configured the inputs to your ETL graph. Now, you can configure the outputs.
For this ETL graph, you are writing data to the GoodData project to which this CloudConnect project has been assigned as the working project. To write data to any GoodData project, you use the GD Dataset Writer component.
Steps:
- To begin, let’s configure the GD Dataset Writer component for the Account graph.
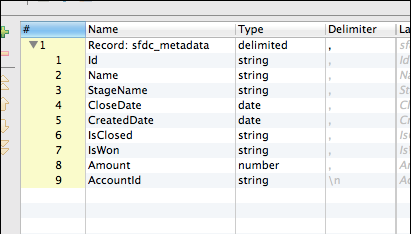
- In this case, you are going to configure the metadata for this object first. The metadata is the set of fields that are passed from one ETL component to the next. To configure the metadata that is being fed to the GD Dataset Writer, secondary-click the line connecting the SF Reader component to the GD Dataset Writer component for the Account ETL. Then, select New metadata > Extract from Salesforce.
- Put in the same SOQL query used in the SF Reader:
SELECT Id, Name, Description FROM Account - To see the generated metadata, click Next.
- As needed, you can rename the metadata fields to make them easier to find at a later time. To change a metadata field name, double-click it.
- If necessary, you can also change the datatype from the Type drop-down.
- To finish, click Done.
- Click OK twice.
- Double-click the GD Dataset Writer component. Click the Data set item, and then click the Browse button.
- From the list, select the dataset in the working project to which you wish to write the Account data. In this case, it should be identified as, dataset.account. Click OK.
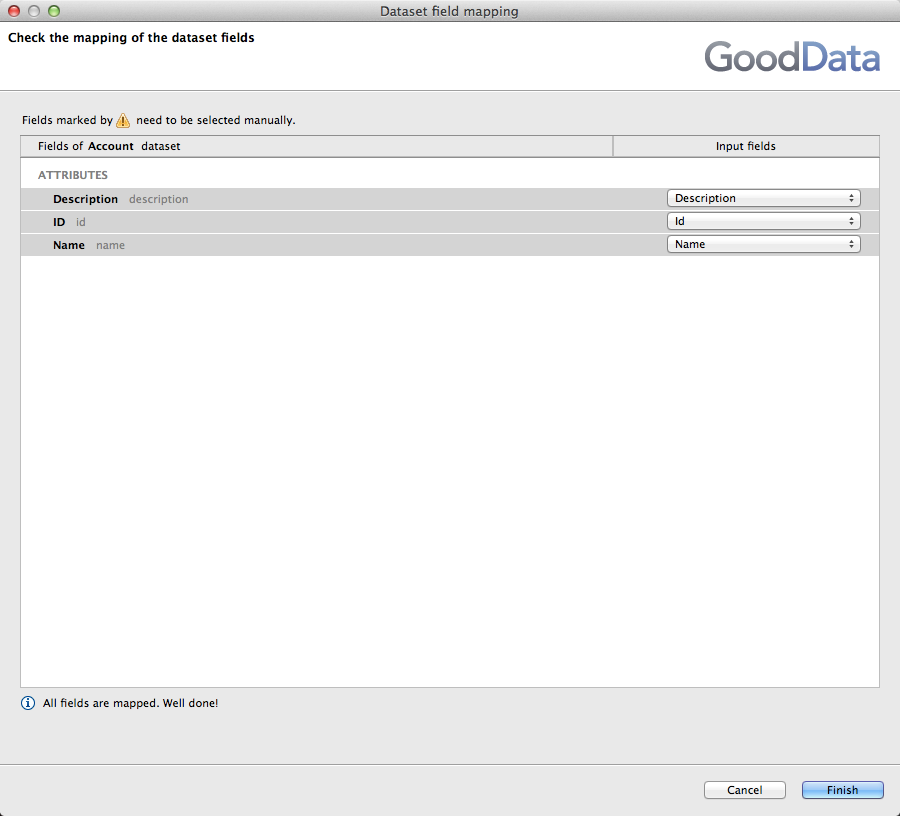
- Click the Field mapping parameter. Review the automatic field mapping. The fields should automatically map, but they can be changed by selecting the appropriate metadata field from the drop-downs.
- When the fields are mapped, click OK twice.
- Repeat the above steps for the Opportunity and Opportunity Line Item ETLs.
Configuring the ExtSort Component
Before you apply an external merge join (ExtMergeJoin) on two sets of data, you must ensure that the data has been sorted. This requirement simplifies and speeds the merging process and is required for use of the ExtMergeJoin component.
In the steps below, you can verify that the ExtSort components have been configured to sort appropriately.
Steps:
- For the Opportunity data feed, double-click the ExtSort component. The configuration for the ExtSort component is displayed.
- Select the Sort Key parameter. Note that the field value should be Id(a), which means that the field used to sort the records is the Id field, in ascending order.
- Click the Browse button. The Select Fields window is displayed:
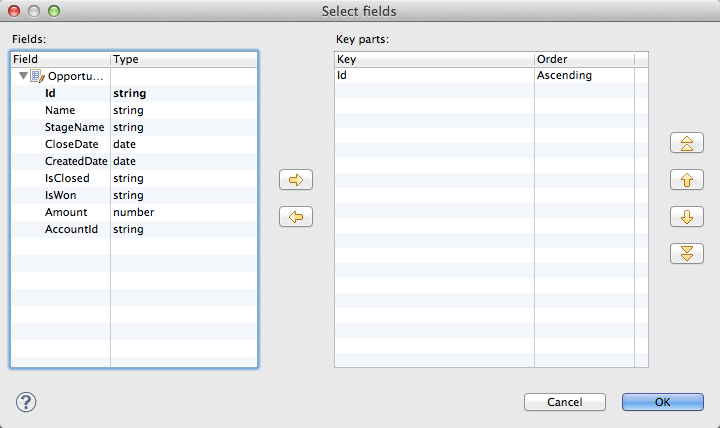
- Click OK twice.
- Repeat the above steps for the Opportunity Line Item ETL. The field that should be used for sorting is the OpportunityId field, in ascending order.
Configuring the ExtMergeJoin Component
In CloudConnect, the ExtMergeJoin component can be used to combine two data streams into one, so that all of the data can be written to a single dataset in the GoodData project.
As an exercise, there is one aspect of this configuration that needs to be changed. In this case, the project has been predefined to perform the join on the selected, sort keys in each data stream. However, in the steps below, you review the configuration and change the Join Type in the component.
Steps:
- Double-click the ExtMergeJoin component.
- The key configuration parameters are the following: Join key, Join Type, and Transform.
- Join Key: Select the Join Key parameter. Then, click the Browse button.
- In the Master Key tab, you can see that the Id field in the Opportunity dataset has been identified as the master primary key field.
- The available fields are acquired from the data stream that is connected to the Port 1 input of the component, which is reserved for the master data.
- Each master record is matched to all slave records based on one or more fields specified in the join key.
- This field has been dragged into the Master key panel, and the Order has been set to Ascending to match how the records are sorted in the ExtSort component.
- When the Master Key field is defined, you can click the Slave Key tab to define the slave key field for the merge. The available fields are acquired from the data stream that is connected to the Port 2 input of the component. In this case, the OpportunityId field from the metadata input to the ExtSort component has been dropped as the Slave Key field.
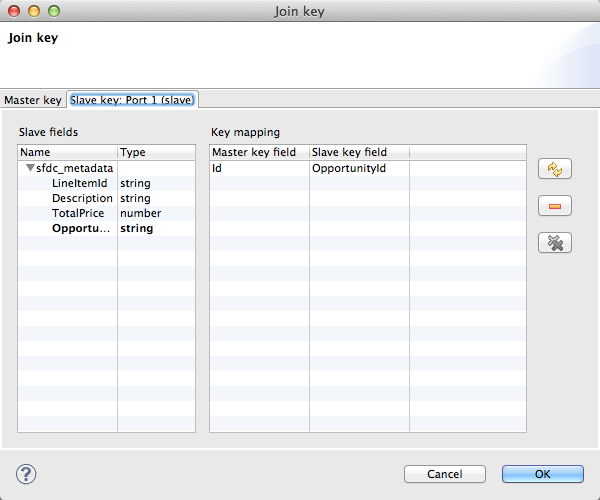
- Click OK.
- Join type: From the drop-down list, you can specify the type of database join to perform on the two tables of records. In this case, set the value to Left Outer join.
- Transform: Click the Transform field. Then, click the Browse button.
- In the Transform Wizard, the displayed field transformations are listed in CTL, a proprietary scripting language. Since the transformations have been manually applied, you must edit them in the Source tab:
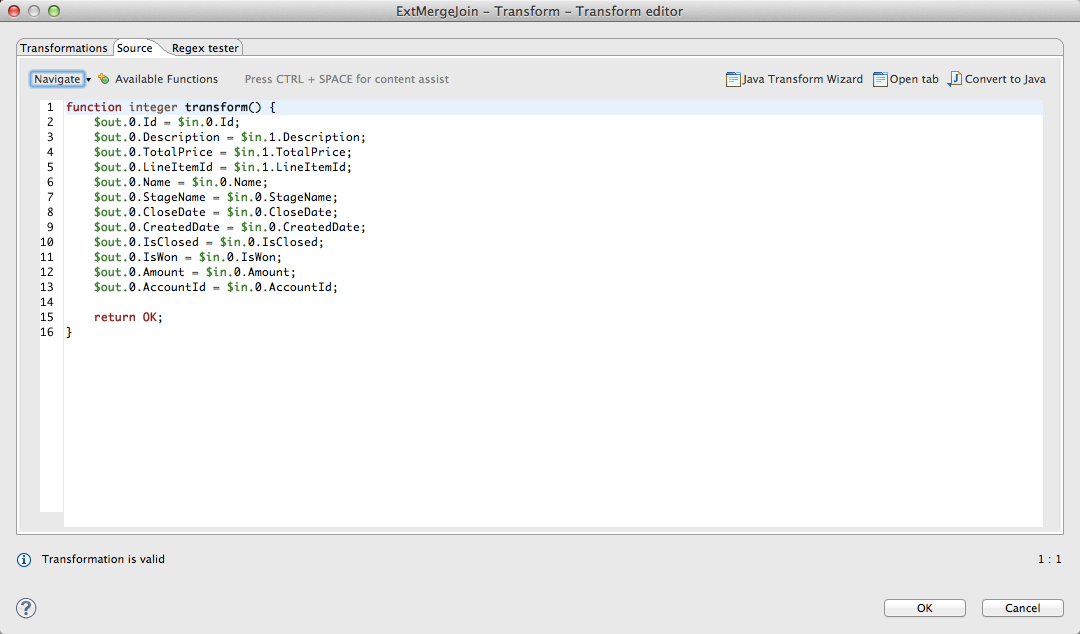
- Click OK twice.
- The component configuration should now have Join key, Join type, and Transform populated.
Configuring the GD Dataset Writer Component to Use Mapped Fields
The newly mapped fields in this ETL need to be mapped into the appropriate dataset in the GD Dataset Writer component.
Steps:
- For the ETL gathering from the Opportunity and Opportunity Line Item objects, double-click the GD Dataset Writer.
- Select the Data set parameter. Then, click the Browse button.
- Select the Opportunity dataset and click OK.
- Click the Field mapping parameter. Click the Browse button.
- Map any fields that are not automatically mapped for you. Then, click Finish.
- Click OK. To save the graph, select File > Save.
Running the Graph
You can now run the graph within CloudConnect Designer to gather the data from Salesforce and to publish it to your GoodData project.
To run the graph locally, secondary-click in the white space of the graph and select Run As > 1 Graph (Locally). If the graph succeeds, blue checks are placed in each component of the graph:
There should also be a success message in the Console tab.
Through the GoodData Portal, you should verify that the data has been populated in the project.
Summary
You have successfully modified the Salesforce project to do the following:
- Use your Salesforce account
- Query the appropriate Salesforce objects
- Write to your project’s fields in the logical data model
- Executed the graph to gather the data and publish it to your GoodData project.