Adding Attributes and Facts to a Dataset in CloudConnect Modeler
CloudConnect is a legacy tool and will be discontinued. We recommend that to prepare your data you use the GoodData data pipeline as described in Data Preparation and Distribution. For data modeling, see Data Modeling in GoodData to learn how to work with Logical Data Modeler.
Now, you need to add field data to your dataset. In logical data models, fields in a dataset are broken down into two basic types: Facts and Attributes.
- Facts: Numerical data that is to be used in computed functions in your reporting.
- Attributes: Data that is to be used in grouping the values resulting from the computed functions. In almost all use cases, this data is non-numerical. Attributes are grouping or segmenting data.
For a review of these terms, see Logical Data Model Components in GoodData.
Steps:
Select the Payments dataset.
Double-click the rectangle, or click the Down Arrow icon in the rectangle. Then, click Edit. The Attributes and Facts window is displayed.
There are currently no attributes or facts in this dataset. In the original dataset, the fields are identified as either attributes or facts in the following table: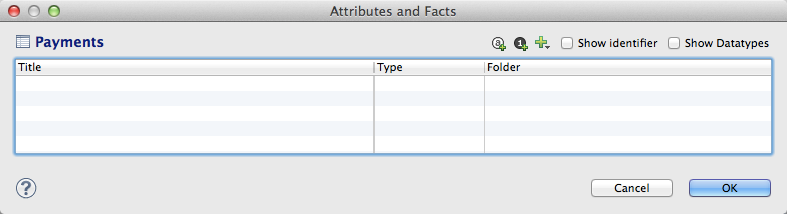
Field Name
LDM Data Type
Employee ID
Attribute
Name
Label of Employee ID Attribute (explained later)
Pay Stub ID
Attribute
Pay Date
(ignore this field for the moment)
Payment
Fact
Department ID
Attribute
Department
Label of Department ID Attribute (explained later)
For purposes of this tutorial, we will add all of these fields to the Payments dataset and then break them out into separate datasets to define the hierarchical relationships.
Add the fields from the table to the dataset:
To add an attribute, click the Add Attribute (
 ) icon.
To add a fact, click the Add Fact (
 ) icon.
For the Title value, enter the value as listed in the table.
Later, when the source data is mapped to the logical data model, CloudConnect attempts to perform the mapping for you based on the Titles of fields in the data and in the dataset. Where possible, use the same names that are defined in your source data, such as the headers in the database table or CSV file.For the Folder value, leave the default.
To add a label, click the Plus (
 ) icon. Select Add Label For > field_name . Add labels for Employee ID and Department ID.For the time being, skip the Date field. Dates use a special object in logical data modeling, which is covered in the next section.
To delete a field, secondary-click the field. Then, select Delete.
When finished, click OK. The finished Payments dataset should look like the following:
You may notice that the label fields (Name and Department) are not displayed.
From the menu, select File > Save. The Publish Model to Server dialog appears.
Click Do not publish for now as you don’t want to publish the model to the server at this moment. The data model is saved.