Disconnecting Dataset Directly
CloudConnect is a legacy tool and will be discontinued. We recommend that to prepare your data you use the GoodData data pipeline as described in Data Preparation and Distribution. For data modeling, see Data Modeling in GoodData to learn how to work with Logical Data Modeler.
This short tip will help you understand how to edit the data model in your Project. When you are creating data models in GoodData, you sometimes need to make some model changes. Imagine that you need to change the reference between two data sets.
For training purposes, we are going to disconnect the Employee dataset from the Salary dataset and then connect it back again. In the same way, you can connect the dataset to the different dataset.
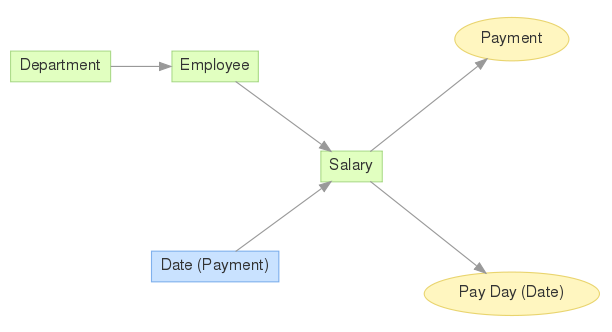
Have a look at the following data model:
Let’s run the MAQL manually via the REST API.
On the
https://secure.gooddata.com/gdc/md/PROJECT_ID/ldm/manage2
you can simply paste the following MAQL DDL statement:
ALTER ATTRIBUTE {attr.employee.employee} DROP KEYS {f_salary.employee_id};
SYNCHRONIZE {dataset.salary};
{attr.employee.employee} - identifies the dataset {f_salary.employee_id} - identifies the dataset column representing the foreign key
To identify correct columns and dataset identifiers, go to the https://secure.gooddata.com/gdc/md/PROJECT_ID/query/ where you can browse metadata objects and find the correct identifier. For our example, you can browse the dataset columns in https://secure.gooddata.com/gdc/md/PROJECT_ID/query/columns and find the {f_salary.employee_id} by clicking on the link. You can also see that this is the foreign key column and copy its identifier for your usage.
This query will drop the keys in Salary dataset and disconnect the Employee dataset from it. All you need to know is the correct name of the dataset and the foreign key column. See the resulting data model:
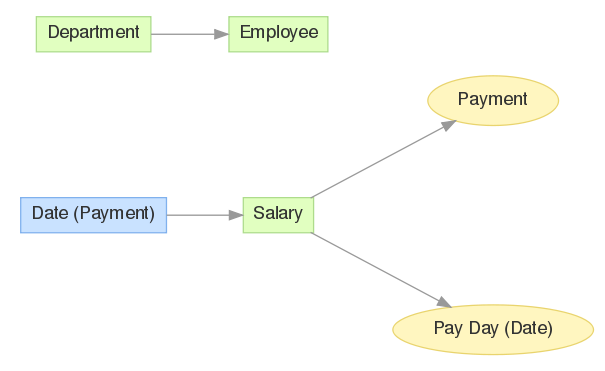
As you can see, we just successfully disconnected two datasets. Now you will learn how to connect them back together. Running a similar but not the same query on your data model will do this. See the MAQL query:
ALTER ATTRIBUTE {attr.employee.employee} ADD KEYS {f_salary.employee_id};
SYNCHRONIZE {dataset.salary};
Remember to synchronize the dataset because you are changing the physical data model. As you can see in the following picture, model is same as in the beginning of the tutorial and you can load the data back into the Project. Now, you need to reload your data.
