Creating Analytical Project with MAQL DDL
CloudConnect is a legacy tool and will be discontinued. We recommend that to prepare your data you use the GoodData data pipeline as described in Data Preparation and Distribution. For data modeling, see Data Modeling in GoodData to learn how to work with Logical Data Modeler.
This article describes data modeling within GoodData platform using our REST API. You will learn about the relationship between the Logical Data Model (LDM), Physical Data Model (PDM) and MAQL DDL language. MAQL DDL is GoodData proprietary data definition language and we outline its basic concepts and usage in this article.
The LDM (Logical Data Model) is necessary for creating your reports. It consists of attributes and facts that GoodData users add to their reports.
The PDM (Physical Data Model) is used for the data storage and query. It is de facto a DBMS schema (tables, columns, primary/foreign keys etc.).
The SLI (Single Loading Interface) is used for loading data to the GoodData projects.
LDM describes the logical structure of organization’s data in terms like datasets, attributes and facts. Most analytical tools and platforms will force you to develop both LDM and PDM that are perfectly aligned. Unlike the average tools, GoodData interface with user only via the LDM. The corresponding PDM and SLI are automatically generated from the LDM. The logical data model can be created and modified easily thanks to the MAQL DDL language statements.
Creating a Simple Model
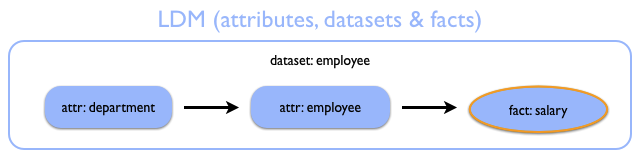
In this scenario, we will model a simple dataset with employees with their salaries and departments. Every employee is in one department, but a department may have more employees. To model such a situation we put these two attributes into single dataset hierarchy (see the picture). To generate this piece of model we use the following MAQL DDL:
CREATE DATASET {ds.hrdemo} VISUAL (TITLE "HR Demo", DESCRIPTION "Dataset with basic attributes and facts from HR Demo model");

CREATE FACT {fact.employee.salary} VISUAL (TITLE "Salary", DESCRIPTION "Employee's monthly salary") AS {hr_empl.f_salary};

CREATE ATTRIBUTE {attr.employee} VISUAL (TITLE "Employee") AS KEYS {hr_empl.id_empl} PRIMARY
    WITH LABELS {lbl.employee.ssn} VISUAL (TITLE "Employee SSN") AS {hr_empl.nm_ssn},
    {lbl.employee.fullname} VISUAL (TITLE "Employee Full Name") AS {hr_empl.nm_fullname};

CREATE ATTRIBUTE {attr.department} VISUAL (TITLE "Department") AS KEYS {hr_dept.id_dept} PRIMARY, {hr_empl.id_dept_fk}
    WITH LABELS {lbl.department.name} VISUAL (TITLE "Department") AS {hr_dept.nm_deptname};

ALTER DATASET {ds.hrdemo} ADD {attr.department}, {attr.employee}, {fact.employee.salary};

SYNCHRONIZE {ds.hrdemo};
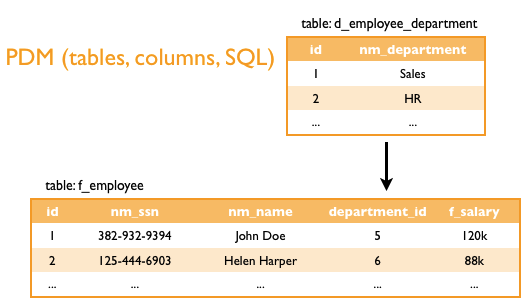
The physical representation of the previous example is very simple. The names of tables and columns are derived from identifiers mentioned in the MAQL DDL commands. Every attribute has its own table with columns containing primary key of the attribute, foreign key to related attributes, textual labels, and facts. The keys in MAQL DDL define relationships among attributes.
The following figure outlines the PDM that has been automatically generated from the LDM above.
The last piece of the puzzle is the SLI that is necessary for data loading. SLI provides a special feature: you don’t have to load primary keys of the attributes, since these are generated automatically in GoodData platform. In addition, these identifiers are persistent and any string will always get the same ID. The SLI APIs provide templates of self-describing packages which are possible to load to the platform. The data package is a ZIP archive that contains the data (delimited file) and a manifest that describes how the data map to the project’s LDM and PDM.
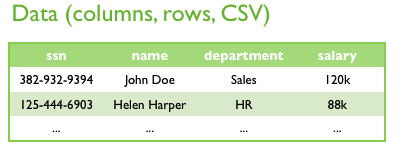
The following figure shows the data file only. As you can see, this is de-normalized (flattened d_employee_department and f_employee PDM tables) version of the PDM.
Next, we are going to inspect the MAQL DDL statements that created the LDM above. We have created the “HR Demo” dataset with the Department and Employee attributes and the Salary fact.
Creating the Employee Dataset
First, we have to declare the dataset itself. Here is the corresponding MAQL DDL statement:
CREATE DATASET {ds.hrdemo} VISUAL (TITLE "HR Demo", DESCRIPTION "Dataset with basic attributes and facts from HR Demo model");
Creating the Salary fact
Then, we may create the fact Salary and put it in the PDM table hr_empl, column f_salary. Remember that the fact is represented as a database column.
CREATE FACT {fact.employee.salary} VISUAL (TITLE "Salary", DESCRIPTION "Employee's monthly salary") AS {hr_empl.f_salary};
Creating the Employee attribute
CREATE ATTRIBUTE {attr.employee} VISUAL (TITLE "Employee") AS KEYS {hr_empl.id_empl} PRIMARY
WITH LABELS {lbl.employee.ssn} VISUAL (TITLE "Employee SSN") AS {hr_empl.nm_ssn},
{lbl.employee.fullname} VISUAL (TITLE "Employee Full Name") AS {hr_empl.nm_fullname};
The first command line creates the LDM attribute named Employee. The LDM attribute maps to a PDM table hr_empl with primary key id_empl. We can also add a foreign key (you will learn how to do that later). As mentioned above, the attribute is defined as a PDM table.
The second and the third row add labels (also called display forms) to the Employee attribute. Labels are text representations of the attribute. For example, the Employee attribute has two: SSN and Full Name. Later you will be able to choose which label is more suitable for your report. Both labels and ID map to the columns in the same PDM table. You will see these names later in the SLI.
Creating the Department attribute
Now, we will repeat the exercise and create the Department attribute. The only difference is that we will add a foreign key to the hr_empl table now. This will enable us to aggregate employees by departments since it is many to one.
CREATE ATTRIBUTE {attr.department} VISUAL (TITLE "Department") AS KEYS {hr_empl.id_dept_fk}, {hr_dept.id_dept} PRIMARY
WITH LABELS {lbl.department.name} VISUAL (TITLE "Department") AS {hr_dept.nm_deptname};
In the second line of the script, we again added the label to the Department attribute. Label is defined as nm_deptname column in the table hr_empl table.
Generating / Synchronizing PDM and SLI
Finally, we add all the attributes and facts to the dataset HR Demo, and call SYNCHRONIZE MAQL DDL command, since all the PDM tables, columns, keys etc. are automatically generated after calling it. Due to that it is usually the last command of a MAQL DDL script.
This is the magic statement that generates the PDM and the SLI.
ALTER DATASET {ds.hrdemo} ADD {attr.department}, {attr.employee}, {fact.employee.salary};
SYNCHRONIZE {ds.hrdemo};
Remember that SYNCHRONIZE command will erase all data and require loading it back. If you want to preserve the data in the tables, use PRESERVE DATA option in addition.
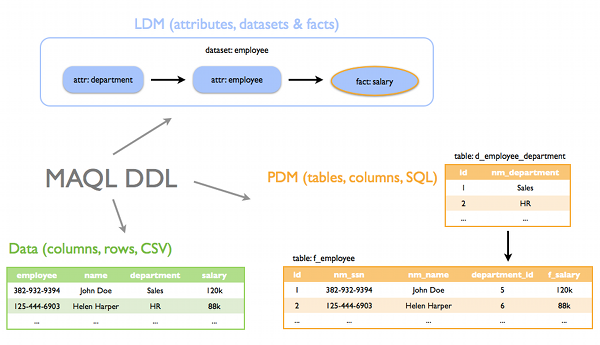
The figure below describes the relationship between the MAQL DDL, LDM, PDM and SLI.
Loading data
We have called SYNCHRONIZE command and we’ve ended up with an empty GoodData project. The last step is to populate it with some useful data. We can use the SLI REST API to do the job.
The self-describing data package is a ZIP archive, that contains the data file with predefined columns and a simple manifest that describes the mapping between the data file and the project’s PDM. The data package template resides on this URI:
https://secure.gooddata.com/gdc/md/PROJECT_ID/ldm/singleloadinterface/dataset./template
You can simply download the template, unzip it, populate the data file with your data (you’ll need to preserve the CSV header row and the column sequence), re-pack it, upload it to the SLI API’s WebDav location, and call the md/etl/pull2 API to start the data loading process.
SLI
The SLI template can be found at the following address:
https://secure.gooddata.com/gdc/md/PROJECT_ID/ldm/singleloadinterface/ds.hrdemo/template
It is a ZIP archive containing upload_info.json and a CSV file. Since the SLI mechanism controls table keys, we cannot specify our own identifiers, and hence the CSV file has simplified structure. Also, there is only one for both attributes. The SLI method can be slower for large datasets.
To upload data via SLI we may use the following commands (Linux, MAC OS):
$ zip -9 upload.zip ds.hrdemo.csv upload_info.json
    adding: ds.hrdemo.csv (deflated 28%)
    adding: upload_info.json (deflated 74%)
curl --basic -u your-email@example.com -T upload.zip https://secure-di.gooddata.com/uploads/my-second-upload/
Then go to
https://secure.gooddata.com/gdc/md/PROJECT_ID/etl/pull2
and start the loading process with parameter User staging directory = my-second-upload.