Add Limits and Goals to a Report
There is a simple way to add static numbers to your reports, which can be used to signify goals, limits, or any type of baselines within a report. These types of reports can be generated by creating a simple custom metric that returns the same number no matter how it is sliced.
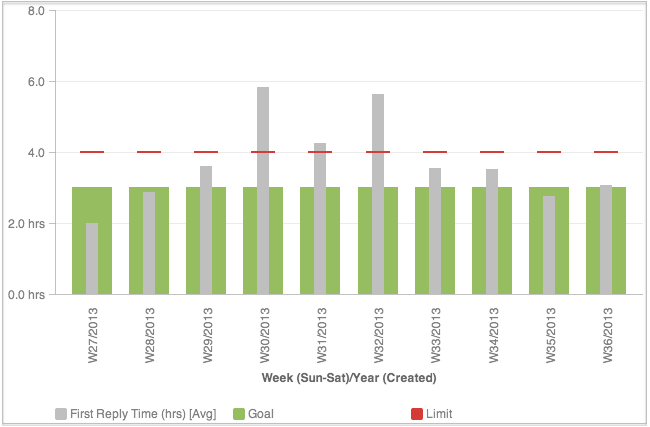
In the above example, a help desk maintains a service-level agreement (SLA), in which the first reply time is four hours. This Limit metric provides a consistent baseline across your report. The second custom metric, Goal , indicates the desired first reply time of three hours. In the steps below, these metrics can be created and added to your First Reply Time report.
Steps:
Create a new report and add the base metric with dynamic values. In the example, this metric was called First Reply Time .
For limit and goal reports, slice them by a time-based attribute. In the example, the metric is sliced by the Week (Sun-Sat)/Year (Created) attribute.
In the Custom Metric Editor, enter the following definition for the Goal metric:
SELECT 3These metrics must be created in the Custom Metric Editor. Since they are static values, you do not have to make selections from the pick lists. These definitions can be typed directly in the editor.In the Custom Metric Editor, enter the following definition for the Limit metric:
SELECT 4Configure the report to be the type of interest to you. This example is a bullet chart.
If the report is a Bullet chart, in the Show Configuration side panel, you can configure where the metrics appear in the report:
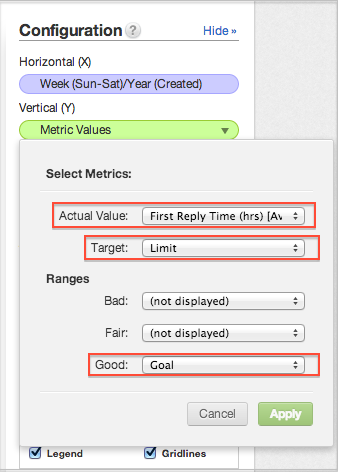
You can also change the colors displayed for each metric. Since the Goal metric is positive, you could configure it to be green, while the Limit metric is the red line.
The report now identifies when first reply time is within acceptable parameters for each week.