Filter for Variables
Variables are values assigned to individual users that dynamically impact the data they see. For example, a workspace administrator could define a variable that allow account managers to see the accounts only in their region. This type of variables could serve to improve usability.
Variable Filters
Variable filters are a special case of attribute filters. They work in the same way but only allow users to see and select those attribute values that pertain to them. The values that each user can see are determined by the associated variable’s configurations. Variables are defined by workspace administrators (see Define Filtered Variables).
In some situations, you may need to limit the number of values some users see in their dashboard attribute filters. For example, you can filter down a list of 100 products to only the products that apply to individual users.
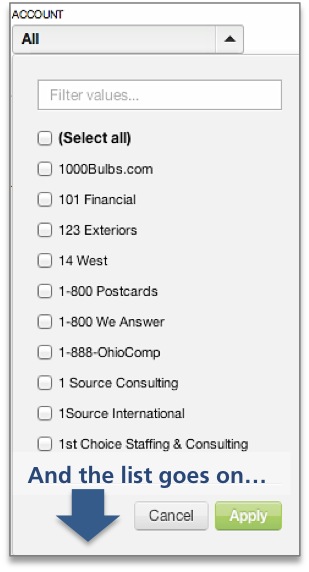
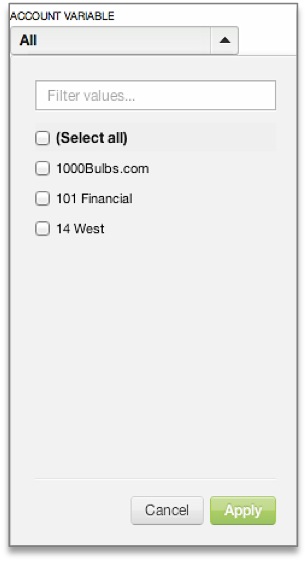
The following graphics shows how, once configured, attribute and variable filters are essentially indistinguishable from the point of view of the dashboard viewer. In the attribute filter, thousands of accounts are displayed, most of which are irrelevant to the user in question.
When a variable filter is used, only relevant accounts are displayed in each user’s filter drop-down.
How Variables are Controlled
Variables are controlled on the report level, not the dashboard level.
In order for your dashboard variable filters to be defined by a variable, each of your reports needs to have the variable added either to the metric (see Incorporating Filtered Variables at the Metric Level) or the filter (see Incorporating Filtered Variables at the Report Level). Without the variable defined on the report level, the filter will not update the values on the dashboard.
- On a report, adding the variable filter limits the data displayed.
- On a dashboard, adding the variable filter limits the number of attribute values displayed on the filter.
Before You Start
Make sure that the following is true:
- Your workspace administrator created variables for you. For more information, see Define Filtered Variables.
- All the reports on your dashboard have the variable filter defined. For more information, see Incorporating Filtered Variables at the Report Level and Incorporating Filtered Variables at the Metric Level.
Limitations
Variable filters are not compatible with element masking (see Element Masking). Variable filters applied together with element masking within the same dashboard may result in unexpected behavior of dashboard reports and filters.
Create a Variable Filter
Steps:
- While on your dashboard in edit mode, click the Filter menu on the top, and click Attribute.
- Toggle to the Variable pane.
- Choose a filter variable that has been established by a workspace administrator.
- Click Add. The filter is added to the dashboard.
- Click the pencil icon that appears above the filter, and configure (select and un-select) what filter values to include in the filter. The values that you configured will become the default ones (automatically pre-selected) for all dashboard users.
- To configure the filter further, click the Gear icon. The filter’s configuration opens.
- Under Selection, determine whether users will be able to select just one value at a time or many values at once.
- (Optional) Under Arrange, rearrange the filter with respect to other dashboard objects it may be overlapping.
- Click Apply. The filter is saved.
- Click Save. The dashboard is saved.