Filter for Attributes
Attribute filters allow you to select which values of a given attribute should be included in report computations. Each attribute filter pertains to a single attribute (for example, Product) but contains a number of discrete attribute values to select from (for example, MegaBounce Ball, Dart Rocket, UFO Frisbee).
Once set up and saved, the filter configuration is set as the default for this dashboard and applied to all dashboard users.
If you have a saved view that includes attribute filters, the filter settings from the saved view will be used instead of the default filter values when you switch to this saved view. For details, see Using Saved Views.
Steps:
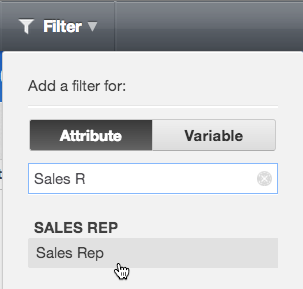
While on your dashboard in the edit mode, click the Filter menu on the top, then click Attribute.
Search for a workspace attribute and select its name from the list of attributes beneath the search bar.
Click Add. The filter is added to the dashboard.
Click the pencil icon that appears above the filter, and configure (select and un-select) what filter values to include in the filter. The values that you configured will become the default ones (automatically pre-selected) for all dashboard users.
(Optional) If the attribute values do not fit the dialog, resize the dialog by manually dragging the dialog border so that the whole value names are visible. The dialog width that you configured will become default for all dashboard users.
To configure the filter further, click the Gear icon. The filter’s configuration opens.
Under Selection, determine whether users will be able to select just one value at a time or many values at once.
(Optional) Under Parent Filters, add parent filters to set up a filter cascade.
(Optional) Under Available Values, select one or more metrics to limit the filter value. For more details about this feature, see Filter out Values of Attribute Filters.
(Optional) Under Arrange, rearrange the filter with respect to other dashboard objects it may be overlapping.
Click Apply. The filter is saved.
Click Save. The dashboard is saved.

